
I remember the first time I successfully made a crepe that didn't tear. I was in my early twenties, trying to recreate a memory from a trip abroad. My kitchen was tiny, the pan wasn't quite right, and I think I made a dozen clumsy, ripped ones before a single, beautiful, lacy-edged crepe slid off the spatula. Wow, that feeling of triumph! It was such a small thing, but it felt huge. Now, the process is second nature, a muscle memory that brings me right back to that feeling of quiet accomplishment. This blender recipe is my secret—it takes out all the guesswork. It's the one I use when my kids have friends for a sleepover, and they wake up to a 'crepe bar' on the kitchen island with bowls of berries, chocolate sauce, and whipped cream. It turns an ordinary Saturday into something truly memorable, a core memory built around a simple stack of warm crepes. It’s one of my favorite recipes to share.
Why You'll Love This Crepe Recipe
-
Impossibly Easy: Honestly, the blender does all the work. You just measure, pour, and blend. There’s no whisking until your arm aches, no sifting flour, and definitely no lumps. It’s a beautifully simple method that guarantees a silky-smooth batter every single time.
-
Perfectly Delicate Texture: This recipe creates crepes that are wonderfully thin, soft, and tender with those lovely, slightly crisp, lacy edges. They are sturdy enough to hold your favorite fillings but delicate enough to melt in your mouth. It's that ideal balance that makes a crepe so special.
-
Endlessly Versatile: This batter is a perfect neutral canvas. Add a little more sugar for dessert, or keep it as is for savory fillings like cheese, mushrooms, or turkey ham. They are just as delicious for a weekend brunch as they are for a fancy dessert, making them one of the most versatile sweet treats in my collection.
-
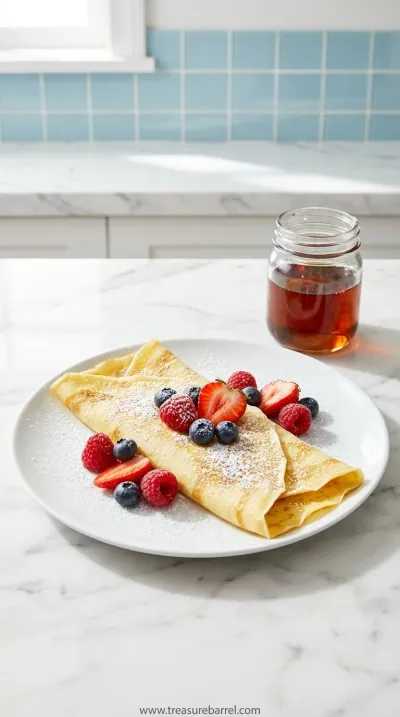
Feels Effortlessly Elegant: There is something so graceful about serving a plate of freshly made crepes. It feels a little bit fancy, a little bit special, but with this recipe, it's truly one of the simplest things you can make. It’s a beautiful way to show a little extra care without a ton of effort.
These crepes are foolproof and taste just like the ones from the little stands in Paris. A true delight!
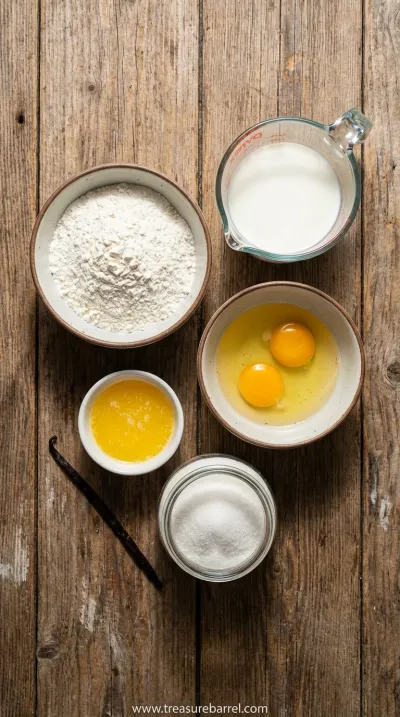
Essential Ingredient Guide
- All-Purpose Flour: You don't need anything fancy here, just regular all-purpose flour. It has the perfect protein content to give the crepes structure without making them tough. The key is to let the batter rest so the gluten can relax, which is what makes the final crepes so wonderfully tender and not at all rubbery. I’ve found that this simple, humble ingredient is truly the heart of a good crepe.
- Eggs: Eggs are the binder that holds everything together and gives the crepes their lovely, rich flavor. I always, always use room temperature eggs. It might seem like a fussy little detail, but it helps the batter emulsify into a much smoother, more uniform consistency. Just pull them out of the fridge about 30 minutes before you start, and let them rest on the counter. It makes a world of difference.
- Milk: Whole milk will give you the richest flavor and most tender texture, and just like the eggs, bringing it to room temperature is a game-changer. Cold milk can make the melted butter seize up and create little clumps in your batter. By letting it warm up a bit, it mixes seamlessly with the other ingredients, creating that liquid-silk consistency we’re aiming for. You can use other milks, but for that classic taste, whole milk is my favorite.
 Morning Comfort
Blueberry Chia Overnight Oats
A soothing bowl of blueberry chia oats that you can prepare the night before and enjoy at sunrise.
Complete Cooking Process
-
Making the Batter:
This part is so wonderfully simple, it almost feels like cheating. You’ll add your wet ingredients—the milk, eggs, and melted butter—to the blender first. Putting liquids in before the dry ingredients helps everything combine more easily and prevents flour from getting stuck at the bottom. Then, you’ll add the flour, sugar, and a tiny pinch of salt. A quick blitz is all it takes. You're looking for a smooth, thin consistency, almost like heavy cream. Scrape down the sides once to make sure everything is incorporated, and that’s it. Your batter is ready for its rest.
-
Resting the Batter:
Okay, so this is the most important step, and the one people are most tempted to skip. Please don't! Letting the batter rest in the refrigerator for at least 30 minutes (or even overnight) allows the gluten in the flour to relax. This is the secret to tender, delicate crepes rather than chewy, rubbery ones. It also gives the flour time to fully absorb the liquid, resulting in a better flavor and texture. Just cover the blender pitcher or pour the batter into a bowl, cover it with plastic wrap, and let it chill. Go make a cup of coffee, prepare your fillings, or just enjoy a quiet moment. It's worth the wait, I promise.
-
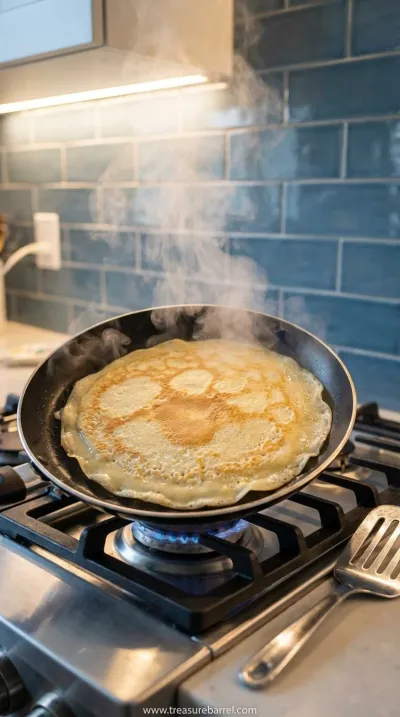
Cooking the Crepes:
Now for the fun part. You’ll want a good non-stick or well-seasoned cast iron skillet heated over medium heat. It’s hot enough when a drop of water sizzles and evaporates quickly. Add a tiny sliver of butter and swirl it around to coat the pan. Pour about 1/4 cup of batter into the center of the pan and immediately—this is key—pick up the pan and swirl your wrist to spread the batter into a thin, even circle. It happens fast! Let it cook for about a minute or two, until the edges look dry and golden and the center is set. The whole process is a gentle, rhythmic dance of pour, swirl, and wait.
-
Your first crepe is almost always a 'test' crepe. Use it to gauge your pan's temperature and your swirling technique. Don't worry if it's not perfect!
-
Keep the heat at a steady medium. If it's too high, the crepes will cook too fast and get crispy. Too low, and they can become tough.
-
Stack the cooked crepes on a plate, separating them with small squares of parchment or wax paper if you're worried about them sticking.
Pro Tips
Once you get into a rhythm, you'll be flipping out perfect crepes one after another. It becomes such a relaxing and satisfying process.

Frequently Asked Questions
→ Why is my crepe batter lumpy?
Oh, the dreaded lumpy batter! This usually happens when you mix by hand and the flour doesn't fully incorporate. That's honestly why I swear by this blender method—it completely eliminates lumps and gives you a perfectly smooth batter every time. If you don't have a blender, make a well in your dry ingredients, add the wet ingredients to the center, and whisk slowly, incorporating the flour a little at a time. And remember, letting the batter rest also helps any tiny lumps dissolve.
→ Can I make the batter ahead of time?
Yes, absolutely! This is one of the best things about this recipe. You can make the batter the night before and store it in an airtight container in the fridge. It actually gets even better with an overnight rest. Just give it a quick stir before using it the next morning, as some of the flour may have settled. It makes for such an easy and elegant breakfast.
→ Why did my first crepe fall apart?
Ah, the sacrificial first crepe! It happens to all of us. The most common reasons are that the pan isn't hot enough, or you tried to flip it too soon. Make sure your pan is properly preheated over medium heat. You'll know the crepe is ready to flip when the edges are starting to lift away from the pan and the surface looks matte, not shiny. Be patient, and use a thin spatula to gently lift the edge and peek underneath. You'll get the hang of it!
→ What's the best way to store leftover crepes?
Leftover crepes are a wonderful thing to have on hand! Let them cool completely, then stack them with a small piece of parchment or wax paper between each one to prevent sticking. You can then wrap the whole stack tightly in plastic wrap or place them in a zip-top bag. They'll keep in the refrigerator for about 3 days or in the freezer for up to 2 months. To reheat, you can warm them in a dry skillet for a few seconds per side or microwave them briefly.
→ Can I use a different type of flour?
You can experiment, but it will change the texture. For a gluten-free version, a good quality all-purpose gluten-free blend that contains xanthan gum works quite well. Buckwheat flour is a classic for savory crepes (called galettes) and gives a wonderful nutty flavor. The process is similar to making pizza dough; the type of flour really defines the final product. For the classic, delicate texture of this specific recipe, though, all-purpose wheat flour is best.
→ Can I make these crepes dairy-free?
Yes, for sure! You can easily substitute the whole milk with an unsweetened plant-based milk like almond, soy, or oat milk. The texture might be slightly different—a little less rich—but still absolutely delicious. For the butter, you can use a dairy-free butter substitute or a neutral-flavored oil like canola or melted coconut oil. It's a very adaptable recipe.
→ What are some easy filling ideas?
Oh, the possibilities are endless! For sweet, you can never go wrong with a simple sprinkle of sugar and a squeeze of lemon juice. Nutella and sliced bananas, fresh berries with whipped cream, or a dollop of jam are all classics. For savory, I love them with sautéed mushrooms and spinach, or turkey ham and melted Gruyère cheese. You can find inspiration across all our categories!

Nutrition Facts
per serving
95
Calories
3g
Protein
11g
Carbs
4g
Fat
Taste Profile
A delicate, slightly sweet, and eggy flavor that serves as a perfect canvas for other fillings.
Ingredient Substitutions
Don't have an ingredient? Try these alternatives
Plant-based milks work well, but the crepes may be slightly less rich. Ensure it is at room temperature before blending.
Oil can be substituted in a 1:1 ratio for the melted butter in the batter. You will still want to use butter or a dairy-free spread for greasing the pan for flavor and non-stick properties.
Recipe Variations
Try these delicious twists on the original
Chocolate Crepes
For a decadent dessert, add 2 tablespoons of unsweetened cocoa powder to the dry ingredients. These are incredible filled with whipped cream and fresh raspberries.
Savory Herb Crepes
Reduce the sugar to 1 teaspoon and add 2 tablespoons of finely chopped fresh herbs like chives, parsley, or dill to the batter. These are perfect for brunch fillings like smoked salmon and cream cheese.
Common Mistakes to Avoid
Learn from others' mistakes for perfect results
- Skipping the resting step for the batter. This is the #1 reason for tough or rubbery crepes. Let it rest!
- Using a pan that isn't hot enough. This can cause the crepe to stick and makes it difficult to flip.
- Over-mixing the batter if doing it by hand. Mix only until the ingredients are just combined and smooth.
- Using too much batter. A thin crepe is a happy crepe! A 1/4 cup is usually perfect for an 8-inch pan.
Meal Prep & Storage
Make Ahead Tips
The crepe batter is perfect for making ahead. You can prepare it up to 48 hours in advance and keep it covered in the refrigerator. A longer rest actually improves the flavor and texture. Cooked crepes can also be made a day ahead, stacked with parchment paper, wrapped, and refrigerated.
Leftover Ideas
Leftover crepes are fantastic! For a quick snack, simply reheat one in a warm skillet and spread it with jam. You can also use them to make crepe cakes by layering them with pastry cream or whipped cream. For a savory idea, chop them into ribbons and use them in place of noodles in a light broth.
Perfect Pairings
Serve this with...
Cooking Timeline
Gather and measure all ingredients. Add everything to the blender and blend until smooth.
Rest the batter in the refrigerator. Use this time to prepare your desired fillings and toppings.
Preheat the skillet over medium heat. Give the batter a quick stir.
Cook the crepes one by one, swirling, flipping, and stacking them on a plate as you go.
 Morning Comfort
Starbucks Strawberry Marshmallow Drink
Strawberry‑sweet, marshmallow‑soft beverage to start your day on a cozy note.
Best Crepe Recipe - Easy and Delicious
Make perfect crepes with this easy blender recipe. Enjoy freshly baked crepes with basic batter preparation for sweet breakfasts or desserts.
Timing
Prep Time
5 Minutes
Cook Time
25 Minutes
Total Time
1 Hour (includes resting time)
Recipe Details
Ingredients
For the Crepe Batter
-
01
2 large eggs, at room temperature
-
02
1 ½ cups whole milk, at room temperature
-
03
1 cup all-purpose flour
-
04
2 tablespoons granulated sugar (for sweet crepes, use 1 tsp for savory)
-
05
¼ teaspoon salt
-
06
2 tablespoons unsalted butter, melted and cooled slightly
-
07
Extra butter, for greasing the pan
Instructions
First, we’ll make the batter, and it’s beautifully simple. In the pitcher of your blender, combine the room temperature eggs and milk. Giving it a quick pulse helps break up the eggs. Then, add the flour, sugar, and salt. Finally, drizzle in the slightly cooled melted butter. You want it warm, not hot, so it doesn’t scramble the eggs. Pop the lid on and blend on medium-high speed for about 20-30 seconds, or until the batter is completely smooth and free of any lumps. You might need to stop and scrape down the sides of the blender once to make sure everything is incorporated perfectly.
Now comes the secret to truly tender crepes: the rest. It’s so important. Pour the batter into a bowl or leave it in the blender pitcher, cover it tightly with plastic wrap, and place it in the refrigerator to rest for at least 30 minutes. An hour is even better, and honestly, overnight is fantastic if you can plan ahead. This allows the gluten to relax and the flour to fully hydrate, which results in a much more delicate and flavorful crepe. This is your time to relax, too—go prepare your fillings or enjoy a quiet moment.
When you're ready to cook, heat an 8 or 9-inch non-stick skillet or crepe pan over medium heat. The pan is ready when a drop of water flicked onto the surface sizzles and disappears right away. Add a very small amount of butter (about 1/4 teaspoon) and swirl to coat the bottom of the pan. Pour about 1/4 cup of the rested batter into the center of the pan. Immediately pick up the pan and tilt and swirl it in a circular motion to spread the batter into a thin, even layer. It feels like a little dance once you get the hang of it, and is part of the joy of home baking.
Let the crepe cook for about 60-90 seconds. You'll see the edges start to dry and curl up slightly, and the surface will look matte instead of wet. This is your cue! Gently slide a thin spatula under the edge of the crepe, lift it, and quickly flip it over. Cook for another 30 seconds on the other side—it just needs to be lightly golden. Slide the finished crepe onto a plate. Repeat the process with the remaining batter, adding a tiny bit more butter to the pan every few crepes to prevent sticking. You can stack the finished crepes on a plate; they won't stick together once they've cooled a little.
Notes & Tips
-
1
For ultra-lacy edges, make sure your pan is well-heated and your batter is spread very thinly. A slightly hotter pan will create more of those beautiful, crisp patterns around the perimeter. It’s a lovely textural contrast to the soft center.
-
2
If you want to make savory crepes, reduce the sugar to just one teaspoon and feel free to add finely chopped fresh herbs like chives or parsley directly into the batter. It adds a beautiful layer of flavor that complements savory fillings perfectly.
-
3
This batter can be made up to 48 hours in advance and kept in an airtight container in the refrigerator. Just give it a gentle stir before using, as the flour can settle at the bottom. This makes it perfect for a no-fuss morning treat.
 Morning Comfort
Caramel Ribbon Crunch Frappuccino
Homemade caramel‑infused frappuccino with crunchy ribbons and fluffy topping.
Tools You'll Need
-
Blender: A blender is the key to this recipe's simplicity. It ensures a perfectly smooth, lump-free batter in seconds without any effort. Any standard blender will work just fine for this.
-
8 or 9-inch Non-stick Skillet: A good non-stick skillet makes flipping the crepes a breeze. You could also use a traditional crepe pan or a well-seasoned cast iron skillet. The key is a flat surface that heats evenly.
-
Thin Spatula: A long, thin spatula (an offset spatula is perfect) is your best friend for getting under the delicate crepe without tearing it. Its flexibility allows you to gently lift and flip with confidence.
-
Ladle or 1/4 Cup Measure: Using a ladle or a measuring cup ensures that you use a consistent amount of batter for each crepe. This helps you make crepes that are uniform in size and thickness, which is especially helpful when you're first learning.

Recipe by
Luna BelleLuna starts mornings ☀️🍳 with cozy breakfasts 🥞💛, warm drinks ☕✨, and comforting bites 🍯🥐. Her kitchen smells like happiness 😍🍩 every day.
Get Delicious Recipes Weekly
Join 25,000+ home cooks getting our best recipes straight to their inbox.
Free forever • No spam • Unsubscribe anytime