
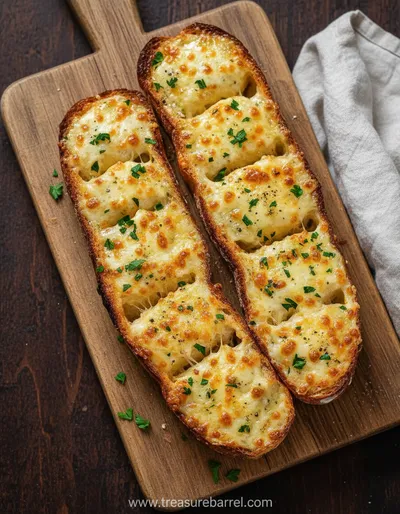
Garlic bread, as we know it today, traces its roots back to Italian-American cuisine in the early 20th century. Immigrants adapted their traditional bruschetta and focaccia using readily available ingredients like French or Italian bread, creating a baked good that became a staple in pizzerias and family dinners across the country. The combination of garlic-infused butter and melted cheese transforms a simple loaf into a shareable, deeply satisfying comfort food that feels both rustic and indulgent.
Why You'll Love It
-
Incredibly easy to throw together with pantry staples.
-
The aroma while it bakes is pure comfort.
-
Perfectly crispy edges with a soft, cheesy center.
-
A crowd-pleaser for parties, weeknights, or just because.
"My family devoured this in minutes! So much better than anything from a store."
Essential Ingredient Guide
- Italian Bread Loaf: A good, crusty loaf is key. It should feel substantial in your hand, with a firm crust that'll hold up to the butter. A stale loaf actually works beautifully here, soaking up the garlic butter without getting mushy.
- Unsalted Butter: I always use unsalted so I can control the saltiness. Let it soften on the counter for a bit until it's spreadable, but not melted. You want it to cling to the bread.
- Fresh Garlic: Fresh is non-negotiable, I mean it. That sharp, punchy flavor mellows into something warm and fragrant when it bakes. Mince it finely, or even use a press if you want it to really disappear into the butter.
- Mozzarella Cheese: This is for that classic, stretchy, mild melt. I like to use a mix of low-moisture mozzarella, which browns nicely, and maybe a little fresh mozzarella for extra creamy pockets.
- Parmesan Cheese: This adds a salty, nutty depth that takes it over the top. Freshly grated is worth the extra minute, it just has so much more flavor than the pre-shredded kind.
- Fresh Parsley: A sprinkle of fresh parsley at the end isn't just for looks. It adds a little bright, fresh note that cuts through the richness. Dried works in a pinch, but fresh is lovely.
 Warm Meals
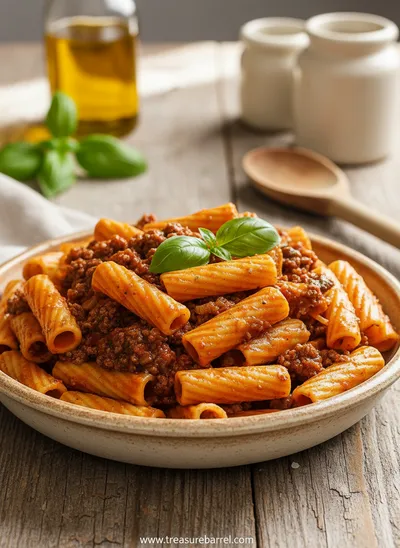
Beef Ragu Pasta Recipe in Tomato Sauce
A rich and hearty pasta dish with slow-cooked beef ragu in a savory tomato sauce.
Complete Cooking Process
-
Ingredient Readiness:
This is where the magic starts, honestly. Softening the butter is crucial – if it's too cold, it'll tear the bread. And mincing that garlic finely means every bite will be infused evenly. It’s a quiet, methodical start.
-
Flavor Development:
When you mix the garlic into the butter, that's when the scent really wakes up. Letting it sit for even ten minutes allows the flavors to meld. It's a small wait that makes a big difference.
-
Texture Control:
Cutting the bread properly is key. You want deep cuts, but don't go all the way through. This creates little pockets that hold the butter and cheese, ensuring every piece is flavorful and the center stays soft.
-
Finishing Touches:
The last few minutes under the broiler are everything. You’re watching for that perfect golden-brown bubble on the cheese. It happens fast, so don't walk away. That crisp top over the soft bread... that's the goal.
-
Serving Timing:
You have to serve this right away. The cheese is at its most stretchy, the bread is warm and crisp. It’s a fleeting perfect moment, so have everyone gathered around the table.
-
Let your butter soften naturally on the counter – microwaving can make it oily.
-
Use a serrated knife to slice the bread; it glides through the crust without squashing the loaf.
-
Don't be shy with the butter mixture – get it right down into all the nooks and crannies.
-
Watch the broiler like a hawk! It can go from golden to burnt in seconds.
Pro Tips
You know, I’ve burned a batch or two in my day. It’s okay. You learn to listen to the oven, to smell when it's just right. Cooking is like that – a little imperfect, but always worth it.
And honestly, the best part is sharing it. Seeing people’s faces light up when you bring a warm, bubbling tray to the table. It’s a simple joy, but a real one.
 Warm Meals
Garlic Steak Tortellini – A Warm Classic
Steak meets garlic‑kissed tortellini in a creamy, herb‑filled sauce for a cozy night in.
The essence of the dish:
What makes it special is its sheer simplicity and the way it brings people together. It's humble food, but the combination of warm bread, rich butter, pungent garlic, and gooey cheese is just... timeless. It feels like a hug from the kitchen.
A fun fact or historical angle:
While garlic bread is an Italian-American staple, the concept of flavoring bread with garlic and oil dates back to ancient times. It was a practical way to make stale bread palatable and nutritious.
Flavor or sensory focus:
The first thing you'll notice is the smell – that warm, toasted garlic and browning cheese aroma that fills the whole house. Then, the contrast: the crunch of the crust giving way to the soft, steaming interior soaked in garlic butter.
You Must Know
-
Quality bread makes all the difference – a sturdy loaf is essential.
-
Fresh garlic is non-negotiable for the best flavor.
-
Don't skimp on the butter mixture – it's the soul of the dish.
-
Serve immediately for the ultimate texture experience.
Frequently Asked Questions
→ Can I use a different type of bread?
Absolutely. A French baguette works wonderfully for individual servings, or a ciabatta loaf for a more rustic feel. Just make sure it's a crusty, sturdy bread that can hold the toppings.
→ What's the best cheese to use?
I love the classic combo of mozzarella for meltiness and Parmesan for flavor. But you can experiment! A sharp cheddar, provolone, or even a sprinkle of Gruyère would be delicious. A mix of cheeses can create a really unique flavor profile.
→ Can I make this ahead of time?
You can prepare the garlic butter and stuff the bread a few hours ahead, cover it, and keep it in the fridge. Just let it come to room temperature for about 20 minutes before baking so it heats evenly.
→ My cheese burns before the bread is warm. Help!
This is common! Try tenting the bread with foil for the first half of baking, then removing it for the last few minutes to brown the cheese. Also, make sure your oven rack is in the center, not too close to the broiler element.
→ Can I add other herbs?
Oh, for sure. A little dried oregano or basil mixed into the butter is lovely. Fresh chives or thyme are nice additions too. It's a very adaptable recipe.
→ What should I serve with cheesy garlic bread?
It's fantastic with pasta dishes, soups, or stews. Or, just enjoy it on its own as a snack! It pairs well with a simple moist banana bread for a sweet and savory spread, if you're feeling ambitious.
Nutrition Facts
per serving
285
Calories
11g
Protein
25g
Carbs
16g
Fat
Taste Profile
Savory, garlicky, cheesy, and rich with a buttery finish.
Ingredient Substitutions
Don't have an ingredient? Try these alternatives
Both offer a great melt and mild flavor.
Adjust baking time slightly as thinner baguettes may cook faster.
Recipe Variations
Try these delicious twists on the original
Herb Lover's Version
Add 1 tablespoon of chopped fresh basil and 1 teaspoon of dried oregano to the butter mixture.
Everything Bagel Style
Sprinkle the top with everything bagel seasoning along with the cheese for a savory, oniony crunch.
Common Mistakes to Avoid
Learn from others' mistakes for perfect results
- Using melted butter instead of softened, which can make the bread greasy.
- Slicing the bread all the way through, causing it to fall apart.
- Overcrowding the cheese, which can prevent even melting and browning.
- Burning the cheese under the broiler by walking away for even a moment.
Meal Prep & Storage
Make Ahead Tips
You can prepare the garlic butter mixture up to 2 days ahead and store it covered in the fridge. Let it come to room temperature before using. You can also slice and butter the bread a few hours ahead, cover, and refrigerate.
Leftover Ideas
Reheat leftovers in a 350°F oven for about 10 minutes, or until warm and the cheese is soft again. The microwave will make the bread soggy.
Perfect Pairings
Serve this with...
Cooking Timeline
Preheat oven. Soften butter if needed. Mince garlic and chop parsley.
Mix garlic butter. Slice the bread and spread the butter mixture into the cuts.
Wrap in foil and bake for 10 minutes to steam the bread.
Unwrap, add cheese, and bake/broil until melted and golden.
Rest for a minute, then serve immediately.
 Cozy Classics
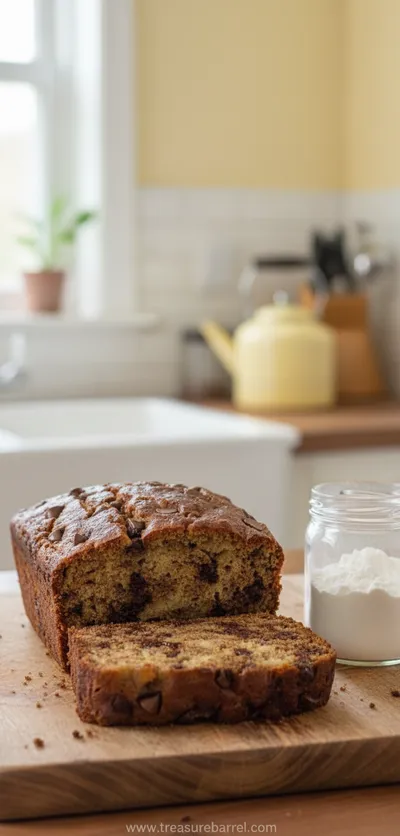
Easy Chocolate Chip Banana Bread
Moist chocolate chip banana bread, quick to bake, perfect for cozy breakfasts.
Cheesy Garlic Bread Recipe - Easy Homemade Snack
Honestly, there's nothing quite like the smell of garlic and cheese filling your kitchen. This cheesy garlic bread recipe is my go-to when I need something warm and comforting. It's simple, yeah, but the way the cheese gets all bubbly and golden... wow. I've been making this for years, and every time, it feels like coming home.
Timing
Prep Time
15 Minutes
Cook Time
15 Minutes
Total Time
30 Minutes
Recipe Details
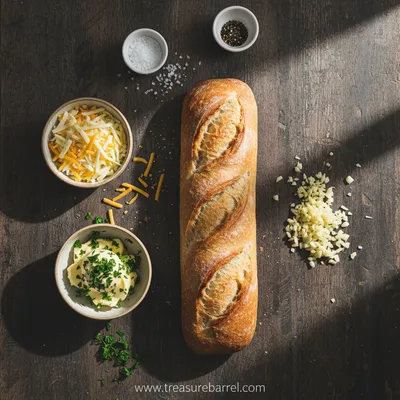
Ingredients
For the Garlic Bread
-
01
1 large loaf Italian or French bread (about 16 inches long)
-
02
1/2 cup (1 stick) unsalted butter, softened
-
03
4-5 large cloves garlic, minced very finely
-
04
2 tablespoons fresh parsley, finely chopped
-
05
1/4 teaspoon salt
-
06
1/4 teaspoon black pepper
For the Cheesy Topping
-
01
1 1/2 cups shredded low-moisture mozzarella cheese
-
02
1/2 cup freshly grated Parmesan cheese
-
03
Optional: 1/4 teaspoon red pepper flakes for a little heat
Instructions
Preheat your oven to 375°F (190°C). Let the butter sit out to soften if you haven't already. It should be spreadable. Line a baking sheet with parchment paper.
In a small bowl, combine the softened butter, minced garlic, chopped parsley, salt, and pepper. Mix it all together until it's well combined. Honestly, the smell is already amazing.
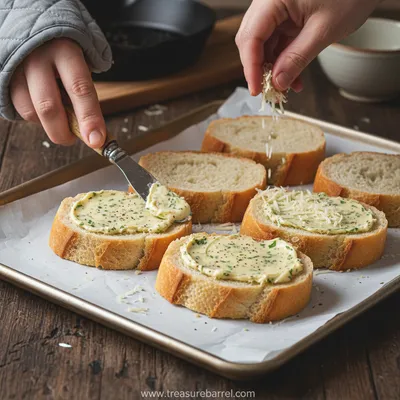
Place the loaf of bread on your cutting board. Using a serrated knife, make diagonal cuts about 1-inch apart across the top of the loaf, but be careful not to slice all the way through the bottom crust. You want it to stay connected.
Now, use a butter knife or a small spatula to generously spread the garlic butter mixture into each and every one of those cuts you made. Get it down deep into the bread. Don't be shy here – this is what makes it so good.
Wrap the entire loaf tightly in aluminum foil. This is going to help the bread heat through and become soft and steamy inside. Place the foil-wrapped loaf on the prepared baking sheet.
Bake for 10 minutes. This initial bake warms the bread and infuses it with the garlic butter flavor.
Carefully open the foil packet – watch out for steam! Sprinkle the shredded mozzarella and Parmesan cheeses evenly over the top of the warm bread, making sure it gets into the cracks.
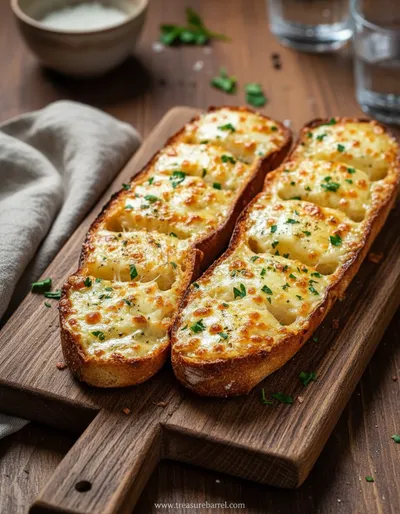
Return the bread to the oven, but this time, leave it open-faced (no foil). Bake for another 5-7 minutes, or until the cheese is fully melted. If you like a browner, bubbly top, switch the oven to broil for the last 1-2 minutes, but watch it constantly so it doesn't burn.
Remove from the oven and let it rest for just a minute or two. This helps the cheese set a little so it's not overwhelmingly messy. Sprinkle with a little extra fresh parsley if you'd like, then serve immediately while it's warm and gooey.
Notes & Tips
-
1
For a crispier bottom, you can place the unwrapped loaf directly on the oven rack for the last few minutes of baking.
-
2
Leftovers can be rewarmed in a 350°F oven for about 10 minutes. It won't be as perfect as fresh, but still tasty.
-
3
You can add a teaspoon of Italian seasoning to the butter mixture for extra herb flavor.
Tools You'll Need
-
Baking sheet
-
Parchment paper
-
Aluminum foil
-
Serrated bread knife
-
Small mixing bowl
-
Butter knife or small spatula
-
Measuring cups and spoons
Must-Know Tips
-
Use a sturdy, crusty loaf – soft sandwich bread will get soggy.
-
Let the butter soften naturally for the best texture.
-
Don't slice all the way through the bread; keep it connected at the bottom.
Professional Secrets
-
Wrapping in foil first steams the bread, making it tender.
-
A quick broil at the end creates the perfect cheesy crust.
-
Freshly grated cheese melts better than pre-shredded.

Recipe by
Claudia SageClaudia serves earthy, rustic dishes 🌿🥘, natural flavors 🍄🍞, and homestyle warmth 🏡💛. She enjoys hearty meals 🍲🔥 and cozy table moments 🕯️✨.
Get Delicious Recipes Weekly
Join 25,000+ home cooks getting our best recipes straight to their inbox.
Free forever • No spam • Unsubscribe anytime