
I remember the first time I made these. It was one of those relentlessly gray Saturdays, the kind where the rain just doesn't stop and all you want to do is stay inside. The kids were getting restless, and I wanted to make something fun, something we could all do together. I had a tube of biscuit dough in the fridge and some ground beef, and this idea just sort of...popped into my head. Our first attempt was a little messy, with cheese oozing out before they even made it to the oven, and oops, I definitely forgot to season the beef enough. But we were all laughing in the kitchen, our hands dusted with flour.
The second time, though? Magic. We figured out how to pinch the seams just right, and when I brushed that shimmering garlic-parmesan butter over the tops, I knew we had a winner. Pulling them from the oven, golden and bubbling, and watching everyone's eyes light up—that's a feeling that sticks with you. It’s more than just food; it’s one of those simple, happy memories baked right in. It reminds me of making other soulful foods, like a pot of chicken and dumplings, where the process is just as comforting as the final dish.
Why You'll Love This Recipe
-
Ultimate Comfort Food: It’s a cheeseburger and a garlic knot rolled into one perfect bite. The combination of savory beef, melted cheese, and that rich garlic butter topping is just pure, nostalgic comfort. It’s the kind of food that makes a gray day feel so much brighter.
-
So Fun to Make and Eat: There’s something so satisfying about assembling these little bundles. It’s a great recipe to get the kids involved in, and even more fun to eat. Everyone loves pulling them apart and dipping them. They disappear so fast!
-
Perfect for Sharing: Whether it’s game day, a movie night, or a casual appetizer for guests, these are made for sharing. They look so inviting piled on a platter and they’re one of those guaranteed crowd-pleasers. A true batch of family favorites in the making.
-
Simple, Accessible Ingredients: There’s nothing complicated here. You’re using everyday ingredients like ground beef, cheddar cheese, and refrigerated biscuit dough. It feels special and indulgent without a long, fussy shopping list or complicated steps.
Wow, just wow. These are dangerously good. The whole family devoured them in minutes.
Essential Ingredient Guide
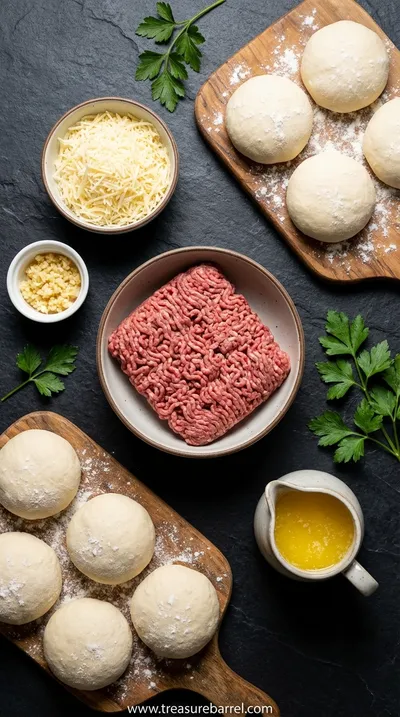
- Refrigerated Biscuit Dough: Honestly, this is the secret to making these so easy. I prefer the large, flaky-style biscuits because they give you more dough to work with and create lovely, soft layers. You can find them in the refrigerated section of any grocery store. Just let them sit out for a few minutes before you start so they're a little easier to stretch without tearing. It's the simple canvas for our little masterpiece.
- Ground Beef: I recommend an 80/20 or 85/15 ground beef for this recipe. You want a little bit of fat because that’s where the flavor is, and it keeps the filling nice and juicy. A leaner ground beef can sometimes turn out a little dry inside the dough. Make sure to brown it well and drain off any excess grease before you start assembling the bombs so the bottoms don’t get soggy.
- Sharp Cheddar Cheese: Please, if you can, shred your own cheese! The pre-shredded kind has starches that prevent it from melting as beautifully. A good, sharp cheddar provides that classic, tangy cheeseburger flavor that stands up to the savory beef and garlic. I like to cut mine into small cubes instead of shredding so you get a distinct pocket of gloriously melted cheese in the center of each bomb. It’s a game-changer, trust me.
 Warm Meals
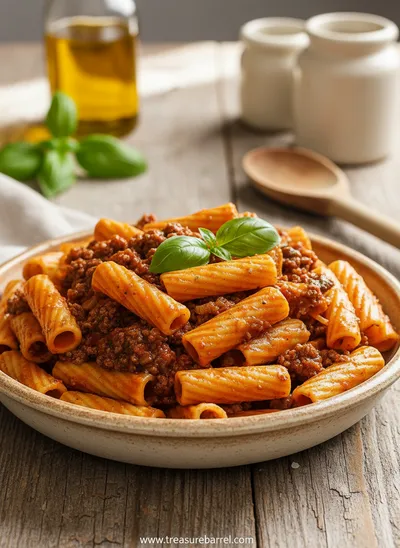
Beef Ragu Pasta Recipe in Tomato Sauce
A rich and hearty pasta dish with slow-cooked beef ragu in a savory tomato sauce.
Complete Cooking Process
-
Making the Savory Filling:
The heart of these little bombs starts with a perfectly seasoned, juicy filling. It begins with browning the ground beef in a skillet, breaking it apart with a spoon until it’s cooked through. The sound and smell of it sizzling is the first layer of comfort. Then, you’ll drain the fat and mix in your seasonings—a little Worcestershire, ketchup, salt, and pepper—to create that classic, savory-sweet cheeseburger taste. You want the mixture to be flavorful on its own, as the dough will mellow it slightly. Let it cool a bit before assembling; this is key to keeping the dough from getting warm and sticky.
-
Assembling the Bombs:
This is the fun, hands-on part. You’ll gently separate your biscuit dough and flatten each piece into a small circle. Don’t worry about making them perfect; the rustic look is part of their charm. A spoonful of the beef mixture goes in the center, followed by a little cube of that sharp cheddar. Then, you just gather the edges of the dough up and around the filling, pinching tightly to seal it into a little ball. Making sure it’s sealed well is the most important part to keep all that cheesy goodness from escaping in the oven.
-
The Glorious Garlic Butter Finish:
This is what takes these from good to absolutely irresistible. While the bombs are baking to a lovely golden brown, you’ll melt some butter and stir in minced garlic, grated Parmesan, and a little fresh parsley. The moment you brush this shimmering, fragrant mixture over the hot bombs, the kitchen will smell absolutely divine. The butter soaks into the warm dough, the garlic becomes fragrant, and the Parmesan gets just a little toasty. It's the final touch that makes every bite a flavor explosion.
-
Don't overfill the dough. It’s tempting, I know, but too much filling will make them impossible to seal and they might burst open while baking.
-
Ensure the beef mixture has cooled. Placing hot filling onto the raw dough can make it tear or become greasy on the bottom.
-
Seal them really, really well. Pinch the seams together firmly, then roll the ball gently in your hands to smooth it out. This is your best defense against cheese leakage.
Pro Tips
Following these little tips just ensures that all that wonderful flavor stays right where it belongs—inside that soft, golden dough.
 Warm Meals
Garlic Steak Tortellini – A Warm Classic
Steak meets garlic‑kissed tortellini in a creamy, herb‑filled sauce for a cozy night in.

The Magic is in the Brush
I really believe the final step of brushing the bombs with garlic-parmesan butter is what makes them so special. It’s not just a topping; it’s an infusion of flavor that transforms the simple baked dough into something truly spectacular. As you brush it on, the hot dough sighs and soaks up all that buttery goodness. The heat from the bombs gently cooks the raw garlic just enough to mellow its bite while releasing its incredible aroma. And the parmesan adds a salty, nutty crust that provides a beautiful texture. Don't be shy with it—every nook and cranny should glisten.
You Must Know
-
Drain the beef thoroughly to avoid a soggy bottom on your bombs.
-
Space the bombs an inch apart on the baking sheet so they cook evenly and get golden all around.
-
The garlic butter is best applied right after they come out of the oven, while they're still piping hot.
Frequently Asked Questions
→ Can I make these ahead of time?
Yes, you absolutely can, which is a lifesaver for parties! You can assemble the bombs completely, but don't bake them. Just arrange them on a baking sheet, cover them tightly with plastic wrap, and refrigerate for up to 24 hours. When you're ready, bake them straight from the fridge, adding a few extra minutes to the baking time. I would wait to brush on the garlic butter until after they are baked. It’s a wonderful way to get ahead, much like prepping ingredients for a cozy chicken fettuccine alfredo.
→ Can I use a different kind of dough?
Definitely! While refrigerated biscuit dough is the easiest, you could also use pizza dough or even thawed dinner roll dough. If you use pizza dough, you’ll need to roll it out and cut it into squares or circles. The texture will be a bit chewier and more bread-like, which is also delicious. Just remember to adjust the baking time according to the package directions for the dough you choose. The right base is so important, just like it is for a perfect shrimp linguine.
→ What about using ground turkey or chicken?
That's a fantastic idea for a lighter version. Ground turkey or chicken would work beautifully here. Because they are leaner, I would suggest adding a little olive oil to the pan when you brown the meat to keep it from drying out. You might also want to be a little more generous with your seasonings—maybe add a pinch of smoked paprika or some onion powder—to make up for the milder flavor of the poultry. It’s a simple swap that works well.
→ How do I prevent the bottoms from getting soggy?
This is the most common concern, and there are two key tricks. First, and most importantly, make sure you drain the cooked ground beef really, really well. I mean, let it sit in a colander for a few minutes. Any excess fat will sog up the dough. Second, make sure your beef filling has cooled down to at least room temperature before you spoon it onto the raw biscuit dough. Hot filling will start to melt the dough before it even bakes, causing weak spots.
→ What are the best dipping sauces for these bombs?
Oh, the dipping possibilities are endless and so much fun! A simple marinara sauce is wonderful, giving it a pizza-burger vibe. A creamy ranch or blue cheese dressing is another classic choice. For that authentic burger experience, try a side of your favorite burger sauce or a simple mix of ketchup and mayonnaise. Honestly, even just a little extra ketchup on the side is perfect. It's all about what makes you happy!
→ Can I freeze these?
Yes, they freeze surprisingly well. The best way is to freeze them after baking. Let them cool completely, then arrange them in a single layer on a baking sheet and freeze until solid. Once frozen, you can transfer them to a freezer-safe bag or container. To reheat, just pop them in a 350°F (175°C) oven for about 10-15 minutes, or until they're warmed through and the dough has crisped up a bit. They are a wonderful little treasure to have on hand.
→ I don't have fresh garlic, can I use garlic powder?
You can, for sure. While fresh minced garlic in the butter topping gives the most vibrant flavor, garlic powder is a great substitute in a pinch. I would recommend using about 1/2 teaspoon of garlic powder for every 1-2 cloves of fresh garlic called for. Just whisk it into the melted butter along with the Parmesan and parsley. The aroma will still be lovely and it will taste delicious.

Nutrition Facts
per serving
280
Calories
12g
Protein
17g
Carbs
18g
Fat
Taste Profile
Rich and savory with a classic cheeseburger flavor, elevated by buttery garlic and salty Parmesan.
Ingredient Substitutions
Don't have an ingredient? Try these alternatives
For a leaner option, ground poultry works wonderfully. Just add a teaspoon of olive oil to the pan when browning to keep it moist. We use this swap often, even in dishes like our chicken parmesan pasta.
Feel free to use your favorite melting cheese! Provolone will give it a milder, creamier melt, while pepper jack will add a nice little bit of spice.
Pizza dough will result in a chewier, more bread-like bomb, while crescent roll dough will create a flakier, lighter texture. Both are delicious alternatives.
Recipe Variations
Try these delicious twists on the original
Bacon Cheeseburger Bombs
For an extra layer of savory goodness, add some crispy, crumbled turkey ham to the ground beef mixture. The smoky flavor is a perfect complement to the beef and cheese.
Spicy Jalapeño Popper Bombs
Give them a little kick! Add finely diced pickled jalapeños to the beef filling and swap the cheddar for a Monterey Jack or a pepper jack cheese for some extra heat.
Pizza Bombs
Use seasoned ground beef or beef sausage, add a little mozzarella cheese and a teaspoon of marinara sauce inside each bomb. Serve with extra marinara for dipping. It's a fun twist on Italian-American flavors, another one of my cozy classics.
Common Mistakes to Avoid
Learn from others' mistakes for perfect results
- Forgetting to drain the beef well, which is the number one cause of soggy bottoms.
- Overfilling the dough, making it difficult to seal and leading to cheese explosions in the oven.
- Not sealing the seams tightly enough. Take an extra second to pinch them securely.
- Brushing with the garlic butter before baking. This can cause the garlic and Parmesan to burn; it's always best to do it after.
Meal Prep & Storage
Make Ahead Tips
You can fully assemble the bombs a day in advance. Place them on a parchment-lined baking sheet, cover tightly with plastic wrap, and store them in the refrigerator. When ready to serve, bake them straight from the fridge, adding 2-3 extra minutes to the baking time. Prepare the garlic butter topping just before brushing it on the hot, baked bombs for the best flavor.
Leftover Ideas
Leftovers are such a treat. Reheat them in a 350°F oven or air fryer for 5-7 minutes until warm and re-crisped. You can enjoy them as is, or even slice them in half and serve them like mini-sliders. They are less flexible than something like leftover creamy mushroom chicken, but they are still absolutely delicious the next day for a quick lunch or snack.
Perfect Pairings
Serve this with...
Cooking Timeline
Preheat oven and prepare baking sheet. Brown the ground beef with onion and seasonings in the skillet.
Let the meat mixture cool slightly while you separate and flatten the biscuit dough.
Assemble the bombs: fill, add cheese, and seal each one carefully. Arrange them on the baking sheet.
Bake until golden brown. While they bake, prepare the garlic-parmesan butter topping.
Remove bombs from the oven, brush with garlic butter, and let them rest for a few minutes before serving.
 Cozy Classics
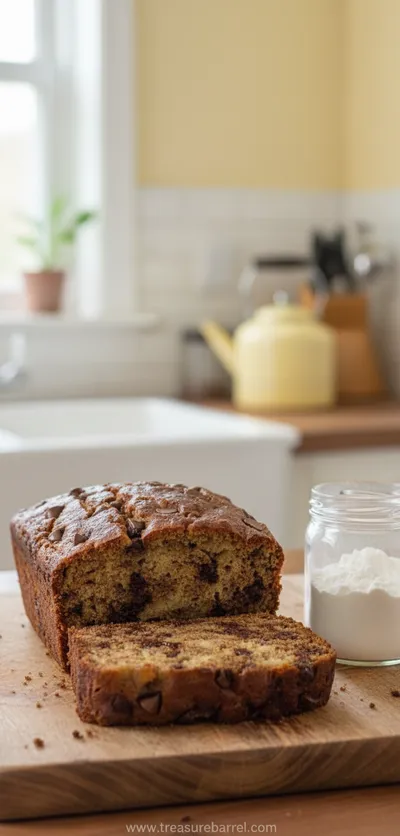
Easy Chocolate Chip Banana Bread
Moist chocolate chip banana bread, quick to bake, perfect for cozy breakfasts.

Garlic Parmesan Cheeseburger Bombs Recipe
Delicious garlic parmesan cheeseburger bombs: the perfect bite-sized comfort food with juicy beef and cheesy garlic flavors.
Timing
Prep Time
20 Minutes
Cook Time
15 Minutes
Total Time
35 Minutes
Recipe Details
Ingredients
For the Cheeseburger Filling
-
01
1 lb ground beef (80/20 recommended)
-
02
1/2 teaspoon salt
-
03
1/4 teaspoon black pepper
-
04
1/4 cup finely chopped onion
-
05
2 tablespoons ketchup
-
06
1 teaspoon Worcestershire sauce
-
07
4 ounces sharp cheddar cheese, cut into 8 cubes
For the Bombs and Topping
-
01
1 (16.3 ounce) can refrigerated grand biscuits (8 count)
-
02
4 tablespoons unsalted butter, melted
-
03
2 cloves garlic, minced
-
04
1/4 cup grated Parmesan cheese
-
05
1 tablespoon chopped fresh parsley
Instructions
First, let’s get the oven preheating to 375°F (190°C) and line a baking sheet with parchment paper. This little step makes cleanup so much easier later. In a medium skillet over medium-high heat, add the ground beef and chopped onion. Cook, breaking the beef apart with a wooden spoon, until it's nicely browned and the onion is soft. The kitchen will start to smell so good! Drain off any excess grease very thoroughly—this is super important! Stir in the salt, pepper, ketchup, and Worcestershire sauce. Let it simmer for just a minute for the flavors to meld, then remove it from the heat to cool down a bit. This seasoned beef is so versatile, a great base for many meals, even a simple pasta like in this garlic parmesan pasta.
Now for the fun part. Open your can of biscuits—I still jump at that ‘pop!’ every single time—and separate the 8 biscuits. On a lightly floured surface, gently press or roll each biscuit into a circle about 4 inches wide. Don't worry about perfect circles; a little rustic is lovely. Spoon about 2 tablespoons of the cooled beef mixture into the center of each dough circle. Nestle one of your cheddar cubes right into the middle of the filling. This little pocket of cheese is going to be amazing.
Time to seal them up. Carefully pull the edges of the dough up and over the filling, gathering them at the top. Pinch the seams together very firmly to create a sealed little ball. I find it helps to give it a gentle roll between my palms to smooth everything out. Place each bomb, seam-side down, onto your prepared baking sheet, leaving a little space between them. Pop them into the preheated oven and bake for 13-15 minutes, or until they’re beautifully golden brown and puffed up. Your kitchen is about to smell heavenly.
While the bombs are baking, let's make that glorious topping. In a small bowl, stir together the melted butter, minced garlic, grated Parmesan, and fresh parsley. As soon as you pull the golden-brown bombs from the oven, immediately brush this mixture generously over the tops of each one. Be liberal with it; you want every bit of that garlicky, cheesy butter to soak in. Let them cool for just a few minutes before serving, as that melted cheese inside will be molten hot. Then, pile them on a platter and watch them vanish.
Notes & Tips
-
1
Don't skip cooling the meat filling. If it's too hot, it will make the dough difficult to handle and can create a greasy result.
-
2
Using freshly grated Parmesan cheese for the topping makes a world of difference. It melts better and has a much richer, nuttier flavor than the pre-grated kind.
-
3
If you find your dough is too sticky to work with, just dust your hands and your work surface with a tiny bit of flour. It helps make the assembly process much smoother.
Tools You'll Need
-
Large Skillet: You'll need a good-sized skillet to brown the ground beef and onions. A cast-iron or heavy-bottomed stainless steel pan will give you a beautiful, even browning.
-
Baking Sheet: A standard half-sheet pan is perfect for this. Lining it with parchment paper is my favorite trick for no-fuss cleanup, so you can spend more time enjoying the food.
-
Mixing Bowls: You’ll need a bowl for the cooled beef filling and a smaller one to mix up that incredible garlic butter topping. Nothing fancy required, just simple, useful bowls.
-
Pastry Brush: A small pastry brush is so helpful for evenly coating the hot bombs with the garlic parmesan butter. A silicone one is great because it’s so easy to clean.
Must-Know Tips
-
Seal Tightly: The key to keeping all the cheesy goodness inside is a very secure seal. Pinch, then pinch again!
-
Seam-Side Down: Always place the bombs on the baking sheet with the pinched seam facing down. This uses the weight of the bomb to help keep it sealed.
-
Brush While Hot: Apply the garlic butter the second the bombs come out of the oven. The heat helps the dough absorb all that wonderful flavor.
Professional Secrets
-
A Cube of Cheese: Using a small cube of cheese instead of shredded ensures a distinct, molten pocket of cheese in the center rather than having it disappear into the meat.
-
Let the Dough Warm Slightly: Let the tube of biscuit dough sit on the counter for about 10-15 minutes before you use it. Slightly warmer dough is much more pliable and less prone to tearing.
-
Room Temperature Ingredients: This is a tip that applies to so many recipes for even cooking, from these bombs to something like my cowboy butter chicken. It just helps everything cook more evenly.

Recipe by
Clara JoyClara’s kitchen is all about family 👨👩👧👦💖, sharing timeless favorites 🍝🍰, and creating memories 🕯️✨. She loves easy meals 🍳 and heartwarmi ...
Get Delicious Recipes Weekly
Join 25,000+ home cooks getting our best recipes straight to their inbox.
Free forever • No spam • Unsubscribe anytime