
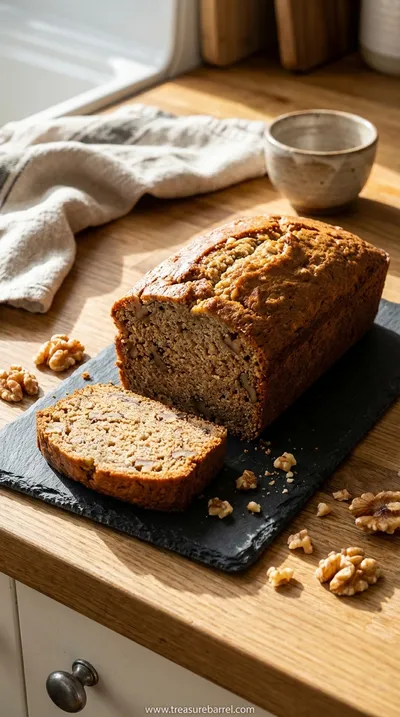
I’ve tried, I don't know, maybe a dozen banana bread recipes over the years. Some were too dry, some too dense, some just…lacked that certain something. It became a quiet little mission of mine to find the one. This recipe came together piece by piece, a little trick from a friend here, a note from a very old cookbook there. I remember the afternoon I finally got it right. The light was streaming into the kitchen just so, and when I pulled the loaf from the oven, it had that perfect crack down the middle, a deep golden-brown crust, and the aroma was just…wow. It’s that same feeling I get when I browse through other amazing recipes—that spark of inspiration. This version, for me, is the perfect balance of moist, tender crumb and rich, caramelized banana flavor. It feels like coming home.
Why You'll Love This Banana Bread
-
Impossibly Moist & Tender: The combination of very ripe bananas and melted butter creates a crumb that is just so soft and stays moist for days. Honestly, it might even be better on day two, when the flavors have had a chance to really meld together. It’s the kind of texture that makes you close your eyes for a second when you take a bite.
-
Incredibly Simple to Make: This is a one-bowl wonder, truly. You don't need a stand mixer or any fancy equipment. Just a bowl, a whisk, and a fork for mashing. It’s a very forgiving recipe, perfect for a relaxing weekend baking session or even a quick weekday treat when you need a little comfort. It’s as straightforward as my favorite simple recipe.
-
The Perfect Sweetness: It's sweet, but not overpoweringly so. The brown sugar adds this lovely, deep molasses note that perfectly complements the bananas. You could have a slice for breakfast with a cup of coffee and not feel like you’ve overdone it. It's just a beautiful, balanced sweetness that lets the banana flavor shine.
-
A No-Waste Hero: Ugh, I used to feel so guilty about those bananas that went past their prime. This recipe turns them into something truly special. It’s the best way to use up those spotty, freckled bananas sitting on your counter, transforming them from forgotten fruit into the best possible treat. It feels good to give them a delicious new purpose.
This is, without a doubt, the only banana bread recipe I will ever use again. It’s perfect every single time.
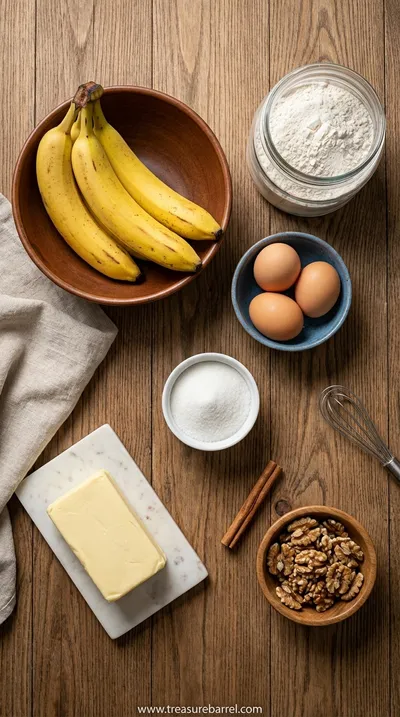
Essential Ingredient Guide
- Overripe Bananas: This is the absolute key. You want bananas that are heavily speckled, even mostly black. The uglier, the better, honestly. As bananas ripen, their starches convert to sugar, which not only makes them sweeter but also contributes to an incredibly moist loaf. Don't be tempted to use yellow or green-tinged bananas; you just won't get that deep, classic banana flavor or the right texture.
- Melted Unsalted Butter: While some recipes use oil, I stand by melted butter. It provides a richness and a flavor that oil just can't replicate. It adds a subtle, velvety note to the background that makes the bread taste more decadent and, well, buttery. Make sure it's cooled slightly before you add it to the eggs so you don't accidentally scramble them. A small detail, but it makes a difference.
- Light Brown Sugar: I love using light brown sugar instead of just white sugar. The molasses content in brown sugar adds a wonderful depth and a slight caramel undertone to the bread. It also reacts with the baking soda to help the loaf rise beautifully, and it contributes to that soft, moist texture we're aiming for. It makes the flavor profile so much more interesting and cozy.
 Warm Meals
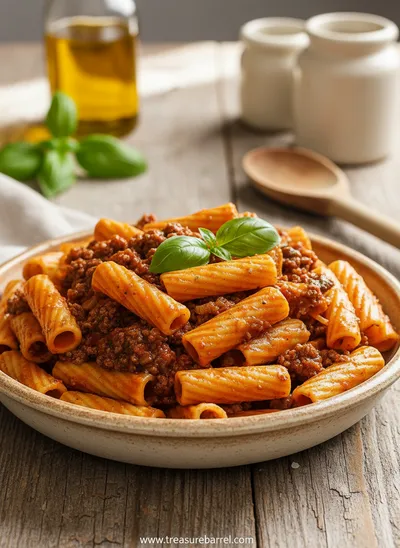
Beef Ragu Pasta Recipe in Tomato Sauce
A rich and hearty pasta dish with slow-cooked beef ragu in a savory tomato sauce.
Complete Cooking Process
-
Preparation is a Moment of Calm:
First, find your quiet moment. Preheat your oven and just breathe in. This part is about gathering and organizing, which I find so therapeutic. Grease and flour your loaf pan—I love the soft thump, thump, thump of tapping out the excess flour. In a large bowl, mash your bananas until they are almost liquid, with just a few small lumps remaining. This is the heart of the bread, so take your time with it. Then, whisk in your melted butter, the sugars, egg, and vanilla. The mixture will look glossy and smell incredible. It’s the promise of what's to come.
-
Combining and Baking:
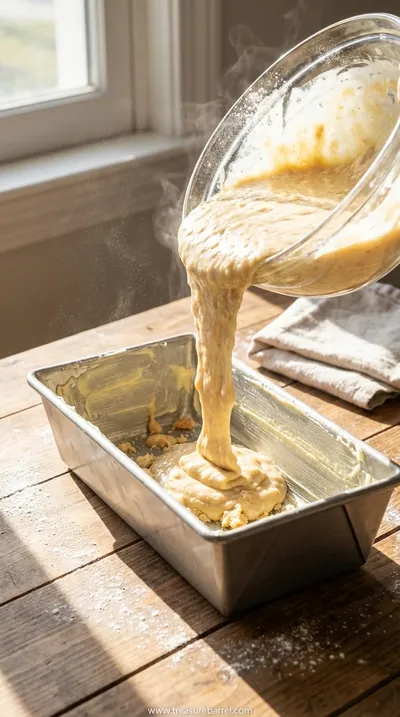
Now, gently fold in your dry ingredients. I like to sift them in, but it’s not strictly necessary. Just mix until you no longer see streaks of flour. Please, don't overmix! A few little lumps are perfectly okay and are the secret to a tender crumb. Pour the batter into your prepared pan and smooth the top. The moment it goes into the oven, the whole house starts to change. The baking is a slow transformation, a 60-minute wait that fills your home with the most comforting scent imaginable. It’s pure anticipation.
-
The Final Touches:
When a wooden skewer comes out clean, your bread is ready. Let it cool in the pan for about 10 minutes. This little rest is important; it helps the loaf set up so it doesn’t fall apart when you move it. Then, gently turn it out onto a wire rack to cool completely. I know, this is the hardest part. The temptation to slice into it while it's warm is immense, but patience rewards you with cleaner slices and a fully developed flavor. This is the final step before you get to enjoy all your lovely work.
-
Don't overmix the batter. This develops the gluten in the flour and can lead to a tough, rubbery bread. Mix just until the ingredients are combined.
-
Check for doneness early. Ovens can vary, so start checking your bread about 10 minutes before the recipe says it should be done.
-
Tent with foil. If the top of your bread is browning too quickly before the inside is cooked, gently place a piece of aluminum foil over the top for the remainder of the baking time.
Pro Tips for a Perfect Loaf
These little details make all the difference between a good banana bread and a truly great one.
 Morning Comfort
Easy Peanut Butter Protein Oatmeal Cups
Fluffy peanut butter oatmeal cups packed with protein for a wholesome breakfast.
Frequently Asked Questions
→ Can I use frozen bananas?
Absolutely! Using frozen bananas is a fantastic idea. Just make sure to thaw them completely before using. They'll release a lot of liquid as they thaw—don't throw that liquid away! It's full of banana flavor. Just mash the thawed bananas along with their liquid and add them to the batter as directed. Your bread will be just as moist and delicious, and it's a great way to save those overripe bananas before they go bad.
→ How do I know when my bananas are ripe enough?
You're looking for bananas with lots of brown and black spots; the more, the better. They should feel soft to the touch and have a very strong, sweet banana smell. The peel should come away easily. If your bananas are still yellow, you can speed up the ripening process by placing them in a paper bag for a day or two. For a super-quick method, you can bake unpeeled bananas on a baking sheet at 300°F (150°C) for 15-20 minutes, or until the peels are blackened.
→ Can I add mix-ins like nuts or chocolate chips?
Yes, of course! This recipe is a wonderful canvas for additions. You can fold in about a cup of chopped walnuts, pecans, or chocolate chips. For a fun twist, try my chocolate chip version. To prevent the mix-ins from sinking to the bottom, I like to toss them with a tablespoon of the dry flour mixture before folding them into the batter. This little trick helps suspend them evenly throughout the loaf.
→ Why did my banana bread sink in the middle?
Oh, that's such a frustrating moment. A sunken middle is usually caused by one of a few things: underbaking, overmixing the batter, or opening the oven door too frequently while it's baking. Make sure you're testing for doneness with a skewer in the center of the loaf. If it comes out with wet batter, it needs more time. Also, be gentle when mixing and try to resist peeking until the last 10 minutes of baking time.
→ How should I store banana bread to keep it moist?
To keep your banana bread wonderfully moist, allow it to cool completely first. Slicing into it while it's hot lets all the steam (and moisture) escape. Once cool, I wrap it tightly in plastic wrap or place it in an airtight container. It will keep at room temperature for up to four days. Honestly, I think the flavor deepens and it gets even better on the second day. If you need inspiration for other versions you can check out this easy moist recipe
→ Can I make this recipe into muffins?
You certainly can! This batter makes beautiful muffins. Just line a muffin tin with paper liners or grease it well. Fill each cup about two-thirds full with batter. The baking time will be much shorter, of course. Start checking them around 18-20 minutes. A toothpick inserted into the center of a muffin should come out clean. You should get about 12 standard-sized muffins from this recipe.
→ Is there a simpler one-bowl version of this?
This recipe is already quite simple, but if you're looking for the ultimate in ease, you might enjoy this one-bowl banana bread. The principles are very similar—gentle mixing, ripe bananas—but it streamlines the process even further. I find that on days when I'm short on time or energy, having a reliable one-bowl recipe in my back pocket is a true gift. It’s all about finding joy in the process, no matter how simple.
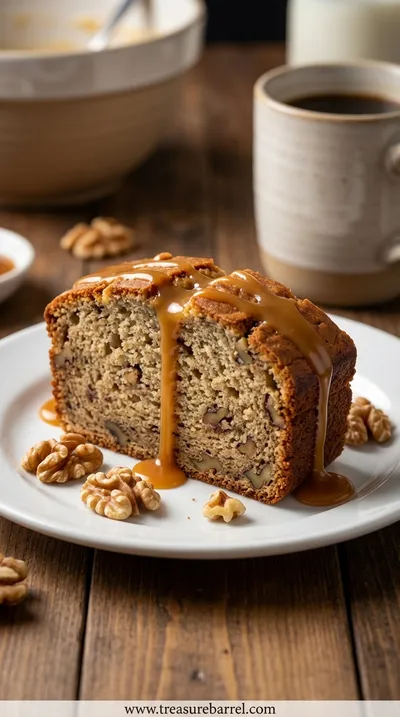
Nutrition Facts
per serving
220
Calories
3g
Protein
32g
Carbs
9g
Fat
Taste Profile
A beautifully balanced, sweet banana flavor with warm notes of cinnamon and rich butter.
Ingredient Substitutions
Don't have an ingredient? Try these alternatives
You can substitute the melted butter with an equal amount of melted and cooled coconut oil or a neutral vegetable oil. Oil will produce a slightly different, but still very moist, crumb. Coconut oil will add a subtle coconut flavor that pairs beautifully with banana.
For a heartier, more rustic loaf, you can replace up to half of the all-purpose flour with whole wheat flour. This will add a nutty flavor and a slightly denser texture. I wouldn't recommend using 100% whole wheat as it can make the loaf too heavy.
Recipe Variations
Try these delicious twists on the original
Chocolate Chip Banana Bread
For an extra touch of indulgence, gently fold in 1 cup of semi-sweet chocolate chips into the batter before pouring it into the pan. The melted pockets of chocolate are a dreamy addition to the moist banana bread. For another take on this classic, check out this chocolate chip recipe.
Nutty Banana Bread
Add a lovely crunch and nutty flavor by folding in 3/4 cup of chopped walnuts or pecans. To enhance their flavor, I like to toast the nuts in a dry skillet for a few minutes until fragrant before adding them to the batter. It adds another layer of texture and taste that is just wonderful.
Common Mistakes to Avoid
Learn from others' mistakes for perfect results
- Using Underripe Bananas: Green or yellow bananas lack the sugar and moisture needed for great banana bread. Wait until they are heavily speckled with brown or black spots for the best flavor and texture.
- Overmixing the Batter: Mixing too much after adding the flour develops gluten, resulting in a tough, dense, and rubbery loaf. Fold gently and stop as soon as the flour streaks disappear.
- Underbaking: Banana bread is very moist, so it can be tricky to tell when it's done. Rely on the skewer test—if it comes out with wet batter, it needs more time. A sunken middle is a classic sign of an underbaked loaf.
- Measuring Flour Incorrectly: Scooping flour directly with a measuring cup packs it in, adding too much to the recipe and leading to dry results. Always spoon flour into the cup and level it off.
Meal Prep & Storage
Make Ahead Tips
This is a great recipe to prep ahead of time. You can whisk together all the dry ingredients and store them in an airtight container at room temperature for weeks. You can also mash the bananas and store them in an airtight container in the refrigerator for up to a day. When you're ready to bake, just combine the wet ingredients, fold in the dry mix, and you're ready to go. It saves a few precious minutes when you need a quick baking fix.
Leftover Ideas
Leftover banana bread is a true gift. The easiest way to enjoy it is to simply warm up a slice in the microwave for 10-15 seconds—it becomes so soft and fragrant again. For something a bit more special, try making banana bread french toast! Dip thick slices in an egg and milk mixture and pan-fry in butter until golden. It’s an incredibly decadent breakfast treat. You can also crumble leftover slices over yogurt or ice cream for a delicious topping.
Perfect Pairings
Serve this with...
Cooking Timeline
Preheat oven to 350°F (175°C) and prepare your loaf pan. Gather and measure all your ingredients.
In a large bowl, mash the bananas. Whisk in the melted butter, brown sugar, egg, and vanilla until well combined.
In a separate bowl, whisk together the flour, baking soda, salt, and spices. Gently fold the dry ingredients into the wet ingredients until just combined.
Pour the batter into the prepared loaf pan and smooth the top.
Bake for 55-65 minutes, or until a skewer inserted into the center comes out clean. Let cool in the pan for 10 minutes before transferring to a wire rack.
Banana Bread Recipe: So Easy, It's Bananas!
Make this super easy banana bread that's perfectly moist and delicious. A timeless classic that's perfect for breakfast or any time of day.
Timing
Prep Time
15 Minutes
Cook Time
60 Minutes
Total Time
1 Hour 15 Minutes
Recipe Details
Ingredients
Wet Ingredients
-
01
3 very ripe medium bananas, mashed
-
02
1/2 cup (113g) unsalted butter, melted and cooled
-
03
3/4 cup (150g) packed light brown sugar
-
04
1 large egg, at room temperature
-
05
1 teaspoon vanilla extract
Dry Ingredients
-
01
1 1/2 cups (180g) all-purpose flour
-
02
1 teaspoon baking soda
-
03
1/2 teaspoon ground cinnamon
-
04
1/4 teaspoon ground nutmeg
-
05
1/2 teaspoon salt
Instructions
First, let's set a calm mood. Preheat your oven to 350°F (175°C). Find your favorite 9x5 inch loaf pan and grease it with a little butter, then dust it with flour, tapping out any excess. This little bit of prep feels like a ritual, ensuring your beautiful loaf will slide out perfectly later. I always take a deep breath here; it’s the start of something wonderful and one of my favorite parts of making any super easy delicious recipe.
In a large mixing bowl, place your very ripe, mashed bananas. Now, pour in the slightly cooled melted butter and the brown sugar. Whisk them all together until the sugar starts to dissolve and everything is beautifully combined. It should look a bit like a loose caramel sauce. Crack in your egg and add the vanilla extract, then give it another good whisk until the batter is smooth and slightly pale. The aroma at this stage is just divine—sweet, fruity, and so promising.
Now for the dry ingredients. In a separate, smaller bowl, whisk together the all-purpose flour, baking soda, salt, cinnamon, and nutmeg. I love the warm, spicy scent that rises up when you mix these together. Gently pour the dry mixture into your wet ingredients. Using a spatula, fold everything together just until you can no longer see any dry streaks of flour. Please be gentle here; overmixing is the enemy of a tender crumb. A few little lumps in the batter are a good thing, a sign of a light touch.
Carefully pour the thick, fragrant batter into your prepared loaf pan. Use your spatula to spread it evenly, making sure it reaches into the corners. I sometimes like to sprinkle a little extra granulated sugar on top for a crackly, sweet crust, but that’s totally up to you. Place the pan on the center rack of your preheated oven and let it bake for 55 to 65 minutes. The whole house will slowly fill with the most incredible, comforting aroma. It’s the best kind of air freshener.
Check for doneness by inserting a wooden skewer or a long toothpick into the center of the loaf. If it comes out clean, with just a few moist crumbs attached, it's ready. If there's wet batter, give it another 5 minutes. Once baked, let the bread cool in the pan on a wire rack for about 10 minutes. This allows it to set. Then, carefully invert the pan to release the loaf and let it cool completely on the rack before slicing. I know it's hard to wait, but the texture will be so much better.
Notes & Tips
-
1
The riper your bananas, the better. Seriously. Bananas that are almost completely black are perfect for this. They provide the most sweetness and moisture, which is the secret to an amazing banana bread. If your bananas aren't quite there yet, you can roast them in their peels in the oven to intensify their flavor.
-
2
Be careful not to overmix the batter. Once you add the dry ingredients, you want to mix only until they're just combined. Overmixing develops the gluten in the flour, which can result in a dense, tough loaf instead of the light, tender one we're aiming for. A gentle hand is key.
-
3
Let the bread cool completely before slicing. I know, this is the hardest rule to follow! But a warm loaf is very delicate and can crumble easily. Letting it cool completely allows the crumb to set, giving you beautiful, clean slices. It also gives the flavors time to settle and deepen. It’s worth the wait, I promise.
 Warm Meals
Garlic Steak Tortellini – A Warm Classic
Steak meets garlic‑kissed tortellini in a creamy, herb‑filled sauce for a cozy night in.
Tools You'll Need
-
9x5 Inch Loaf Pan: This is the classic pan for banana bread. A light-colored metal pan is my preference as it conducts heat evenly without over-browning the crust. A glass or dark metal pan will also work, but you may need to reduce the oven temperature by 25°F.
-
Large Mixing Bowl: A nice, big bowl gives you plenty of room to mash the bananas and mix the batter without making a mess. This recipe is simple enough that you truly only need one main bowl, which makes cleanup a breeze.
-
Whisk and Spatula: A whisk is perfect for combining the wet ingredients thoroughly, ensuring the sugar dissolves and the egg is well incorporated. Then, switch to a flexible silicone spatula for folding in the dry ingredients. The spatula helps you mix gently and scrape the sides of the bowl to make sure everything is included.
-
Wire Cooling Rack: This is an essential but often overlooked tool. Placing the hot loaf on a wire rack allows air to circulate all around it, preventing the bottom from getting soggy as it cools. It ensures your perfect crust stays perfect.
Must-Know Tips
-
Measure Flour Correctly: Instead of scooping flour directly from the bag with your measuring cup, which compacts it, use a spoon to fluff up the flour and then spoon it into the cup. Level it off with a straight edge. This prevents you from adding too much flour, which is a primary cause of dry bread.
-
Room Temperature Egg: Using an egg that's at room temperature helps it incorporate more evenly into the batter. This creates a lighter, more uniform texture in the final loaf. It's a small detail that makes a big difference. To quickly warm up an egg, just place it in a bowl of warm water for a few minutes.
-
Don't Slice It Hot: Patience is a virtue, especially with banana bread. Allowing the loaf to cool completely on a wire rack before you slice into it is crucial. This gives the internal structure time to set, so you get clean, beautiful slices instead of a crumbly mess. The flavor is even better once it has cooled.
Professional Secrets
-
A Touch of Spice: The combination of cinnamon and nutmeg is classic for a reason. It warms up the flavor of the banana and adds a layer of comforting complexity. Don't be afraid to add a tiny pinch of allspice or cardamom if you're feeling adventurous.
-
Let the Batter Rest: If you have an extra 15-20 minutes, let the batter rest in the pan before baking. This allows the flour to fully hydrate, which can result in a more tender crumb and a slightly more developed flavor. It's a little trick that pastry chefs use.
-
Sour Cream or Yogurt for Moisture: For an even moister and slightly tangy loaf, you can substitute a quarter cup of the mashed banana with a quarter cup of full-fat sour cream or Greek yogurt. It adds a wonderful richness and a tenderizing effect to the crumb.

Recipe by
Sofia BelleSofia bakes with love 🧁💛, sweet smells filling her home 🍪🏡, and flour on her hands 🤲✨. She believes every loaf 🍞 and cake 🎂 tells a story of wa ...
Get Delicious Recipes Weekly
Join 25,000+ home cooks getting our best recipes straight to their inbox.
Free forever • No spam • Unsubscribe anytime