
I remember the first time I tried to make chicken parmesan from scratch. I was in my early twenties, trying to impress my then-boyfriend, now-husband. The kitchen was tiny, the pans were mismatched, and I, well, I had more enthusiasm than skill. It was a bit of a disaster—soggy breading, burnt cheese, the whole nine yards. But we laughed about it and ate it anyway, and it's still such a sweet memory. Over the years, I've refined my process, finding the little rhythms and details that make all the difference. It's become less about impressing anyone and more about creating a feeling of home.
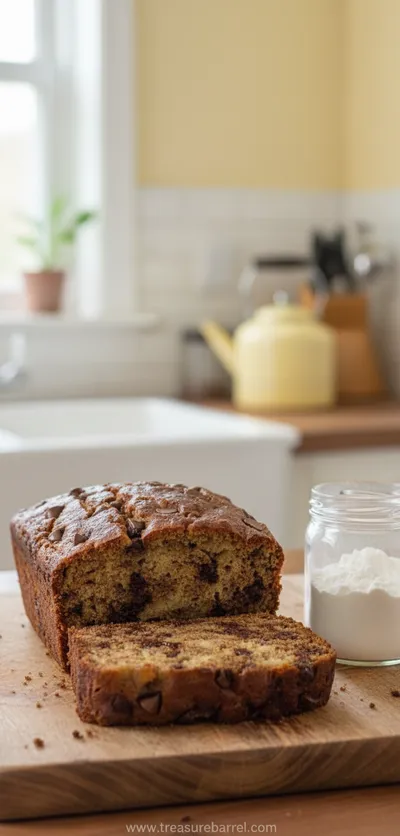
Now, making it is a peaceful ritual. I lay out my little dredging stations—flour, egg, breadcrumbs—like an artist arranging her palette. The kids will sometimes wander in, drawn by the smells, and I'll give them little tasks. While the chicken sizzles away, the house fills with that comforting aroma, and sometimes the scent of an easy banana bread baking for dessert mingles with it. It’s a recipe that has grown with our family, marking quiet Tuesday nights and small celebrations alike. It's proof that the simplest things, when made with a little bit of love, can feel the most luxurious.
Why You'll Adore This Recipe
-
Perfectly Crispy Crust: The secret is a simple three-step breading process with Panko breadcrumbs, which stay incredibly crunchy even after being topped with sauce and cheese. That textural contrast between the crispy chicken and the soft, melted mozzarella is just divine. It’s that satisfying crunch you hear with every single bite.
-
Incredibly Simple to Make: Despite looking and tasting like a restaurant-quality dish, this recipe is surprisingly easy and forgiving. The steps are straightforward, and there are no complicated techniques involved. It’s a perfect dish for a beginner cook who wants to create something that feels special and impressive without all the stress.
-
A True Family Favorite: This is one of those rare meals that makes everyone happy, from picky toddlers to hungry teenagers. It’s comforting, cheesy, and familiar in the best possible way. Putting this on the table guarantees clean plates and happy faces all around—a true win for any home cook.
-
So Cozy and Comforting: Chicken parmesan is the culinary equivalent of a warm, cozy blanket on a chilly evening. The combination of savory chicken, rich tomato sauce, and gooey cheese is deeply satisfying and nostalgic. It's the perfect meal to lift your spirits and make an ordinary day feel a little more special.
This is the only chicken parm recipe I'll ever use. It's perfectly crispy and so comforting.
Essential Ingredient Guide
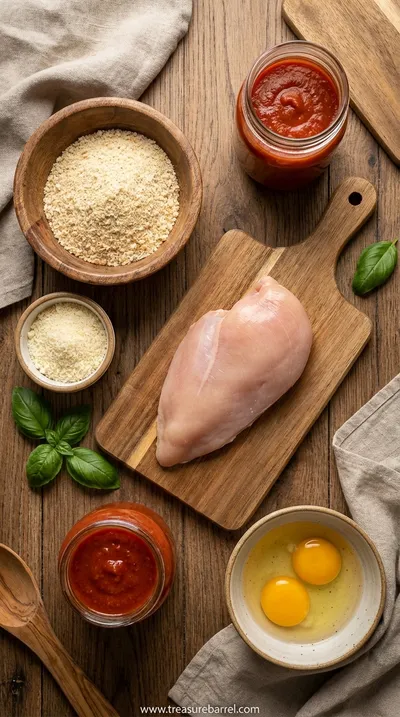
- Thinly Sliced Chicken Breasts: The key to tender, evenly cooked chicken parmesan is starting with thin cutlets. You can buy them this way or simply slice regular chicken breasts in half horizontally. Pounding them to an even thickness, about 1/4-inch, ensures they cook quickly and remain juicy. This step feels a bit fussy, but I promise it makes a world of difference in the final texture.
- Panko Breadcrumbs: Please, if you can, use Panko! These Japanese-style breadcrumbs are lighter and flakier than traditional breadcrumbs, which means they absorb less oil and create a much crispier, crunchier coating. I like to season them generously with Parmesan, garlic powder, and dried oregano to build flavor right into the crust. The sound they make when the chicken is frying is just heavenly.
- Fresh Mozzarella: While pre-shredded, low-moisture mozzarella works in a pinch, using fresh mozzarella is a game-changer. I buy the kind packed in water, pat it very dry with paper towels, and then tear or slice it. When it melts, it becomes wonderfully gooey and creamy, with those beautiful 'cheese pulls' everyone loves. It brings a fresh, milky flavor that you just can't get from the bagged stuff.
 Warm Meals
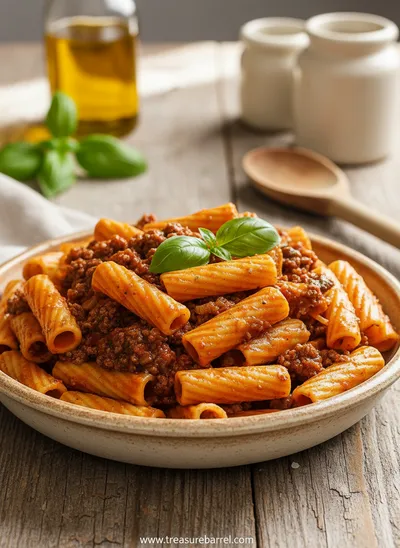
Beef Ragu Pasta Recipe in Tomato Sauce
A rich and hearty pasta dish with slow-cooked beef ragu in a savory tomato sauce.
Complete Cooking Process
-
Preparation: The Art of the Breading Station:
This is my favorite part; it feels so meditative. Set up three shallow dishes in a row. The first holds the seasoned flour, which gives the egg something to cling to. The second has your lightly beaten eggs, the binder that holds it all together. The third is for the star of the show: the Panko breadcrumb mixture, full of Parmesan and herbs. Working with one piece of chicken at a time, you'll lightly dredge it in flour, shake off the excess, dip it completely in the egg, and then press it firmly into the breadcrumbs, making sure every inch is coated. This little assembly line makes the process smooth and, honestly, quite satisfying.
-
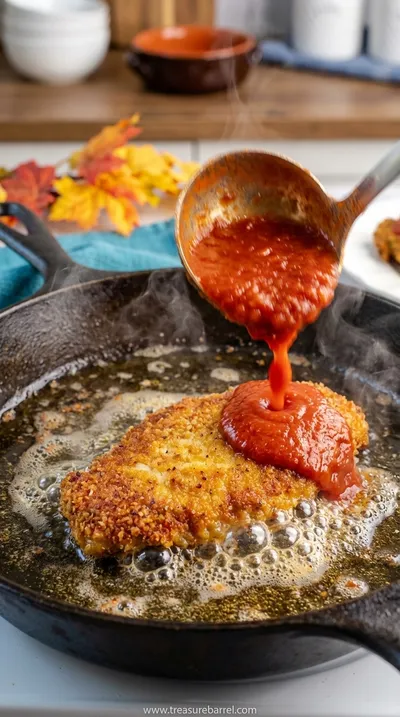
Cooking: The Golden Sizzle:
Now for the magic. You’ll pan-fry the chicken in a bit of olive oil over medium-high heat. The goal here isn't to cook it all the way through, but to get that gorgeous, deep golden-brown crust on both sides. This usually takes just 2-3 minutes per side. Don’t overcrowd the pan; work in batches if you need to. Listen for that steady, energetic sizzle—it's the sound of deliciousness being created. Once they're golden, transfer them to a wire rack. This little trick prevents the bottom from getting soggy while you fry the rest.
-
Assembly: Layering the Love:
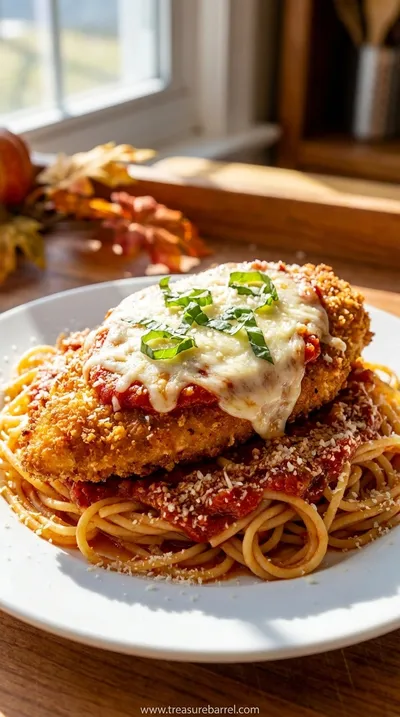
Here's where it all comes together in a beautiful, bubbly harmony. Spoon a thin layer of your favorite marinara sauce into the bottom of a baking dish. This prevents the chicken from sticking and adds a layer of flavor. Arrange the beautifully golden chicken cutlets on top. Then, spoon a little more sauce over each piece—not too much, you don't want to drown that crispy crust! Finally, top generously with those slices of fresh mozzarella and a little sprinkle of extra Parmesan. It’s ready for its final transformation in the oven.
-
Pat the chicken completely dry before breading. Moisture is the enemy of a crispy crust!
-
Use one hand for the dry ingredients (flour, breadcrumbs) and the other for the wet (egg) to avoid clumpy fingers.
-
Don't skip placing the fried chicken on a wire rack. It allows air to circulate, keeping the bottom just as crispy as the top.
Pro Tips for the Perfect Finish
These small details truly elevate the dish from good to unforgettable. And for dessert? A slice of moist banana bread is a wonderfully simple and cozy finish to the meal.
 Warm Meals
Garlic Steak Tortellini – A Warm Classic
Steak meets garlic‑kissed tortellini in a creamy, herb‑filled sauce for a cozy night in.
Frequently Asked Questions
→ How do I prevent my chicken parmesan from getting soggy?
Oh, the soggy bottom struggle is real! The best way to combat this is threefold. First, use Panko breadcrumbs for a superior crunch. Second, don't overdo the sauce; just a spoonful on top of each cutlet is enough, and make sure to place the chicken on a bed of sauce in the pan, not directly on the pan itself. Finally, serve it immediately after it comes out of the oven. The longer it sits, the more time the sauce has to soften that beautiful crust you worked so hard to create.
→ Can I bake the chicken instead of frying it?
You absolutely can, and it's a wonderful, lighter alternative! To bake it, preheat your oven to 400°F (200°C). Place the breaded cutlets on a wire rack set inside a baking sheet. Lightly spray the tops with cooking spray. Bake for about 15-20 minutes, flipping halfway through, until golden and cooked through. Then, proceed with the sauce and cheese topping and pop it back in the oven for a few more minutes to melt. It won't be quite as deeply crispy as the fried version, but it's still incredibly delicious.
→ What should I serve with chicken parmesan?
My absolute favorite way to serve it is over a bed of simple spaghetti tossed with a little bit of the same marinara sauce. It's a classic for a reason! However, it's also lovely with a side of garlic bread to mop up the extra sauce, a fresh, crisp green salad with a simple vinaigrette to cut through the richness, or even some roasted broccoli or zucchini. For dessert, something simple and comforting like my chocolate chip banana bread is always a hit.
→ Can I make this recipe ahead of time?
Yes, you can do some of the prep in advance to make dinnertime easier. You can bread the chicken cutlets a few hours ahead and store them in a single layer on a baking sheet in the refrigerator. I wouldn't recommend fully assembling and baking it ahead of time, as that's when sogginess can creep in. However, frying the chicken and then assembling just before baking works beautifully. It's a great way to get a head start on a busy evening.
→ Why is my chicken tough or rubbery?
Ugh, that's the most disappointing outcome! This usually happens for two reasons: the thickness of the chicken or overcooking. It’s so important to pound the chicken to an even, thin consistency (about 1/4-inch). This ensures it cooks quickly and evenly. Because the cutlets are so thin, they only need a few minutes of frying and then a short time in the oven. The chicken is likely fully cooked after the frying stage, so the oven time is really just about melting the cheese and warming everything through. Use a meat thermometer if you're unsure—it should register 165°F.
→ What's the best kind of sauce to use?
Honestly, the best sauce is the one you love the most! A high-quality store-bought marinara sauce works beautifully here and is a fantastic time-saver. Look for one with simple ingredients, like tomatoes, garlic, onion, and herbs. Of course, if you have a favorite homemade marinara recipe, that will make it even more special. The key is to use a sauce with a rich, vibrant tomato flavor that will complement the savory chicken and cheese.
→ Can I make a gluten-free version of this?
Yes, absolutely! It's very easy to adapt. Simply swap the all-purpose flour for a gluten-free all-purpose blend, and use gluten-free Panko or regular gluten-free breadcrumbs. The rest of the ingredients are naturally gluten-free, but always double-check your labels, especially on the marinara sauce. The result is just as delicious, so everyone can enjoy it. It's almost as easy as my gluten-free banana bread!
Nutrition Facts
per serving
580
Calories
45g
Protein
35g
Carbs
30g
Fat
Taste Profile
Richly savory and deeply comforting, with the umami of Parmesan and tomato balanced by the creamy, milky flavor of fresh mozzarella.
Ingredient Substitutions
Don't have an ingredient? Try these alternatives
Both turkey and veal work beautifully in this recipe. Just be sure to pound them to an even thickness and adjust cooking time as needed, as they can cook even faster than chicken.
If you don't have Panko, regular breadcrumbs will work. The coating won't be quite as light and crispy, but it will still be delicious. Seasoned crushed crackers (like saltines or Ritz) also make a tasty crust.
Recipe Variations
Try these delicious twists on the original
Spicy Chicken Parmesan
For a little bit of a kick, add 1/2 teaspoon of red pepper flakes to your breadcrumb mixture. You can also use a spicy arrabbiata sauce instead of regular marinara for an extra layer of heat.
Chicken Parmesan with Prosciutto
To make it extra decadent, lay a thin slice of prosciutto on top of each chicken cutlet before adding the mozzarella cheese. It adds a wonderful salty, savory depth to the dish.
Common Mistakes to Avoid
Learn from others' mistakes for perfect results
- Not pounding the chicken thin enough, which leads to uneven cooking and tough meat.
- Frying in oil that isn't hot enough, which results in oily, soggy breading instead of a crisp crust.
- Overcrowding the pan, which steams the chicken instead of frying it.
- Using too much sauce, which drowns the crispy coating you worked so hard to achieve.
Meal Prep & Storage
Make Ahead Tips
You can prepare the chicken cutlets by breading them up to 4 hours in advance. Lay them in a single layer on a baking sheet, cover with plastic wrap, and refrigerate until you're ready to fry. You can also make your own marinara sauce up to 3 days ahead. For the best crispy texture, it's best to fry and assemble the dish just before serving.
Leftover Ideas
Leftover chicken parmesan makes an incredible sandwich! Just slice a cutlet and place it on a crusty roll with a little extra sauce and melted provolone cheese. You can also chop it up and toss it with pasta and extra sauce for a quick and easy baked ziti-style dish. Reheating in an oven or air fryer will give you the best texture.
Perfect Pairings
Serve this with...
Cooking Timeline
Prepare the chicken cutlets and set up your three-step breading station.
Bread all four chicken cutlets and let them rest for a moment.
Pan-fry the chicken in two batches until golden brown on both sides. Preheat the oven.
Assemble the chicken parmesan in the baking dish with sauce and cheese.
Bake until the cheese is melted and bubbly. Let it rest for a few minutes before serving.
 Cozy Classics
Easy Chocolate Chip Banana Bread
Moist chocolate chip banana bread, quick to bake, perfect for cozy breakfasts.
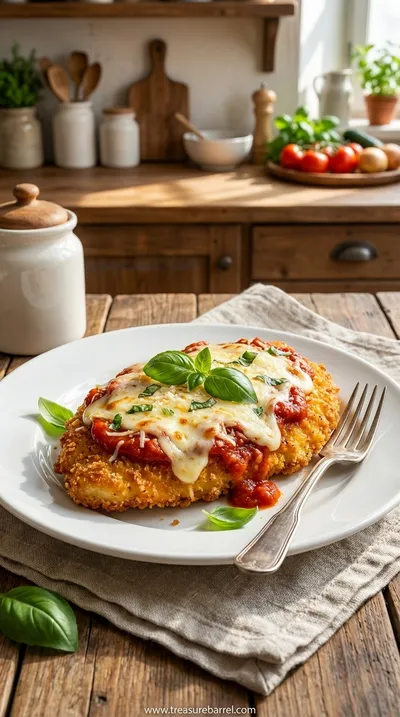
Easy Crispy Chicken Parmesan Recipe
Make this crispy chicken parmesan with a golden crust and cheesy topping. A comforting family favorite that's simple to prepare.
Timing
Prep Time
20 Minutes
Cook Time
25 Minutes
Total Time
45 Minutes
Recipe Details
Ingredients
For the Chicken
-
01
2 large boneless, skinless chicken breasts (about 1.5 lbs total), sliced in half horizontally to make 4 thin cutlets
-
02
1/2 cup all-purpose flour
-
03
2 large eggs
-
04
1 1/2 cups Panko breadcrumbs
-
05
1/2 cup grated Parmesan cheese
-
06
1 tsp garlic powder
-
07
1 tsp dried oregano
-
08
1/2 tsp salt
-
09
1/4 tsp black pepper
-
10
1/4 cup olive oil, for frying
For Assembly
-
01
2 cups marinara sauce, store-bought or homemade
-
02
8 oz fresh mozzarella cheese, patted dry and sliced or torn
-
03
1/4 cup grated Parmesan cheese, for topping
-
04
Fresh basil or parsley, for garnish
Instructions
First, let’s prepare our beautiful chicken. If you haven't already, slice your chicken breasts in half horizontally to create four thin cutlets. Place them between two sheets of parchment paper or plastic wrap and gently pound them to an even 1/4-inch thickness. This is key for tender, quick-cooking chicken. Set up your breading station with three shallow dishes. In the first, whisk together the flour, salt, and pepper. In the second, lightly beat the eggs. In the third, combine the Panko breadcrumbs, 1/2 cup of Parmesan, garlic powder, and oregano. This little assembly line makes everything flow so smoothly.
Now for the coating ritual. Take one chicken cutlet and dredge it in the flour mixture, making sure to coat both sides, then gently shake off any excess. Dip it into the beaten eggs, letting any extra drip back into the bowl. Finally, press the cutlet firmly into the Panko mixture, coating it completely. Pat the breadcrumbs on so they really adhere. Set the breaded chicken on a clean plate or wire rack and repeat with the remaining cutlets. Let them rest for a few minutes; this helps the coating set.
It's time to get that golden crust. Heat the olive oil in a large skillet over medium-high heat. The oil should be shimmering but not smoking. Carefully place two chicken cutlets in the pan, being sure not to overcrowd it. Cook for about 2-3 minutes per side, until they are a beautiful, deep golden brown and crispy. You're not trying to cook them all the way through just yet. Transfer the cooked chicken to a wire rack and repeat with the remaining cutlets, adding a little more oil if needed. Preheat your oven to 400°F (200°C) while you fry.
Let's bring it all together. Spread about a cup of marinara sauce evenly over the bottom of a 9x13-inch baking dish. Arrange the golden chicken cutlets in a single layer on top of the sauce. Spoon a tablespoon or two of the remaining sauce over each piece of chicken. Top each cutlet with a generous amount of fresh mozzarella and a sprinkle of the remaining Parmesan cheese. Bake for 10-15 minutes, or until the chicken is cooked through and the cheese is melted, bubbly, and just starting to brown. Let it rest for a few minutes before serving, garnished with fresh basil. Wow, just look at that.
Notes & Tips
-
1
Don’t be shy with seasoning the breadcrumbs! This is where so much of the flavor comes from. The Parmesan, garlic, and oregano create a savory crust that tastes incredible on its own. It's a simple step that adds so much depth.
-
2
Using a wire rack to rest the chicken after frying is a small step with a big payoff. It allows air to circulate underneath, preventing the bottom crust from steaming and becoming soggy while you cook the other pieces. It keeps everything perfectly crisp.
-
3
Feel free to make this your own! Sometimes I add a pinch of red pepper flakes to the breadcrumbs for a little warmth. If you love a lot of sauce, feel free to add more, or serve extra on the side for dipping. Cooking should feel personal, and after a rich meal, a simple slice of simple banana bread can be the perfect ending.
Tools You'll Need
-
Large Skillet: A 12-inch cast-iron or stainless steel skillet is perfect for getting a beautiful, even golden-brown crust on the chicken. The heavy bottom retains heat well, which is essential for shallow frying.
-
Shallow Dishes or Pie Plates: You'll need three of these for your breading station. They make it easy to dredge the chicken in the flour, egg, and breadcrumbs without making a huge mess on your counter.
-
Meat Mallet or Rolling Pin: This is essential for pounding the chicken into thin, even cutlets. This step ensures the chicken cooks quickly and stays tender and juicy. A heavy rolling pin or even a wine bottle can work in a pinch!
-
9x13-inch Baking Dish: A standard casserole or baking dish is the perfect vessel for the final assembly. It gives the chicken enough space to lie in a single layer so the cheese can melt perfectly over each piece.
-
Wire Rack: I can't recommend this enough! Placing the fried chicken on a wire rack to rest is the secret to maintaining a crispy crust on all sides before it goes into the oven.
Must-Know Tips
-
Pound it Thin: Don't skip pounding the chicken. An even 1/4-inch thickness is the secret to juicy, tender chicken that cooks in minutes.
-
Don't Drown It: Be judicious with the sauce on top of the chicken. Too much sauce will turn your crispy crust into a soggy mess. A spoonful or two is all you need.
-
Fresh is Best: If possible, use a block of fresh mozzarella and grate or slice it yourself. It melts into a much creamier, gooier layer than pre-shredded cheese.
Professional Secrets
-
Season Every Layer: Add a pinch of salt and pepper to the flour, the eggs, and the breadcrumbs. Building flavor at each step makes a huge difference in the final taste.
-
Let It Rest: After breading the chicken, let it sit for 5-10 minutes. This helps the coating adhere to the chicken, so it won't fall off during frying.
-
Hot Pan, Golden Crust: Make sure your oil is properly heated before adding the chicken. A hot pan is essential for creating that instant, crispy seal that locks in the juices.

Recipe by
Clara JoyClara’s kitchen is all about family 👨👩👧👦💖, sharing timeless favorites 🍝🍰, and creating memories 🕯️✨. She loves easy meals 🍳 and heartwarmi ...
Get Delicious Recipes Weekly
Join 25,000+ home cooks getting our best recipes straight to their inbox.
Free forever • No spam • Unsubscribe anytime