
I remember my grandmother’s kitchen, always warm and filled with the scent of something wonderful. She had this old, chipped enamel roasting pan that had seen countless family dinners. This recipe feels like a direct descendant of those memories. She never used a written recipe for her chicken; it was all touch and feel, a little of this, a little of that. I’ve tried to capture that same intuitive, loving approach here. The first time I made this specific garlic butter version, it was for a quiet dinner with my husband after a long week. The world felt so chaotic outside, but inside, the smell of roasting garlic and thyme was like a shield. We sat at our little kitchen table, the chicken golden and glistening between us, and for an hour, everything felt simple and right. That’s what this dish is to me—a moment of peace on a plate. It’s the kind of comfort food that wraps you in a hug. Sometimes, for dessert, I'll whip up an easy banana bread, because, honestly, why not extend that feeling of comfort a little longer?
Why You'll Adore This Recipe
-
Effortlessly Elegant: This dish looks and tastes like something you’d spend hours on, but honestly, it’s so simple to put together. The oven does most of the work, leaving you with a beautiful, golden-brown chicken that’s perfect for guests or just a quiet night in. It’s my go-to for feeling a little fancy without any of the stress.
-
An Aroma That Fills Your Home: Wow, the smell. As this chicken roasts, your entire home will be filled with the most incredible fragrance of melting butter, savory garlic, and earthy herbs. It’s more than just cooking; it’s creating an atmosphere of warmth and welcome before the meal even hits the table.
-
Incredibly Juicy and Flavorful: The garlic butter doesn’t just sit on top; it seeps into the chicken, basting it from the inside out and keeping every single bite succulent and tender. The skin gets impossibly crispy and golden, while the meat underneath just melts in your mouth. It's a texture and flavor combination that is just, ugh, so good.
-
Wonderfully Versatile: I love how adaptable this recipe is. You can serve it with anything from creamy mashed potatoes to a simple green salad. The classic flavors pair beautifully with roasted vegetables, rice, or crusty bread for dipping in that amazing pan sauce. It’s a true kitchen chameleon.
This recipe is pure comfort. The chicken was so juicy and the garlic butter sauce is just heavenly. A new family favorite!
Essential Ingredient Guide
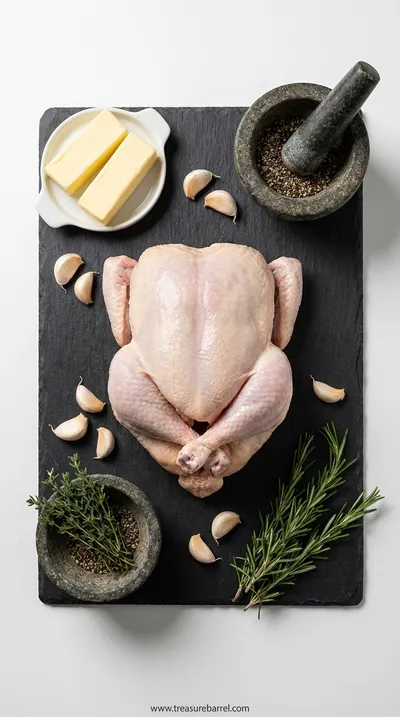
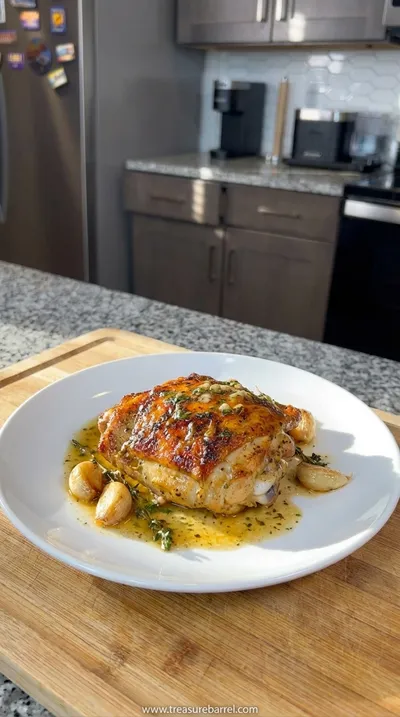
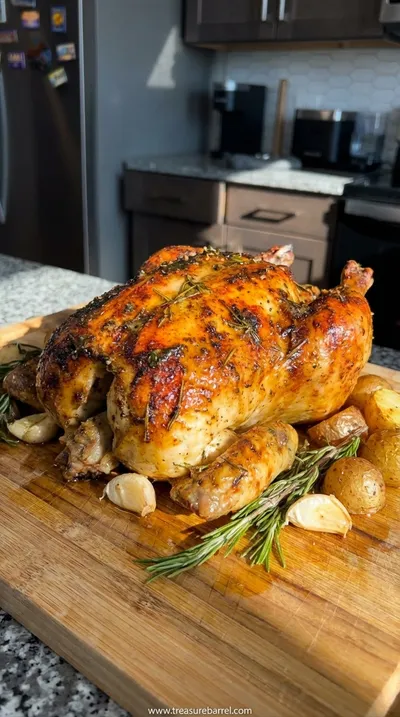
- A Whole Chicken: Look, the star of the show really deserves a moment. I always opt for a good quality, free-range chicken, around 3.5 to 4 pounds. I find they have a richer flavor and a better texture. The most important step, honestly, is patting it completely dry with paper towels before you start. This little bit of prep is the secret to getting that beautiful, crispy, golden-brown skin we all crave. Don’t skip it!
- Fresh Garlic: Please, please use fresh garlic for this. The stuff in a jar just doesn't have the same vibrant, pungent flavor that makes this dish sing. I use a whole head of garlic, sometimes more if I’m feeling it. Mincing it releases all those essential oils, which then infuse the butter and create a sauce that is just heavenly. That moment when the garlic hits the melted butter… wow, that’s one of my favorite kitchen smells.
- Unsalted Butter: Good quality butter is essential here because it’s a primary flavor. I always use unsalted so I can control the seasoning myself. You want it softened to room temperature, almost spreadable, so it mixes beautifully with the garlic and herbs. This luscious compound butter gets gently rubbed all over and under the skin, which is what makes the chicken so incredibly moist and the skin so crisp. It's a simple touch, but it makes all the difference.
 Warm Meals
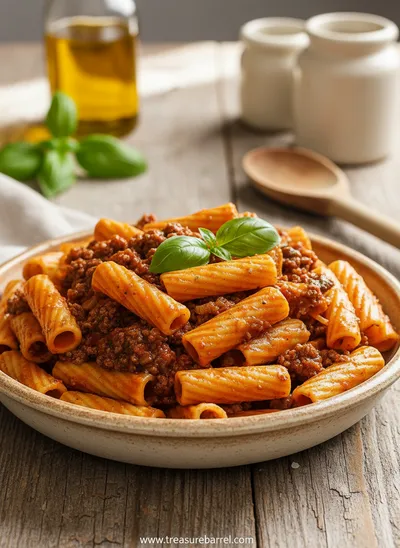
Beef Ragu Pasta Recipe in Tomato Sauce
A rich and hearty pasta dish with slow-cooked beef ragu in a savory tomato sauce.
Complete Cooking Process
-
The Gentle Preparation:
This first stage is all about quiet intention. Think of it as setting the stage for something beautiful. You'll start by making the garlic butter, which feels so lovely and creative. Mashing the softened butter with fragrant minced garlic, fresh herbs, salt, and pepper is a very tactile, grounding process. I love doing this in a simple bowl with a fork. Then, you’ll gently prepare the chicken, patting it dry and carefully loosening the skin. This allows you to tuck that gorgeous butter mixture underneath, ensuring every part of the chicken is seasoned and destined for juiciness.
-
The Roasting Magic:
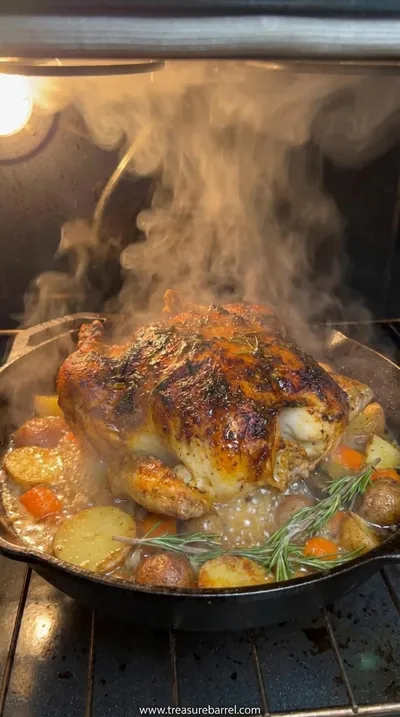
Now comes the patient part, where the oven takes over and works its magic. The chicken is placed in the roasting pan, surrounded by a few extra aromatics if you like—I love adding lemon halves and a few more garlic cloves to the pan. As it roasts, the butter melts and sizzles, basting the chicken continuously. The kitchen begins to fill with that incredible, mouth-watering aroma. I like to peek through the oven door every so often, just to watch it transform, the skin slowly turning a deeper shade of gold. It’s a slow, beautiful process that you can feel in the air.
-
Resting and Serving:
This might be the hardest part—waiting! Once the chicken is perfectly roasted, golden and sizzling, you must let it rest. This allows all those wonderful juices to redistribute back into the meat, ensuring every slice is tender and succulent. Tent it loosely with foil and let it sit on the cutting board for at least 10 to 15 minutes. Use this time to spoon those glorious pan drippings into a small pitcher. Carving the chicken and serving it with that liquid gold sauce is the final, satisfying step of this beautiful ritual.
-
Bring the Chicken to Room Temp: Let the chicken sit out of the fridge for about 30-45 minutes before roasting. This helps it cook more evenly.
-
Don't Be Shy with Seasoning: Season the chicken generously, both inside the cavity and all over the skin. Salt is key for flavor and crispy skin.
-
Tuck the Wings: Tucking the wing tips under the body of the chicken prevents them from burning and helps the chicken sit more stably in the pan.
-
Use a Meat Thermometer: It's the most reliable way to know when your chicken is perfectly cooked. You're looking for 165°F (74°C) in the thickest part of the thigh.
Pro Tips for a Perfect Roast
These little details, honestly, are what elevate a good chicken to a truly great one. They’re simple gestures of care that you can taste in the final dish.
Creating the Perfect Pan Sauce
Once you remove the chicken to rest, don't you dare discard those browned bits and juices in the bottom of the roasting pan. That's pure flavor! You can place the pan over a stovetop burner on medium heat, add a splash of chicken broth or water, and gently scrape up all those delicious caramelized pieces with a wooden spoon. Let it simmer for a few minutes until it reduces slightly. You can strain it if you like, but I personally love the rustic texture. It creates the most incredible, simple sauce to drizzle over the carved chicken and mashed potatoes.
You Must Know
-
Patting the chicken skin completely dry is non-negotiable for crispiness.
-
Getting butter under the skin is the secret to moist breast meat.
-
Resting the chicken after roasting is just as important as the cooking itself.
Frequently Asked Questions
→ Can I use chicken pieces instead of a whole chicken?
Absolutely, you can! This recipe works beautifully with bone-in, skin-on chicken thighs or breasts. You’ll just need to adjust the cooking time. Thighs will probably take around 35-45 minutes, and breasts a bit less, around 25-35 minutes, depending on their size. The key is to use a meat thermometer to ensure they reach that safe internal temperature of 165°F. The garlic butter is just as lovely melted over individual pieces.
→ What herbs work best with the garlic butter?
Oh, this is the fun part where you can play! I adore the classic combination of thyme and rosemary. They are so robust and earthy, and they just scream 'roast chicken' to me. However, parsley adds a lovely freshness, sage would give it a cozy, autumnal feel, and even a little bit of marjoram would be wonderful. I’d recommend using fresh herbs if you can, as their flavor is so much more vibrant and aromatic.
→ How do I get the skin extra crispy?
I have a few little tricks for this! First, as I mentioned, patting the chicken extremely dry is the most important step. Moisture is the enemy of crispiness. Second, make sure your oven is fully preheated. A good blast of initial heat helps render the fat and start the crisping process. Finally, a generous sprinkle of salt on the skin draws out moisture and helps it brown beautifully. If at the end it's still not as crisp as you'd like, you can pop it under the broiler for just a minute or two, but watch it like a hawk so it doesn't burn!
→ What should I serve with this chicken?
This chicken is such a gracious host; it gets along with so many side dishes. Creamy mashed potatoes are a classic for soaking up those pan juices. I also love simple roasted vegetables like carrots, potatoes, and broccoli that can cook right alongside the chicken. A simple green salad with a bright vinaigrette is perfect for cutting through the richness. And for dessert, something simple and comforting is always the answer. We often have moist banana bread waiting on the counter.
→ Can I prepare this recipe ahead of time?
Yes, you can do some of the prep ahead to make things easier. The garlic butter compound can be made up to three days in advance and stored in an airtight container in the refrigerator. You can also season the chicken and rub the butter under the skin a day ahead. Just store it, covered, in the fridge. This actually acts as a bit of a dry brine, making the chicken even more flavorful. Just remember to let it sit out for about 30 minutes before it goes into the oven.
→ My garlic burned. What did I do wrong?
Oh, that can happen! Sometimes, if the minced garlic is too exposed on the top surface of the chicken, it can toast a little too quickly in the direct heat of the oven. To prevent this, make sure most of the garlic butter is rubbed under the skin rather than just on top of it. You can also tent the chicken loosely with foil if you notice the top browning too fast, then remove it for the last 15-20 minutes of cooking to finish crisping the skin. It’s a delicate balance!
→ What's the best way to use the leftovers?
Leftover roast chicken is honestly one of my favorite things. The possibilities are endless! You can shred the meat for chicken salad sandwiches, add it to soups or pastas, or make a quick chicken pot pie. I also love to use the carcass to make a nourishing homemade chicken stock. It feels so wonderful to use every single part and let nothing go to waste. It’s almost as satisfying as baking the best banana bread from scratch.
Nutrition Facts
per serving
450
Calories
40g
Protein
2g
Carbs
30g
Fat
Taste Profile
Rich, savory, and deeply comforting with prominent notes of roasted garlic, butter, and herbs.
Ingredient Substitutions
Don't have an ingredient? Try these alternatives
Ghee (clarified butter) will give you a similar rich flavor with a higher smoke point. Olive oil can also be used for a dairy-free option; it will result in a slightly different, more fruity flavor profile.
If you don't have fresh herbs, you can use dried ones. Just remember the general rule: use about one-third the amount of dried herbs as you would fresh. So, about 1 teaspoon of dried thyme instead of 1 tablespoon of fresh.
Recipe Variations
Try these delicious twists on the original
Lemony Herb Version
Add the zest of one whole lemon to the garlic butter mixture. This adds a beautiful, bright citrus note that cuts through the richness of the butter and makes the whole dish feel a little lighter.
Spicy Paprika Version
For a bit of warmth and color, add a teaspoon of smoked paprika and a pinch of cayenne pepper to the butter. This will give the chicken a gorgeous reddish-gold hue and a subtle, smoky heat.
Common Mistakes to Avoid
Learn from others' mistakes for perfect results
- Forgetting to pat the chicken skin dry, which results in soggy skin.
- Not letting the chicken rest after roasting, which leads to dry meat.
- Under-seasoning. A whole chicken needs a generous amount of salt to be flavorful.
- Crowding the pan with too many vegetables, which can steam the chicken instead of roasting it.
Meal Prep & Storage
Make Ahead Tips
The garlic herb butter can be prepared up to 3 days in advance and kept in the fridge; just let it soften a bit before using. You can also fully prep the chicken with the butter under the skin up to 24 hours ahead. Store it covered in the fridge. This acts as a dry brine and actually enhances the flavor!
Leftover Ideas
Leftover chicken is a dream! Shred the meat and use it for chicken salad, tacos, or add it to a soup. The bones can be used to make a beautiful, nourishing homemade chicken stock. I love to reheat slices gently in a skillet with a splash of broth to keep them moist.
Perfect Pairings
Serve this with...
Cooking Timeline
Preheat oven. Pat chicken dry. Prepare the garlic herb butter.
Gently loosen the chicken skin and rub the butter mixture underneath and all over the outside.
Roast the chicken in the preheated oven for approximately 1 hour and 15 minutes.
Remove chicken from the oven and let it rest, tented with foil, for 10-15 minutes.
Carve the chicken and serve warm with the pan drippings.
 Warm Meals
Garlic Steak Tortellini – A Warm Classic
Steak meets garlic‑kissed tortellini in a creamy, herb‑filled sauce for a cozy night in.
Oven Roasted Garlic Butter Chicken Recipe
Juicy oven roasted chicken with rich garlic butter flavor. A simple, delicious meal that's perfect for family dinners and cozy gatherings.
Timing
Prep Time
20 Minutes
Cook Time
1 Hour 15 Minutes
Total Time
1 Hour 35 Minutes
Recipe Details
Ingredients
For the Chicken
-
01
1 whole chicken (about 3.5 to 4 lbs)
-
02
1 teaspoon kosher salt
-
03
1/2 teaspoon black pepper
-
04
1 head of garlic, top sliced off (optional, for roasting)
-
05
1 lemon, halved (optional, for roasting)
For the Garlic Butter
-
01
1/2 cup (1 stick) unsalted butter, softened
-
02
8-10 cloves garlic, minced
-
03
2 tablespoons fresh parsley, finely chopped
-
04
1 tablespoon fresh thyme leaves
-
05
1 teaspoon fresh rosemary, finely chopped
-
06
1 teaspoon kosher salt
-
07
1/2 teaspoon black pepper
Instructions
First, let's set a calm mood. Preheat your oven to 400°F (200°C). Take your chicken out of the refrigerator and gently pat it completely dry with paper towels, inside and out. This step feels small, but it's so important for crispy skin. In a small bowl, combine your softened butter, minced garlic, all those fragrant fresh herbs, salt, and pepper. Use a fork to mash everything together until it’s a beautiful, aromatic paste. The smell alone is just… wow.
Now for the fun part. Gently slide your fingers between the chicken skin and the breast meat, being careful not to tear the skin, creating a little pocket. Take about two-thirds of your garlic butter and lovingly massage it directly onto the meat underneath the skin. This ensures the breast meat stays incredibly juicy. Take the remaining butter and rub it all over the outside of the chicken—the legs, the wings, everything. This will give you that gorgeous golden-brown color.
Place the chicken in a roasting pan or a large cast-iron skillet. If you're using them, you can tuck the lemon halves and the head of garlic into the cavity of the chicken or just place them around it in the pan. I like to tie the legs together with a bit of kitchen twine; it just helps everything cook a bit more evenly and looks so pretty. Now, it’s ready for its warm oven bath. Slide it into the preheated oven.
Roast for about 1 hour and 15 minutes, or until the juices run clear when you pierce the thigh and a meat thermometer reads 165°F (74°C). The timing can vary a bit depending on your oven and the size of your bird. During the last 20 minutes, you can baste the chicken with the pan drippings for an extra golden finish. Once it’s cooked, carefully remove it from the oven and transfer it to a cutting board. Let it rest, tented with foil, for at least 10-15 minutes before carving. This is the secret to a juicy, perfect chicken, I promise.
Notes & Tips
-
1
Letting the chicken come to room temperature for about 30 minutes before roasting helps it cook much more evenly. It’s a small pause that makes a big difference.
-
2
Feel free to add other root vegetables to the pan, like chopped carrots, onions, or potatoes. They'll roast in the delicious chicken drippings and become a built-in side dish.
-
3
Don't throw away the chicken carcass! It makes the most wonderful, flavorful homemade stock. Just cover it with water in a pot, add some vegetable scraps, and let it simmer for a few hours.
 Cozy Classics
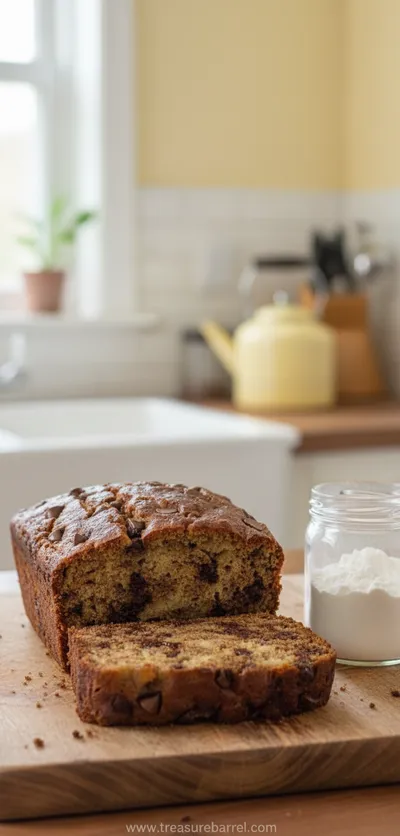
Easy Chocolate Chip Banana Bread
Moist chocolate chip banana bread, quick to bake, perfect for cozy breakfasts.
Tools You'll Need
-
Large Roasting Pan or Cast-Iron Skillet: You need something sturdy that can handle the heat of the oven and is large enough to hold the chicken without it being too crowded. A cast-iron skillet gives a fantastic, even heat.
-
Meat Thermometer: Honestly, this is the most valuable tool for roasting any kind of meat. It takes all the guesswork out of knowing when your chicken is perfectly and safely cooked. It’s a little piece of kitchen confidence.
-
Cutting Board with a Well: When you're carving the rested chicken, there will be so many delicious juices. A cutting board with a trench or well around the edge will catch all of that liquid gold so you can add it to your pan sauce.
-
Kitchen Twine: A simple tool for trussing the chicken. Tying the legs together helps the chicken cook more evenly and gives it a more compact, tidy shape for a beautiful presentation.
Must-Know Tips
-
Dry Skin is Key: I know I keep saying it, but patting the chicken skin completely dry with paper towels is the absolute number one rule for getting it crispy.
-
Butter Under the Skin: Don’t just butter the outside! Getting that flavorful compound butter underneath the skin directly onto the breast meat is the secret to preventing it from drying out.
-
Rest is Best: Please, let your beautiful roasted chicken rest before you carve it. The juices need time to settle back into the meat. If you cut it too soon, they will all run out, and your chicken will be dry. Patience is a virtue here!
Professional Secrets
-
A Bed of Aromatics: Roasting the chicken on a bed of sliced onions, carrots, and celery (a mirepoix) not only adds flavor to the chicken but also creates an incredibly flavorful base for your pan sauce.
-
Start Hot, Finish Lower: For exceptionally crispy skin, some chefs start the chicken in a very hot oven (around 450°F) for the first 15 minutes, then reduce the heat to 375°F for the remainder of the cooking time.
-
The Salt Matters: Using kosher salt for seasoning the skin makes a difference. The larger crystals adhere better and are more effective at drawing out moisture, leading to a crispier result.

Recipe by
Amelia RoseAmelia cooks hearty meals 🥘🔥, sharing warmth 💛 and cozy evenings 🕯️🍲. Every dish she makes is full of love ❤️ and family laughter 👩👩👧👦🍛.
Get Delicious Recipes Weekly
Join 25,000+ home cooks getting our best recipes straight to their inbox.
Free forever • No spam • Unsubscribe anytime