
I remember my daughter’s fifth birthday party. The theme was 'rainbows,' and all she wanted was a cake with 'stars and colors inside.' I spent days looking for the perfect recipe, and this is the one that was born from that search. The kitchen was a beautiful, chaotic mess of flour dust and stray sprinkles. When we finally cut into it, her gasp was just everything. The inside looked like a little pastel galaxy. It's a feeling I chase in my baking, whether I'm making this cake or a simple loaf of one-bowl banana bread on a quiet Sunday. It’s about creating those small, sensory moments of delight that stick with you long after the last crumb is gone. This cake isn't just about the taste; it's about the sparkle in someone's eyes when they see it.
Why You'll Love This Funfetti Cake
-
Pillowy Soft Texture: The combination of cake flour and buttermilk creates a crumb that is just impossibly tender and light. Each bite feels like a little cloud, melting in your mouth. It's not dense or heavy at all, which makes it feel so special and delicate.
-
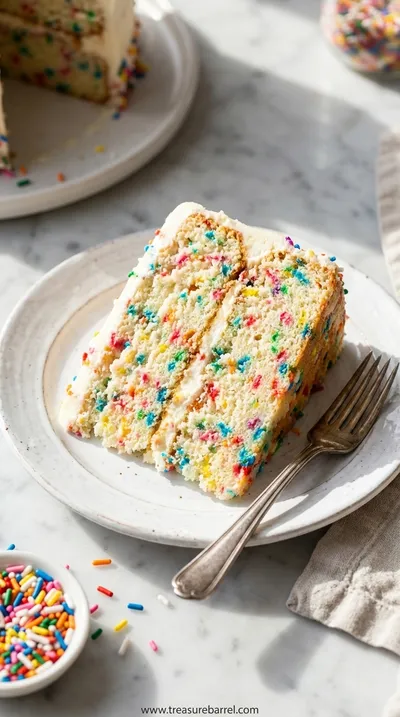
A Visual Delight: Let's be honest, we eat with our eyes first! The confetti of colorful sprinkles suspended in the pale cake is just pure happiness. It’s a cake that smiles back at you, making it the perfect centerpiece for birthdays and celebrations.
-
Classic, Nostalgic Flavor: The subtle hints of both vanilla and almond extract give this cake a classic, almost nostalgic bakery flavor that’s hard to resist. It reminds me of childhood birthday parties and simple, sweet moments that feel so warm and fuzzy.
-
Surprisingly Simple: Despite looking so festive and impressive, the process is incredibly straightforward. It's a recipe that feels grounding and satisfying to make, much like my favorite chocolate chip banana bread, proving that beautiful results don't always require complicated steps.
This cake is pure sunshine! So soft and fluffy, it's become our family's favorite for every single birthday celebration.
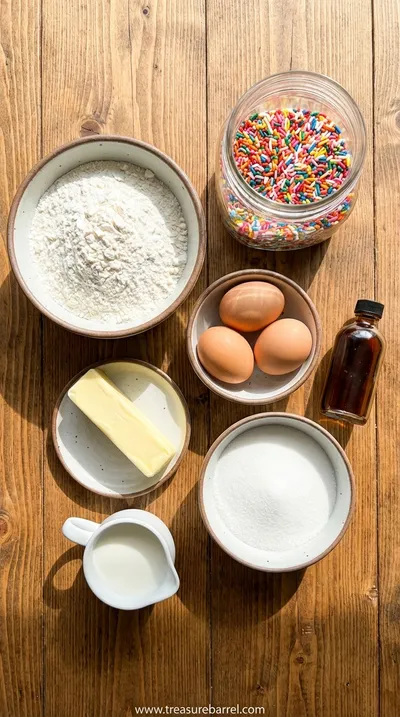
Essential Ingredient Guide
- Cake Flour: Please, if you can, use cake flour for this recipe. It has a lower protein content than all-purpose flour, which is the secret to that incredibly tender, fine crumb we're aiming for. It makes the cake structure so delicate and soft. If you absolutely can't find it, you can make a substitute, but the real thing really does make a noticeable difference in the final texture, giving it that professional bakery quality.
- Buttermilk: Buttermilk is another key player here. Its acidity reacts with the baking powder to give the cake an extra lift, making it super fluffy. It also adds a very subtle tang that beautifully balances the sweetness of the cake and frosting. I always recommend using full-fat buttermilk for the richest flavor and most tender result. It's an ingredient I also swear by in my recipe for the best banana bread.
- Rainbow Jimmies: Not all sprinkles are created equal for a funfetti cake! You want to use the long, thin kind called 'jimmies.' The little round ones ('nonpareils') tend to bleed their color into the batter much more easily, which can turn your lovely white cake a murky gray. Jimmies hold their shape and color much better during baking, giving you those distinct, cheerful flecks of color that everyone loves.
 Warm Meals
Honey Baked Salmon - Sweet & Savory
Sweet honey glaze meets buttery salmon for a comforting dinner.
Complete Cooking Process
-
Preparation:
This is where the calm begins. I love this part. You gather all your ingredients, measure them out, and arrange them on the counter. It’s like setting up your palette before you paint. Whisking the dry ingredients, letting the butter soften on the counter, cracking the egg whites into a little bowl… each step is a small, mindful moment. This process, so similar to getting ready to make an easy banana bread, centers me and prepares the kitchen for the wonderful smells that are about to fill it.
-
Mixing and Baking:
Now, the gentle hum of the mixer begins. Creaming the butter and sugar is such a transformative step; watching it go from grainy to light and fluffy is so satisfying. The key here is patience and not rushing the process. Alternating the wet and dry ingredients feels like a rhythm, a little dance. Then, the best part—folding in the sprinkles! You see the plain batter suddenly turn into something magical. Baking fills the house with the warmest, sweetest scent of vanilla and sugar, a comforting blanket of aroma.
-
Cooling and Assembly:
Patience is a virtue, especially when it comes to cooling cakes. You have to let them cool completely before you even think about frosting them. I use this time to whip up the buttercream, tasting it along the way, of course. Assembling the cake is my favorite design moment. Spreading that creamy, dreamy frosting over the cooled layers, smoothing the sides, and then, finally, adding a cascade of more sprinkles over the top. It feels like adding the final, joyful brushstrokes to a masterpiece.
-
Ensure all your cold ingredients (buttermilk, egg whites) are at room temperature. This helps them incorporate smoothly into the batter for a uniform texture.
-
Do not overmix the batter once you've added the flour! Mix just until the streaks of flour disappear. Overmixing develops gluten and will make your cake tough.
-
When folding in the sprinkles, use a light hand and as few strokes as possible to prevent their colors from bleeding into the beautiful white batter.
Pro Tips for a Perfect Cake
These little details, honestly, they make all the difference between a good cake and a truly unforgettable one.

Frequently Asked Questions
→ Can I make this cake in a 9x13 inch pan?
Absolutely! A 9x13 inch pan works beautifully for this recipe. The baking time will be similar, maybe a little longer, around 35-40 minutes. Just keep an eye on it and use the skewer test to check for doneness. It turns it into a lovely sheet cake, which is honestly so much easier to frost and serve for a big crowd. It's a great, low-stress option for parties and gatherings.
→ How do I prevent my sprinkles from sinking to the bottom?
This is a great question! The key is a properly thickened batter and a gentle hand. First, make sure your batter isn't too thin. Following the recipe with cake flour should give you the right consistency. Second, sometimes tossing the sprinkles in a tablespoon of the dry flour mixture before folding them in can help suspend them. But the most important thing is to fold them in right at the very end and not overmix.
→ Can I prepare this cake in advance?
Yes, you can, and it's a great way to make party day less stressful. The cake layers can be baked a day ahead. Once they are completely cool, wrap them tightly in plastic wrap and store them at room temperature. The frosting can also be made ahead and stored in an airtight container in the refrigerator for up to a week. Just let it come to room temperature and give it a good whip with your mixer to make it fluffy again before frosting the cake.
→ My frosting seems too sweet. Is there a way to balance it?
I totally get that. American buttercream is known for its sweetness. To cut the sweetness, you can add a generous pinch of salt—more than you think you need, it really makes a difference. A tiny splash of lemon juice or even a tablespoon of cream cheese can also help balance it out. Another trick is to whip it for a very long time, an extra 5-7 minutes on high speed. This incorporates more air and makes it taste lighter and less intensely sweet.
→ What's the difference between funfetti and confetti cake?
Honestly, there isn't much of a difference! 'Funfetti' was originally a brand name from Pillsbury for their cake mix with sprinkles baked in. The name just stuck because it's so wonderfully catchy! 'Confetti cake' is the more generic term for any white or yellow cake with sprinkles folded into the batter. So, you can call it either one, but 'funfetti' just sounds a little more like a party, don't you think?
→ Can I use all-purpose flour instead of cake flour?
You can, but the texture will be noticeably different. The cake will be a bit denser and not as delicately tender as it would be with cake flour. If you must use all-purpose flour, I recommend sifting it a few times to aerate it. You can also try the DIY cake flour trick: for every cup of all-purpose flour, remove 2 tablespoons and replace them with 2 tablespoons of cornstarch, then sift it all together. It's a good substitute in a pinch, just like when I experiment with gluten-free banana bread.
→ Why does this recipe use only egg whites?
Using only egg whites is the secret to a bright, white cake crumb that really makes the colorful sprinkles pop. The yolks would give the cake a more yellow, traditional vanilla cake color and a slightly denser, richer texture. By omitting them, we get a lighter, fluffier cake that serves as the perfect crisp, white canvas for our rainbow confetti. It's a small detail that makes a big visual impact when you slice into the finished cake.
→ Any tips for getting perfectly flat cake layers for stacking?
Ugh, the dreaded cake dome! It happens to all of us. To help prevent this, you can try using bake-even strips, which are fabric strips you soak in water and wrap around the outside of your pans. They insulate the pan, forcing the cake to bake more evenly from the edges to the center. If you still get a dome, no worries at all! Just let the cake cool completely and then use a long serrated knife to gently level the top before you start the frosting process.
Nutrition Facts
per serving
480
Calories
4g
Protein
60g
Carbs
25g
Fat
Taste Profile
A beautifully sweet cake with prominent vanilla and subtle almond notes, balanced by a rich, buttery frosting.
Ingredient Substitutions
Don't have an ingredient? Try these alternatives
If you don't have buttermilk, you can make your own! Just add 1 tablespoon of white vinegar or lemon juice to 1 cup of regular milk, give it a stir, and let it sit for 5-10 minutes until it looks slightly curdled. It works perfectly.
You can use 2 whole eggs instead of 4 egg whites. Just be aware that this will give the cake a slightly richer, denser texture and a more yellowish color, which means the sprinkles won't 'pop' as much visually.
Recipe Variations
Try these delicious twists on the original
Lemon Funfetti Cake
Add the zest of one large lemon to the sugar and butter when creaming them together. This adds a beautiful, bright citrus note that cuts through the sweetness wonderfully.
Chocolate Chip Funfetti Cake
For a different kind of fun, substitute the rainbow sprinkles with 1/2 cup of mini chocolate chips. Fold them in gently just as you would with the sprinkles for a delicious chocolate-studded cake.
Common Mistakes to Avoid
Learn from others' mistakes for perfect results
- Overmixing the batter after adding flour, which develops gluten and makes the cake tough.
- Using cold ingredients straight from the fridge, which can result in a dense, curdled-looking batter.
- Opening the oven door too early, causing the cakes to collapse in the middle.
- Trying to frost a warm cake, which will cause the buttercream to melt into a soupy mess.
- Using nonpareils (the little balls) instead of jimmies (the long sprinkles), which can bleed their color into the batter.
Meal Prep & Storage
Make Ahead Tips
This is a great cake to prep in advance! The unfrosted cake layers can be baked, cooled completely, and then wrapped tightly in plastic wrap. They can be stored at room temperature for one day or in the freezer for up to a month. The buttercream can be made up to a week in advance and stored in an airtight container in the refrigerator. Just let it come to room temperature and re-whip it until fluffy before using.
Leftover Ideas
Leftover funfetti cake is a true delight. Store slices in an airtight container at room temperature for up to 3 days. I find it's even more moist the next day! For a fun treat, you can crumble up leftover cake and layer it in a glass with whipped cream and berries for a quick and pretty trifle. It's also delicious slightly warmed for a few seconds in the microwave to soften the frosting just a bit.
Perfect Pairings
Serve this with...
Cooking Timeline
Preheat oven and prepare cake pans. Measure and sift dry ingredients. Bring cold ingredients to room temperature.
Cream butter and sugar until light and fluffy. Add egg whites one by one, followed by extracts.
Alternate adding dry ingredients and buttermilk. Gently fold in sprinkles at the very end.
Pour batter into pans and bake for 30-35 minutes until a skewer comes out clean.
Cool cakes in pans for 10 minutes, then turn out onto a wire rack to cool completely. Prepare frosting and assemble the cake.
 Sweet Treats
Cranberry Orange Muffins
Tender muffins bursting with orange zest and tart cranberries, ideal for a comforting morning treat.
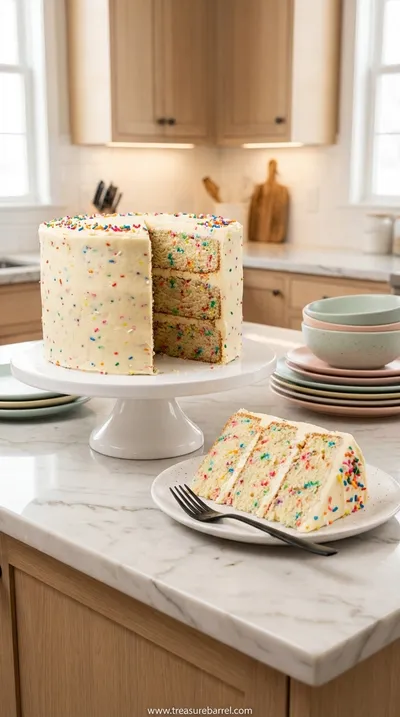
Soft & Moist Funfetti Cake: Easy Baking Recipe
Make this soft and moist funfetti cake with colorful sprinkles. A delightful homemade treat perfect for celebrations.
Timing
Prep Time
20 Minutes
Cook Time
35 Minutes
Total Time
55 Minutes
Recipe Details
Ingredients
For the Funfetti Cake
-
01
2 1/2 cups cake flour, sifted
-
02
2 teaspoons baking powder
-
03
1/2 teaspoon salt
-
04
1 cup unsalted butter, at room temperature
-
05
1 1/2 cups granulated sugar
-
06
4 large egg whites, at room temperature
-
07
1 teaspoon pure vanilla extract
-
08
1/2 teaspoon almond extract
-
09
1 cup buttermilk, at room temperature
-
10
1/2 cup rainbow sprinkles (jimmies)
For the Vanilla Buttercream
-
01
1 1/2 cups unsalted butter, softened
-
02
4 cups powdered sugar, sifted
-
03
1/4 cup heavy cream or milk
-
04
2 teaspoons pure vanilla extract
-
05
1/4 teaspoon salt
-
06
Extra rainbow sprinkles for decorating
Instructions
First things first, let’s get our space ready. It’s like setting a stage for a tiny, sweet performance. Preheat your oven to 350°F (175°C) and gently grease and flour two 8-inch round cake pans. I like to trace the bottom of the pan on parchment paper, cut it out, and lay it inside for extra insurance—no one wants a beautiful cake to stick, right? In a medium bowl, whisk together your dry ingredients: the cake flour, baking powder, and salt. Just give them a gentle stir to get them acquainted. This step feels so foundational, so full of possibility, much like prepping the pan for moist banana bread.
Now for the magic. In the bowl of your stand mixer, or with a hand mixer if that's your tool of choice, cream the softened butter and sugar together until it's light, fluffy, and a pale, buttery yellow. This can take a good 3-4 minutes, so be patient with it; you’re whipping air into the very soul of the cake. Scrape down the sides of the bowl once or twice. Next, add the egg whites one at a time, letting each one fully incorporate before adding the next. Then, pour in the vanilla and almond extracts. The whole kitchen will start to smell like a candy shop, honestly, it’s just dreamy.
This next part is a bit of a dance. You'll be alternating between adding the dry ingredients and the buttermilk to the creamed butter mixture. Start and end with the dry ingredients—I usually do it in three additions of flour and two of buttermilk. Mix on low speed just until the batter comes together. Ugh, please don't overmix! It’s the number one secret to a tender crumb, a lesson I learned the hard way when perfecting my best moist banana bread. Finally, with a spatula, gently, gently fold in those gorgeous sprinkles. You want to distribute them evenly without stirring so much that their colors start to bleed into the batter.
Okay, time to bake. Divide the batter evenly between your prepared pans and smooth the tops with your spatula. Pop them into the preheated oven and bake for about 30-35 minutes. You'll know they're done when a wooden skewer inserted into the center comes out with just a few moist crumbs attached. Let them cool in the pans for about 10 minutes before you carefully turn them out onto a wire rack to cool completely. And I mean completely—frosting a warm cake is a recipe for a soupy, sliding disaster. While they cool, you can whip up the buttercream frosting. Once the cakes are cool, frost and decorate your heart out!
Notes & Tips
-
1
Room temperature ingredients are non-negotiable for this recipe. They emulsify so much better, which results in a smoother batter and a more uniform, tender crumb. So, please, take the time to set your butter, egg whites, and buttermilk out on the counter for at least 30-60 minutes before you begin. It's a small step that makes a huge difference, I promise.
-
2
Be very gentle when you fold in the sprinkles. The goal is to distribute them with as few strokes as possible. If you stir too vigorously, their colors can streak and bleed into the batter, which can make the cake look a bit muddy instead of bright and confetti-like. Think gentle, sweeping motions from the bottom of the bowl up to the top.
-
3
Don't be afraid to really whip your buttercream. After all the ingredients are combined, turn the mixer up to medium-high and let it go for a full 5 minutes. This makes the frosting incredibly light, fluffy, and easier to spread. It also helps to lighten the color and mellow out the sweetness. This technique is as crucial here as it is for a foolproof banana bread recipe.
 Warm Meals
Best Chicken and Rice Casserole: Family Favorite Recipe
Savory chicken and rice bake with vegetables, ideal for make-ahead meals.
Tools You'll Need
-
This is pretty essential for properly creaming the butter and sugar, which is the foundation of the cake's light texture. You can do it by hand, but wow, it would be quite the workout! The mixer does the hard work of incorporating air into the batter for you.
-
I love the classic look of an 8-inch layer cake. It feels so celebratory. Make sure they are light-colored aluminum pans if possible, as darker pans can cause the edges to brown too quickly. You can also use 9-inch pans, but you'll need to reduce the baking time slightly.
-
A good spatula is your best friend in baking. You'll need it for scraping down the sides of the bowl to ensure everything is evenly mixed, and most importantly, for gently folding in those precious sprinkles without overmixing the batter. It's also key for getting every last bit of batter out of the bowl!
-
This is a must-have for properly cooling your cakes. Placing the hot cakes on a wire rack allows air to circulate all around them, preventing them from getting soggy on the bottom as they cool. This step is crucial for the cake's final texture and for successful frosting.
Must-Know Tips
-
Sift Your Dry Ingredients: Sifting the cake flour, baking powder, and salt removes lumps and aerates the mixture, contributing to a lighter, fluffier cake.
-
Scrape The Bowl Often: To ensure a homogenous batter, stop the mixer periodically and scrape down the sides and bottom of the bowl. This prevents pockets of unmixed butter or flour.
-
Don't Open The Oven Door: Resist the urge to peek while the cakes are baking, especially during the first 20 minutes. The rush of cold air can cause your beautiful cakes to sink in the middle.
Professional Secrets
-
A Touch of Almond Extract: The small amount of almond extract alongside the vanilla is what gives this cake that distinct, nostalgic 'bakery' flavor. It's subtle but it makes a huge difference.
-
Room Temperature is Key: I know it's mentioned a lot, but having every ingredient at the same, neutral temperature is what allows them to bond together perfectly into a smooth, stable emulsion.
-
A 'Crumb Coat' for Perfection: For a perfectly smooth, professional-looking finish, apply a very thin layer of frosting all over the cake and then chill it for 20-30 minutes. This traps all the loose crumbs, so your final layer of frosting will be pristine.

Recipe by
Sofia BelleSofia bakes with love 🧁💛, sweet smells filling her home 🍪🏡, and flour on her hands 🤲✨. She believes every loaf 🍞 and cake 🎂 tells a story of wa ...
Get Delicious Recipes Weekly
Join 25,000+ home cooks getting our best recipes straight to their inbox.
Free forever • No spam • Unsubscribe anytime