
I remember my grandmother’s hands, always dusted with a faint layer of flour, mashing bananas in her favorite yellow Pyrex bowl. She never used a mixer, just a fork and a whole lot of patience. She'd let me 'help' by stirring the dry ingredients, my small hands struggling to keep the flour from puffing up over the sides. Oops, I usually made a mess, but she never minded. She would just smile and say that a little mess means a lot of love went into it. This recipe is my version of hers, a little less sugar, maybe, but with all the same heart. Every time I bake it, I feel like I'm channeling that same calm, loving energy from her kitchen into my own. It's more than just a loaf of bread; it's a piece of my history, a tangible connection to those slow, sweet afternoons.
Why You'll Adore This Banana Bread
-
Incredibly Simple & Forgiving: You truly don't need any special equipment or skills for this. It all comes together in one bowl, and even if your measurements are a little off, it still turns out beautifully. It’s one of those quick comfort bakes that never fails.
-
Perfectly Moist Texture: The combination of very ripe bananas and melted butter creates a crumb that is just, wow, so tender and moist it practically melts in your mouth. It's the kind of texture that stays perfect for days, never drying out. It really is the best banana bread for that reason alone.
-
The Aroma is Everything: I mean, the taste is heavenly, but the smell that will fill your home is a gift in itself. It's a warm, caramelized banana and cinnamon scent that is the very definition of coziness. It makes your home feel like the safest, most welcoming place on earth.
-
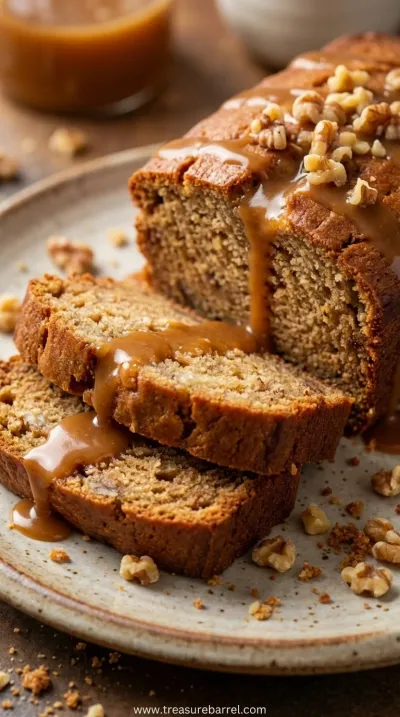
Endlessly Customizable: This recipe is a perfect canvas. You can add chocolate chips, walnuts, pecans, a swirl of cinnamon sugar... whatever your heart desires. It's a foundational recipe you can return to again and again, making it your own each time.
Honestly, this is the only banana bread recipe I use now. It’s foolproof and so, so good.
Essential Ingredient Guide
- Overripe Bananas: This is truly the most important part. You want bananas that are heavily speckled with brown, or even mostly black. They might look a little sad, but they are full of sugar and intense banana flavor, which is key to a sweet, moist loaf. Don't be tempted to use yellow bananas; the result just won't be the same. The natural sweetness of the ripe bananas means you don't have to add an overwhelming amount of sugar.
- Melted Butter: While some recipes use softened butter, I stand by melted. Using melted butter coats the flour differently, resulting in a denser, more tender crumb that I just love. It feels more luxurious. Plus, it’s just easier, isn't it? No need to wait for butter to come to room temperature; just a quick minute in the microwave or a small saucepan is all it takes.
- Brown Sugar: I love using brown sugar here instead of just white granulated sugar. The molasses in the brown sugar adds a wonderful depth, a caramel-like note that pairs so beautifully with the bananas. It also contributes to the incredible moisture of the final loaf. You can use light or dark brown sugar; dark will give you a slightly richer, more molasses-forward flavor.
 Home Baking
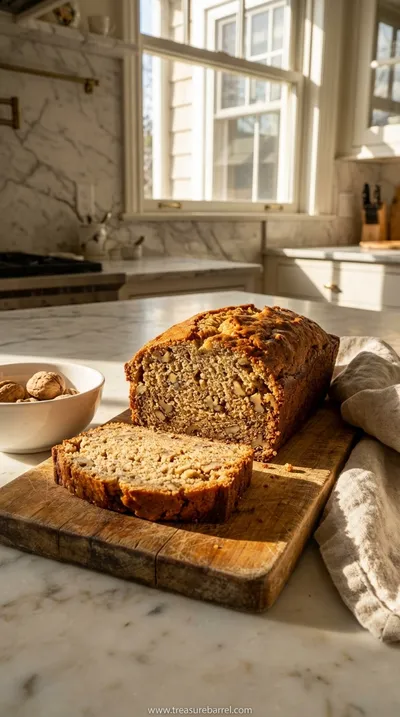
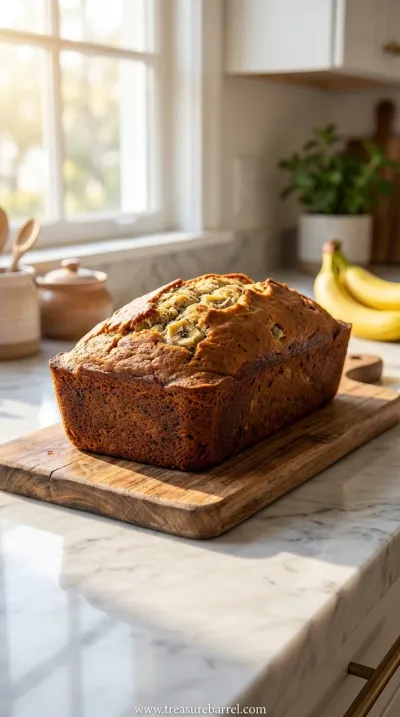
Best Banana Bread Recipe: Moist & Delicious
A classic, incredibly moist homemade banana bread. The perfect easy treat for any day.
Complete Cooking Process
-
Preparation:
First, take a deep breath and slow down. This part is about gathering and preparing, a quiet ritual before the magic happens. You'll want to preheat your oven so it’s ready and waiting, a warm embrace for your batter. I always grease and flour my loaf pan, or use parchment paper. It feels like tucking the bread into a cozy bed, ensuring it will slip out effortlessly later. Mash your bananas in a separate bowl until they're as smooth or as chunky as you like—I prefer a few small lumps for texture. Then, in a larger bowl, whisk together your dry ingredients, creating a light, airy foundation.
-
Mixing the Batter:
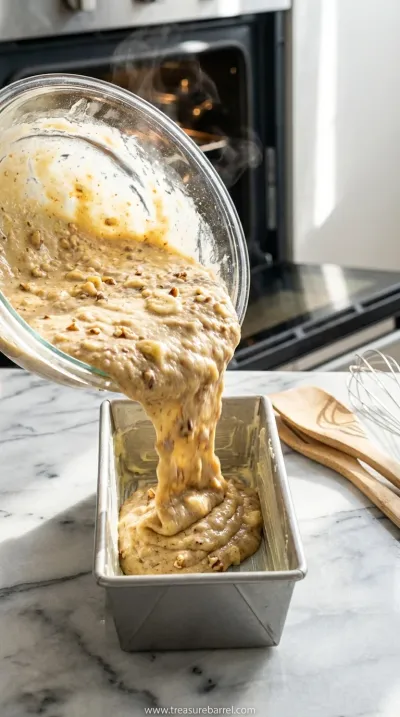
This is where it all comes together. Pour your wet ingredients—the mashed bananas, melted butter, egg, and vanilla—into the dry. Now, this is important: mix only until the flour streaks disappear. Over-mixing is the enemy of a tender crumb; it develops the gluten and can make your bread tough. It should look a little rustic, a bit lumpy, and that's perfectly okay. It's a sign you've done it just right. This one-bowl banana bread approach is part of its simple charm.
-
Baking to Perfection:
Pour the beautiful, thick batter into your prepared pan and gently smooth the top. Now, it goes into the oven, and the waiting game begins. For the next hour, your home will transform, filling with the most incredible aroma. About halfway through, the top will begin to brown and a crack will likely form down the center—that’s the signature look of a perfect loaf of banana bread. Let it bake until a skewer inserted into the center comes out clean or with a few moist crumbs attached. The patience here is worth it, I promise.
-
Don't over-mix! A few lumps in the batter are a good thing.
-
Check for doneness around the 50-minute mark, as all ovens are different.
-
Let the bread cool in the pan for at least 10-15 minutes before turning it out onto a wire rack. This helps it set.
Pro Tips for This Stage
These little details make all the difference, turning a good loaf into a great one. It's all part of the gentle art of home baking.
Frequently Asked Questions
→ My bananas aren't ripe enough. What can I do?
Oh, this is a common problem when a craving strikes! Don't worry. You can quickly ripen bananas by placing them, peel and all, on a baking sheet in a 300°F (150°C) oven for about 15-20 minutes. The peels will turn black and shiny, and the fruit inside will become soft and sweet, perfect for mashing. Just let them cool down a bit before you peel and mash them for the batter. It's a little trick that works like a charm every time.
→ Can I add mix-ins like nuts or chocolate chips?
Absolutely! This is one of my favorite ways to customize this bread. About one cup of mix-ins is perfect. For nuts, I love toasted walnuts or pecans for a lovely crunch. For something sweeter, you can't go wrong with semi-sweet chocolate chips. If you want a chocolatey version without butter, you might like this chocolate chip banana bread. To prevent your add-ins from sinking to the bottom, just toss them with a tablespoon of your dry flour mixture before folding them into the final batter. It’s a simple step that really helps.
→ How do I know when the banana bread is perfectly baked?
The visual cues are a great start: the top should be a deep golden brown, and you'll likely see a crack down the middle. But the most reliable test is the skewer test. Gently insert a wooden skewer, toothpick, or even a thin knife into the thickest part of the loaf. If it comes out clean, or with just a few moist crumbs clinging to it, it's done. If you see wet, raw batter, it needs more time. Give it another 5-7 minutes and check again.
→ Can I make this recipe into muffins?
Yes, this batter makes wonderful muffins! Just divide the batter evenly among a lined 12-cup muffin tin, filling each cup about two-thirds full. The baking time will be much shorter, of course. Start checking them around the 18-20 minute mark. They're done when a skewer inserted into the center comes out clean. They make such a lovely grab-and-go breakfast or snack.
→ Why did my banana bread sink in the middle?
Ugh, that's always so disappointing, isn't it? A sunken middle is usually caused by one of two things: under-baking or opening the oven door too often. If the center isn't fully cooked, the structure can't support itself and it will collapse as it cools. Also, opening the oven door causes the temperature to drop suddenly, which can make the rising bread fall. Make sure you bake it until the skewer test is successful, and try to resist peeking until you're near the end of the baking time.
→ How should I store the banana bread to keep it moist?
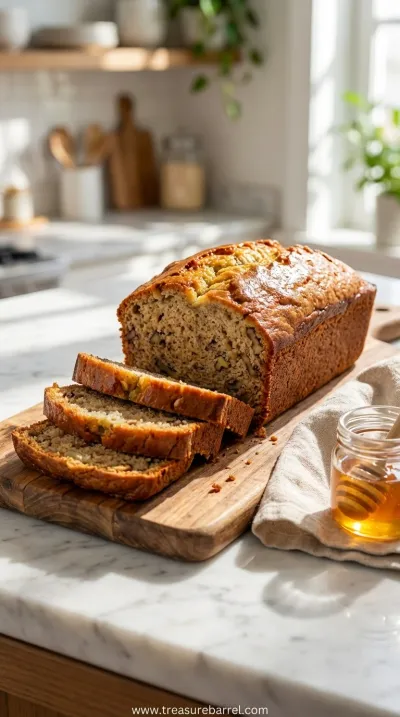
To keep that wonderful moist texture, allow the bread to cool completely on a wire rack first. This is a crucial step! Trapping steam in a container will make the top sticky. Once it's fully cool, wrap it tightly in plastic wrap or place it in an airtight container. It will stay perfectly moist at room temperature for up to four days. For me, part of the joy is slicing into it the next day and finding it just as good, if not better, making it one of my family favorites.
Nutrition Facts
per serving
220
Calories
3g
Protein
32g
Carbs
9g
Fat
Taste Profile
A beautifully balanced sweet flavor with deep, caramelized banana notes and a warm hint of cinnamon.
Ingredient Substitutions
Don't have an ingredient? Try these alternatives
You can substitute up to half of the all-purpose flour with whole wheat flour for a nuttier flavor and denser texture. A gluten-free all-purpose blend with xanthan gum can also be used.
For a dairy-free option, melted coconut oil works beautifully and adds a subtle, lovely flavor. A neutral oil like canola or vegetable oil will also work well.
You can substitute the brown sugar with an equal amount of maple syrup or honey for a different kind of sweetness. You may need to reduce other liquids slightly if you do.
Recipe Variations
Try these delicious twists on the original
Chocolate Chip Banana Bread
Fold in 1 cup of semi-sweet or dark chocolate chips into the batter at the end for a decadent, melty addition that everyone loves.
Nutty Banana Bread
Add 3/4 cup of toasted and chopped walnuts or pecans for a wonderful crunch and nutty flavor that complements the sweet banana perfectly.
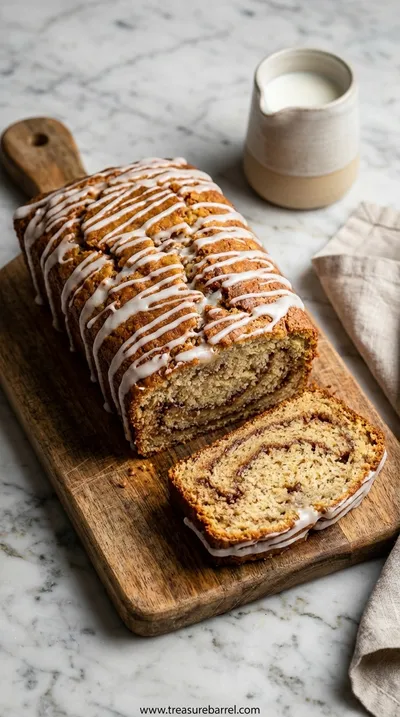
Cinnamon Swirl Banana Bread
Mix 1/4 cup brown sugar with 1 teaspoon of cinnamon. Pour half the batter into the pan, sprinkle the cinnamon-sugar mixture over it, then top with the remaining batter. Gently swirl with a knife before baking.
Common Mistakes to Avoid
Learn from others' mistakes for perfect results
- Using under-ripe bananas. This is the #1 mistake. Yellow or green-tinged bananas lack the sugar and moisture needed for great banana bread.
- Over-mixing the batter. This develops gluten and results in a tough, rubbery loaf instead of a tender one.
- Slicing it while it's still warm. It's so tempting, but this can cause the bread to be gummy and fall apart. Patience is key!
- Incorrect oven temperature. An oven that's too hot will brown the outside before the inside is cooked, leading to a raw center.
Meal Prep & Storage
Make Ahead Tips
This is a great recipe to prep ahead of time. You can whisk together all the dry ingredients and store them in an airtight container at room temperature. You can also mash the bananas and store them in an airtight container in the fridge for up to a day, though they may brown a bit (which is fine!). When you're ready to bake, just combine the wet ingredients, then fold in the dry mixture.
Leftover Ideas
Leftover banana bread is a true gift. Slices are perfect for a quick breakfast or afternoon snack. For a special treat, you can use day-old slices to make French toast—it's absolutely incredible! Another idea is to crumble it over yogurt or ice cream for a delicious topping. It rarely lasts long enough for leftovers in my house, though!
Perfect Pairings
Serve this with...
Cooking Timeline
Preheat oven and prepare loaf pan. Whisk dry ingredients in one bowl.
In a separate large bowl, mash bananas and mix with all other wet ingredients.
Gently fold the dry ingredients into the wet until just combined. Pour into pan.
Bake for 55-65 minutes, or until a skewer comes out clean.
Cool in the pan for 10 minutes, then transfer to a wire rack to cool completely.
The Best Banana Bread Recipe: Easy & Moist
Make the easiest, most delicious banana bread. Perfectly moist and packed with flavor for a cozy treat.
Timing
Prep Time
15 Minutes
Cook Time
60 Minutes
Total Time
1 Hour 15 Minutes
Recipe Details
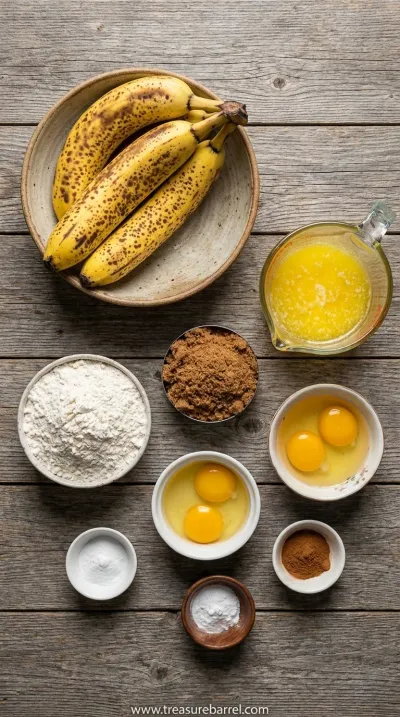
Ingredients
Dry Ingredients
-
01
1 1/2 cups all-purpose flour
-
02
1 teaspoon baking soda
-
03
1/2 teaspoon salt
-
04
1/2 teaspoon ground cinnamon
Wet Ingredients
-
01
3 large, very ripe bananas, mashed
-
02
1/2 cup unsalted butter, melted
-
03
3/4 cup packed brown sugar
-
04
1 large egg, lightly beaten
-
05
1 teaspoon vanilla extract
Instructions
First, let’s get the kitchen ready. It's a lovely, calming way to begin. Preheat your oven to 350°F (175°C). Find your favorite 9x5 inch loaf pan and grease it with a little butter or non-stick spray. I like to dust it with flour too, just to be sure nothing sticks. In a medium-sized bowl, whisk together the flour, baking soda, salt, and cinnamon. The simple act of sifting them together with a whisk feels so professional, doesn't it? Just let that bowl of dry ingredients sit patiently to the side for a moment.
Now for the heart of the bread. In a larger bowl, add your mashed bananas. Add the melted butter, the brown sugar, the lightly beaten egg, and that lovely vanilla extract. Use a spatula or a wooden spoon to gently combine everything. You don't need to beat it vigorously; a simple, gentle stir is all it takes to bring these beautiful ingredients together. The aroma at this stage is already so promising, a little preview of the deliciousness to come. This moist banana bread starts with this simple, fragrant mixture.
It's time to combine the two worlds. Pour the dry ingredients into the bowl with the wet ingredients. Now, this is the most important part of the whole process: mix only until the flour is just barely combined. Seriously, a few little streaks of flour are perfectly fine. If you over-mix, you'll develop the gluten in the flour and end up with a tough, dense bread. We want a tender, delicate crumb, so be gentle. The batter should be thick and a little lumpy. This is what handmade perfection looks like.
Gently pour your beautiful, rustic batter into the prepared loaf pan and use your spatula to smooth the top just a bit. Place it on the center rack of your preheated oven and let it bake for 55 to 65 minutes. The house will start to smell absolutely divine. When a wooden skewer inserted into the center comes out clean, it’s ready. Let it cool in the pan for about 10 minutes before you carefully turn it out onto a wire rack to cool completely. Oh, the patience required for that last step is the hardest part! But it's so worth it for that perfect slice of one of these cozy classics.
Notes & Tips
-
1
For the richest flavor, make sure your bananas are extremely ripe—the darker the peel, the better. They should be soft and intensely fragrant. This is where all the natural sweetness and moisture comes from, so it's a step you really can't skip for the best results.
-
2
Be careful not to over-mix the batter. Lumps are your friend! Mixing until just combined ensures a tender, light crumb. A tough banana bread is often the result of an over-enthusiastic stirring arm. Remember, gentle does it.
-
3
Feel free to make this your own! This is one of those lovely sweet treats that welcomes additions. A cup of chopped walnuts, pecans, or chocolate chips folded in at the very end makes this bread even more special. Just toss them in a bit of flour first to prevent them from sinking.

Tools You'll Need
-
9x5 Inch Loaf Pan: This is the classic size for banana bread. A metal pan will give you nice, crisp edges, while a glass or ceramic one might require a slightly longer baking time. Just make sure to grease it well!
-
Mixing Bowls: You'll need two bowls for this recipe—one for the dry ingredients and one for the wet. I love using my set of nested glass bowls; they feel so sturdy and clean, and I can see everything mixing together perfectly.
-
Whisk and Spatula: A whisk is perfect for aerating the dry ingredients and getting rid of any lumps. A flexible silicone spatula is my go-to for gently folding the wet and dry ingredients together and for scraping every last bit of batter out of the bowl.
-
Wire Cooling Rack: This is more important than you might think! Allowing the bread to cool on a wire rack lets air circulate all around it, preventing the bottom from becoming soggy as it releases steam. It's essential for achieving the perfect final texture.
Must-Know Tips
-
Use Overripe Bananas: The single most important tip! Black-streaked, mushy bananas are packed with sugar and flavor, which is the secret to a naturally sweet and moist loaf.
-
Do Not Overmix: Gently fold the dry ingredients into the wet until just combined. A few lumps are perfectly fine and actually desirable for a tender texture.
-
Cool Completely Before Slicing: I know it's tempting to cut into it while it's warm, but letting it cool completely allows the crumb to set, giving you clean, beautiful slices.
Professional Secrets
-
A Sprinkle of Sugar on Top: Before baking, sprinkle a tablespoon of turbinado or granulated sugar over the top of the batter. It creates a wonderfully crisp, crackly crust that provides a beautiful textural contrast to the soft interior.
-
Let the Batter Rest: If you have an extra 20 minutes, let the batter rest in the pan before baking. This allows the flour to fully hydrate, which can result in an even more tender and moist loaf.
-
Room Temperature Egg: Using an egg that's at room temperature will help it incorporate more evenly into the batter, creating a more uniform texture throughout the bread. It's a small detail that makes a difference.

Recipe by
Sofia BelleSofia bakes with love 🧁💛, sweet smells filling her home 🍪🏡, and flour on her hands 🤲✨. She believes every loaf 🍞 and cake 🎂 tells a story of wa ...
Get Delicious Recipes Weekly
Join 25,000+ home cooks getting our best recipes straight to their inbox.
Free forever • No spam • Unsubscribe anytime