
I was maybe eight years old the first time I helped make an apple pie. My grandmother had this enormous wooden table in her farmhouse kitchen, and we'd stand there for hours, peeling what felt like a mountain of apples. She'd tell me stories about her own mother making pies during the Great Depression, how they'd stretch the fruit with a few extra spices when times were lean. The cinnamon scent would cling to our clothes for days afterward, a sweet reminder of our time together.
Years later, when I had my own kitchen and my own grandchildren visiting, I realized I was continuing this beautiful tradition. There's something so grounding about the rhythm of slicing apples, measuring spices, rolling out dough. It's not just baking - it's weaving generations together with butter and flour and love. I've tweaked her recipe over the years, added a little more cinnamon because we all love that warmth, but the soul of it remains exactly as she taught me.
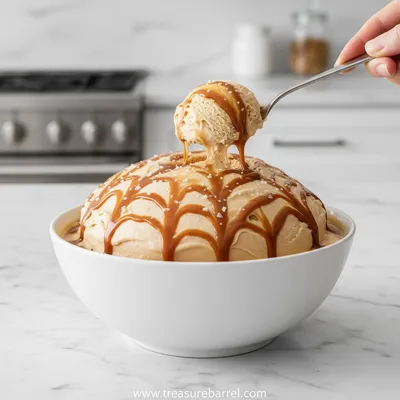
The first time I served it à la mode was actually an accident, honestly. We had unexpected guests and I'd run out of whipped cream, so I scooped some vanilla ice cream on top instead. The way the cold creaminess melted into the warm, spicy apples... oh my goodness, it was pure magic. Now I always keep vanilla ice cream in the freezer just for this moment - that perfect contrast of temperatures and textures that makes everyone's eyes light up.
Making this pie has gotten me through tough times too. When my husband was sick last winter, I'd bake one every Sunday, and the warm, comforting smell seemed to fill the whole house with hope. There's healing in this process, I think - in the careful measuring, the patient waiting, the sharing of something made with your own hands. It's more than dessert; it's a little piece of home you can hold on a plate.
Why You'll Love It
-
The nostalgia factor - Honestly, this pie tastes like childhood memories and cozy afternoons. The way the kitchen fills with that cinnamony-apple scent transports me back to my grandmother's farmhouse every single time. It's not just dessert - it's a warm hug in pie form, perfect for sharing with people you love around the kitchen table.
I remember making this for my daughter's first bake sale, and the way her little face lit up when people complimented her "fancy pie" - that's the magic right there. It makes ordinary moments feel special, you know?
-
The perfect textures - Oh, the flaky crust that shatters into buttery layers, the tender apples that still have a little bite to them, the way the ice cream melts into all the nooks and crannies... It's this beautiful dance of crisp and soft, warm and cold. Every bite feels like a little celebration.
I love how the apples hold their shape but become meltingly tender, and that cinnamon sugar caramelizes into the most gorgeous golden-brown top. It's the kind of dessert that makes you close your eyes and just savor the moment.
-
It's easier than you think - Look, I know pie can seem intimidating, but this recipe is so approachable. The dough comes together like a dream, and there's something so satisfying about creating this beautiful dessert from scratch. Once you get the rhythm of peeling and slicing, it becomes almost meditative.
I've taught so many nervous bakers this recipe, and every time they're amazed at how doable it is. The secret is not overthinking it - just good ingredients and a little patience. You've got this!
-
The à la mode magic - That moment when the cold vanilla ice cream hits the warm pie... wow. It's this perfect temperature contrast that elevates everything. The ice cream melts into the spiced apple juices, creating this incredible sauce right on the plate.
I always keep a carton of good vanilla ice cream in the freezer specifically for this pie. It turns a simple dessert into something truly spectacular, and honestly? It makes cleanup easier too - that melted ice cream sauce is delicious mopped up with the last bits of crust.
"My family insists I make this every Thanksgiving now - the cinnamon spice level is absolutely perfect and the crust flakes like a dream!" - Sarah J.
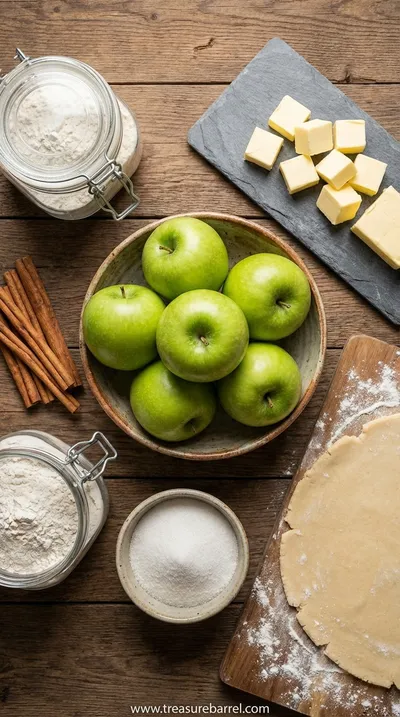
Essential Ingredient Guide
- Apples: I always use a mix of Granny Smith and Honeycrisp apples - the tart and sweet balance each other beautifully. The Granny Smiths hold their shape during baking while the Honeycrisps break down into that lovely saucy texture. Look for firm apples without bruises, and honestly? Don't stress about perfect slices - rustic is charming! Peeling apples can feel tedious, but there's something so satisfying about watching that pile of curls grow. I like to do this sitting at the kitchen table with a good podcast playing - it turns chore into quiet time.
- Cinnamon: Fresh cinnamon makes all the difference here. I buy whole cinnamon sticks and grind them myself sometimes - the aroma is just incredible. But a good quality pre-ground cinnamon works beautifully too. The warmth of this spice feels like autumn in a jar, you know? I love how the cinnamon mingles with the sugar and butter to create that classic pie scent that fills your whole house. It's the heart of this recipe, really - that warm, spicy note that makes everyone's faces light up when they walk in the kitchen.
- Pie Crust: Whether you make your own or use store-bought, the key is keeping everything cold. I chill my butter, my water, even my mixing bowl sometimes. That's what gives you those beautiful flaky layers that shatter when you cut into them. If you're new to pie-making, don't be afraid to start with a good quality store-bought crust - I won't tell! The important thing is that buttery, crisp texture that holds all those juicy apples. It's the perfect vessel for all that cinnamon-apple goodness.
 Warm Meals
Garlic Steak Tortellini – A Warm Classic
Steak meets garlic‑kissed tortellini in a creamy, herb‑filled sauce for a cozy night in.
Complete Cooking Process
-
Preparation:
I always start by clearing off my counter space - there's something so satisfying about having room to work. I get out my grandmother's big mixing bowl and start peeling apples, letting the curls fall into a pile. The sound of the peeler against the fruit is so rhythmic, almost musical.
As I slice the apples, I toss them with lemon juice to keep them from browning - that fresh citrus scent mixes so beautifully with the cinnamon. Then comes the measuring of spices, which I do in my little ceramic bowls first, watching the cinnamon dust settle like autumn leaves.
I love this part because it's where the magic begins - all these separate ingredients coming together, waiting to become something greater. The kitchen starts smelling like promise and memories all at once.
-
Assembly:
Rolling out the dough is my favorite part - there's something so therapeutic about the steady pressure, the way the crust expands under the rolling pin. I flour the surface just enough, remembering my grandmother's advice: "Like a light snowfall, not a blizzard."
Laying the bottom crust into the pie dish feels like tucking in a blanket - you want it to nestle comfortably into the corners. Then comes the apple filling, mounding it up high because it will settle as it bakes. I always sneak a few extra cinnamon sprinkles in there because, well, why not?
The top crust gets carefully draped over, and I press the edges together with my fingers, making those little fluted patterns my grandma taught me. It's these small touches that make a pie feel truly homemade, you know?
-
Baking:
Watching the pie transform in the oven is like watching magic happen. First, you smell the butter in the crust beginning to cook, then the cinnamon starts wafting through the house. About halfway through, I peek through the oven window to see the crust turning golden, the apples bubbling up around the edges.
The waiting is the hardest part, honestly. I usually putter around the kitchen, cleaning up my mess, but really I'm just watching the clock and breathing in that incredible scent. When the crust is deeply golden and the filling is bubbling vigorously, I know it's ready.
That moment when you take it out of the oven - the sheer beauty of it takes my breath away every time. The way the kitchen fills with that warm, spicy steam... it's pure comfort.
-
Chill your crust - After making the dough, let it rest in the fridge for at least 30 minutes. This prevents shrinking and makes it much easier to handle.
-
Vent the top - Cut slits in the top crust so steam can escape. I like to make a simple pattern - sometimes a star, sometimes just slashes.
-
Use a baking sheet - Place your pie dish on a baking sheet to catch any drips. Trust me, cleaning burnt sugar off the oven floor is no fun!
Pro Tips
These little tricks have saved me from many pie disasters over the years. The most important thing though? Don't stress - even if it's not perfect, it will still taste amazing!
 Cozy Classics
Easy Chocolate Chip Banana Bread
Moist chocolate chip banana bread, quick to bake, perfect for cozy breakfasts.
The Magic of À La Mode
There's something truly special about serving pie à la mode - that contrast of temperatures creates this magical experience that elevates simple dessert into something extraordinary. The way the cold, creamy ice cream slowly melts into the warm, spiced apples... it's pure poetry on a plate.
I remember the first time I tried it this way - we'd run out of whipped cream for a family gathering, and my quick-thinking aunt suggested vanilla ice cream instead. The combination was so perfect it became our new tradition instantly. Now I always keep a carton of good quality vanilla ice cream in the freezer specifically for pie occasions.
The beauty of this pairing is how it satisfies every texture craving - crisp crust, tender apples, creamy ice cream, and that wonderful sauce that forms as everything mingles together. It's the kind of dessert that makes people sigh with contentment after the first bite.
You Must Know
-
Let it rest - Wait at least 2 hours after baking before slicing. The filling needs time to set up properly.
-
Warm servings - If serving later, warm individual slices gently before adding ice cream.
-
Quality vanilla - Use good vanilla ice cream - it makes all the difference!
Frequently Asked Questions
→ Can I make this pie ahead of time?
Absolutely! You can prepare the pie up to two days ahead. I often make it the day before a gathering because honestly? The flavors deepen beautifully overnight. Just bake it completely, let it cool completely, then cover it tightly and refrigerate. When you're ready to serve, you can warm individual slices in a 300°F oven for about 15 minutes before adding the ice cream. The crust stays surprisingly flaky, and the apples become even more tender.
→ What's the best way to prevent a soggy bottom crust?
Oh, this is such a common worry! I have a few tricks that work beautifully. First, make sure your bottom crust is chilled thoroughly before adding the filling. Some bakers even brush the bottom with egg white or melted chocolate before adding apples - it creates a barrier. But my grandmother's method was simpler: just make sure your apple filling isn't too wet. If the apples have released a lot of juice, I'll toss them with a tablespoon of flour or cornstarch to thicken it up. Also, baking on the lower rack helps crisp the bottom nicely.
→ Can I use frozen apples?
You can, but fresh is definitely better if possible. Frozen apples tend to release more water, which can make your filling soupy and your crust soggy. If you must use frozen, thaw them completely first and drain off any excess liquid. You might need to adjust the thickener slightly. But honestly? There's nothing like the texture and flavor of fresh, crisp apples - they hold their shape so beautifully and have that lovely bright flavor that really shines through the spices.
→ How do I know when the pie is done baking?
This is mostly about watching and smelling, honestly. The crust should be deeply golden brown - not pale, but not burned either. You'll see the filling bubbling actively through the vents in the top crust. I like to insert a knife through one of the vents to check if the apples are tender. The kitchen will smell incredibly fragrant - that buttery-cinnamony-apple scent is unmistakable. If the crust is browning too quickly, you can cover it loosely with foil for the last 15-20 minutes of baking.
→ Can I make this gluten-free?
Yes, absolutely! You can use your favorite gluten-free pie crust recipe or a store-bought GF crust. The apple filling itself is naturally gluten-free, just make sure your thickener is gluten-free (cornstarch instead of flour works beautifully). I've made this for friends with celiac disease many times, and it's always a hit. The texture might be slightly different, but the warm cinnamon-apple flavors shine through just as beautifully. Just like with my gluten-free baking, it's all about finding the right flour blend that works for you.
Nutrition Facts
per serving
320
Calories
3g
Protein
52g
Carbs
12g
Fat
Taste Profile
Warm, comforting sweetness balanced by warm spices and tart apple notes
Ingredient Substitutions
Don't have an ingredient? Try these alternatives
Shortening makes an extra flaky crust, while vegan butter works well for dairy-free needs
This recreates the flavor of brown sugar in a pinch
Recipe Variations
Try these delicious twists on the original
Dutch Apple Pie
Skip the top crust and instead top with a crunchy streusel topping made from flour, butter, brown sugar, and oats
Caramel Apple Pie
Add ½ cup of caramel sauce to the filling and drizzle more over the top when serving
Common Mistakes to Avoid
Learn from others' mistakes for perfect results
- Using warm ingredients for crust - results in tough, non-flaky texture
- Overworking the dough - develops too much gluten
- Not venting the top crust - leads to soggy filling and cracked crust
- Underbaking - apples remain crisp and filling is watery
- Slicing too soon - filling runs out instead of setting up
Meal Prep & Storage
Make Ahead Tips
You can prepare the pie dough up to 3 days in advance and keep it wrapped in the refrigerator. The apple filling can be prepared 1 day ahead and stored covered in the refrigerator. For ultimate convenience, assemble the entire pie and refrigerate overnight before baking - just add 5-10 minutes to the baking time. The unbaked pie can also be frozen for up to 3 months. Wrap it tightly in multiple layers of plastic wrap and foil. Bake from frozen, adding 15-20 minutes to the baking time and covering the edges with foil if they brown too quickly.
Leftover Ideas
Leftover pie is wonderful warmed gently in the oven or toaster oven. The crust will soften but the flavors deepen beautifully overnight. You can also chop leftover pie and layer it with yogurt for a delicious breakfast parfait. For a fun twist, cut leftovers into small squares and serve as hand pies for lunchboxes or snacks. The pie also makes incredible bread pudding - cube it, mix with an egg custard, and bake until set. It's a great way to repurpose day-old pie!
Perfect Pairings
Serve this with...
Cooking Timeline
Make and chill pie dough, prepare apple filling
Roll out crust, assemble pie, preheat oven
Bake pie until golden and bubbly
Cool pie completely before slicing
Serve warm with ice cream
 Sweet Treats
Salted Caramel Ice Cream Recipe
Silky salted caramel ice cream using the Ninja Creami – sweet, buttery, and perfectly salty.
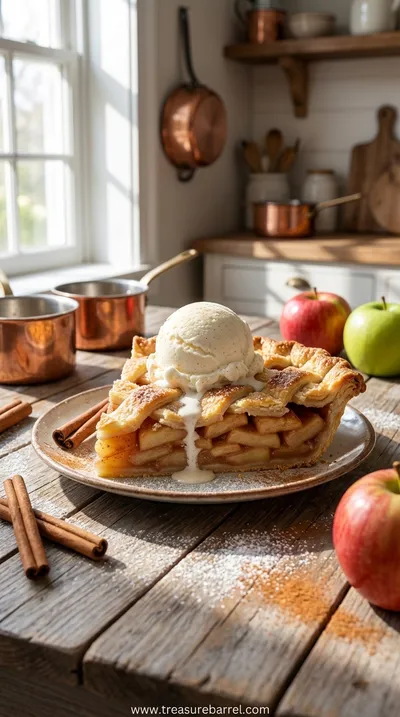
Homemade Cinnamon Apple Pie à la Mode Recipe
Easy homemade cinnamon apple pie served à la mode
Timing
Prep Time
45 Minutes
Cook Time
60 Minutes
Total Time
105 Minutes
Recipe Details
Ingredients
Pie Crust
-
01
2 ½ cups all-purpose flour
-
02
1 cup cold unsalted butter, cubed
-
03
1 tsp salt
-
04
6-8 tbsp ice water
Apple Filling
-
01
6-7 medium apples (mix of Granny Smith and Honeycrisp)
-
02
¾ cup brown sugar
-
03
2 tbsp all-purpose flour
-
04
2 tsp ground cinnamon
-
05
½ tsp nutmeg
-
06
¼ tsp salt
-
07
1 tbsp lemon juice
-
08
2 tbsp unsalted butter, cubed
For Serving
-
01
Vanilla ice cream
-
02
Additional cinnamon for dusting
Instructions
Start by making the pie crust. In a large bowl, whisk together the flour and salt. Add the cold, cubed butter and use a pastry cutter or your fingers to work it into the flour until the mixture resembles coarse crumbs with some pea-sized butter pieces remaining. This step is so therapeutic - I love watching the butter incorporate into the flour, creating those little pockets that will become flaky layers.
Slowly drizzle in the ice water, starting with 6 tablespoons, mixing gently with a fork until the dough just comes together. You might need a bit more water, but be careful not to overwork it. The dough should hold together when pressed but not be wet or sticky. I always think it should feel like playdough - firm but pliable.
Divide the dough in half, shape each into a disk, wrap in plastic wrap, and chill for at least 30 minutes. This resting time is crucial - it allows the gluten to relax and makes the dough much easier to roll out later.
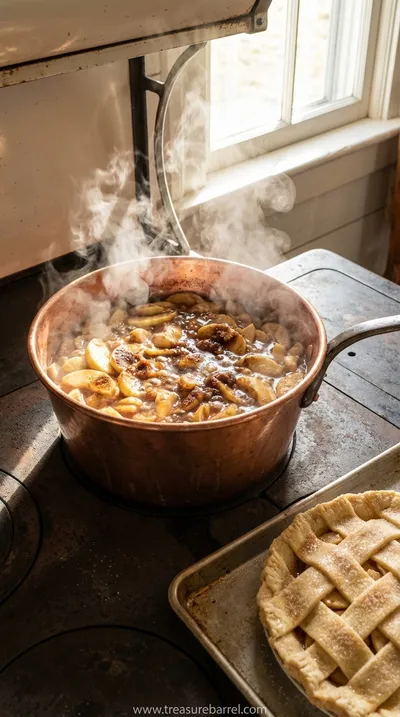
While the crust chills, prepare the apple filling. Peel and slice your apples about ¼-inch thick - I like to do this right into a large bowl so I can toss them with lemon juice as I go to prevent browning. The rhythm of peeling and slicing is so meditative, and the kitchen starts smelling so fresh and fruity.
In a small bowl, whisk together the brown sugar, flour, cinnamon, nutmeg, and salt. Sprinkle this over the apples and toss gently until every slice is coated. I love how the spices dust the apples like little snowflakes - it's such a pretty sight.
Let the apples sit for about 15 minutes to release some of their juices. This helps create that lovely saucy filling without making the crust soggy. You'll see the sugar starting to dissolve and create a light syrup - that's exactly what you want!
Preheat your oven to 375°F (190°C). Take one disk of dough from the refrigerator and roll it out on a floured surface to about 12 inches in diameter. I like to roll from the center outward, turning the dough occasionally to keep it even. If it starts sticking, just add a little more flour - no stress!
Carefully transfer the rolled dough to your 9-inch pie dish, letting it slump gently into the corners. Don't stretch it - that can cause shrinking. Trim the edges, leaving about an inch overhang. Then spoon in the apple filling, mounding it slightly in the center. Dot the top with the cubed butter - these little pockets will melt into the most incredible buttery sauce.
Roll out the second disk of dough for the top crust. You can do a full crust with slits cut for steam, or get creative with a lattice if you're feeling fancy. I usually go with the full crust because I love how it puffs up beautifully in the oven.
Place the top crust over the filling, trim the edges, and crimp them together with your fingers or a fork. Brush the top lightly with milk or egg wash if you like - this gives it that gorgeous golden color. Cut several slits in the top to allow steam to escape.
Bake for 45-60 minutes, until the crust is golden brown and the filling is bubbly. The waiting is the hardest part - but oh, that smell filling your house is pure happiness!
Notes & Tips
-
1
Apple varieties matter - Using a mix of tart and sweet apples gives the best flavor complexity. Granny Smith holds its shape beautifully while sweeter varieties break down into sauce.
-
2
Don't skip the chilling - Chilling the dough is non-negotiable for a flaky crust. If you're short on time, you can pop it in the freezer for 15 minutes instead.
-
3
Thickener adjustment - If your apples are particularly juicy, you might need an extra tablespoon of flour. The filling should be saucy but not watery.
-
4
Resting time - Let the pie cool for at least 2 hours before slicing. I know it's hard to wait, but this allows the filling to set up properly.
-
5
Storage tips - Store covered at room temperature for up to 2 days, or refrigerate for up to 5 days. Reheat slices gently before serving.
 Sweet Treats
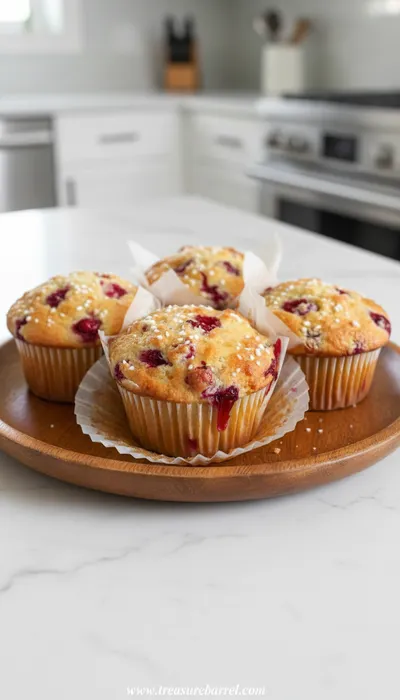
Cranberry and Orange Yogurt Muffins
Bright cranberry‑orange muffins with a soft yogurt crumb and a whisper of citrus.
Tools You'll Need
-
9-inch pie dish: A glass or ceramic pie dish conducts heat evenly and lets you see how the bottom crust is browning. I have my grandmother's old Pyrex dish - it's seen countless pies and each one turns out beautifully.
-
Pastry cutter: This little tool makes cutting butter into flour so much easier than using knives or forks. I love the rhythmic motion of pressing it through the mixture - it's oddly satisfying!
-
Rolling pin: A good wooden rolling pin makes all the difference. Mine has just the right weight - heavy enough to roll smoothly but not so heavy it's exhausting to use.
-
Apple peeler/corer: This is optional but so helpful if you're making multiple pies. It speeds up the prep work significantly and gives you perfectly even slices.
Must-Know Tips
-
Cold ingredients - Keep everything cold for the crust - cold butter, cold water, even a cold bowl. This ensures maximum flakiness.
-
Don't overmix - Mix the dough just until it comes together. Overworking develops gluten and makes the crust tough.
-
Vent properly - Those slits in the top crust are crucial for steam escape. Make them generous!
-
Bake until bubbly - Wait until you see active bubbling through the vents - that means the filling is cooked through.
-
Use a baking sheet - Place the pie dish on a baking sheet to catch any drips. Burnt sugar is no fun to clean!
Professional Secrets
-
Freeze butter - Some pro bakers freeze their butter first, then grate it into the flour for extra flakiness.
-
Chill between steps - If the dough gets warm while rolling, pop it back in the fridge for 10 minutes.
-
Egg wash - Brushing with egg wash gives that professional golden shine.
-
Sugar sprinkle - A light sprinkle of sugar on top adds crunch and beauty.
-
Bottom rack - Bake on the lower oven rack for a crisper bottom crust.

Recipe by
Lila GraceLila creates magical desserts 🍫🧁, sprinkles joy 🌈✨, and shares sweet moments 🍬💖. Her kitchen is full of smiles 😄 and sugar-dusted memories 🍪🍯.
Get Delicious Recipes Weekly
Join 25,000+ home cooks getting our best recipes straight to their inbox.
Free forever • No spam • Unsubscribe anytime