
The ice cream sandwich cake traces its roots to mid‑century American fairs, where vendors stacked simple butter cakes with scoops of vanilla ice cream for a novelty treat. Its popularity grew as home cooks adapted the concept, layering homemade sponge and homemade ice cream for a sophisticated twist. Today, it remains a nostalgic favorite, offering both comfort and a hint of celebration.
Why You'll Love It
-
- It's a crowd‑pleaser for birthdays and picnics
-
- Simple ingredients you probably already have
-
- No fancy equipment required, just patience
-
- The contrast of warm cake and cold ice cream is unforgettable
“The first bite felt like summer on a plate—so smooth, sweet, and perfectly chilled.”
Essential Ingredient Guide
- Vanilla cake layers: Use a light, buttery sponge; it provides a neutral canvas for the ice cream.
- Homemade vanilla ice cream: A smooth, custard‑based ice cream keeps the texture mellow and rich.
- Fresh berries (optional): Adds a bright pop of acidity and color when layered between the cake.
- Unsalted butter: Melted and brushed onto each cake layer for added richness.
- Lemon zest: A little zest lifts the sweetness with a subtle citrus note.
- Sugar: Balances the flavors; adjust slightly if your ice cream is very sweet.
Complete Cooking Process
-
Ingredient Readiness:
Gather all components, bake the cake layers, and let the ice cream soften just enough to spread.
-
Flavor Development:
While the cake cools, the vanilla beans release aroma; the ice cream’s creamy body deepens as it rests.
-
Texture Control:
Stacking in the freezer ensures each layer stays firm yet tender, preventing sogginess.
-
Finishing Touches:
A quick brush of melted butter, a sprinkle of lemon zest, and a few berries crown the cake.
-
Serving Timing:
Let the cake sit at room temperature for five minutes before slicing, so the layers meld beautifully.
-
Freeze the baked cake layers for at least 30 minutes before assembling.
-
Soften ice cream in the microwave for 10‑15 seconds to spread easily.
-
Use a hot, wet knife to cut clean slices without crushing the layers.
-
Allot extra time on hot days; the cake may soften faster than expected.
Pro Tips
When the cake is finally sliced, notice how the cool interior meets the soft crumb—a gentle reminder of summer evenings spent around a kitchen table. Take a moment to admire the layers; the pale vanilla hue with speckles of lemon zest looks as inviting as it tastes. Honestly, it feels like a little celebration of simple pleasures, and that’s what makes it worth the gentle patience.

The essence of the dish:
Layered sponge and ice cream create a harmonious contrast—soft, buttery cake meets whisper‑cold cream, each bite balancing warmth and chill.
A fun fact or historical angle:
The concept was popularized at American county fairs in the 1950s, where vendors used simple cake and ice cream to wow hungry crowds.
Flavor or sensory focus:
Vanilla’s fragrant sweetness is lifted by a hint of lemon zest, while the buttery cake adds body and the ice cream supplies silky smoothness.
You Must Know
-
Work quickly once the ice cream softens
-
Keep each layer chilled before stacking
-
Use a hot knife for clean cuts
Frequently Asked Questions
→ Can I use store‑bought ice cream?
Yes, but a homemade custard base gives a smoother texture and richer flavor.
→ How long does the cake keep?
Stored in the freezer, it stays fresh for up to 3 days; let it soften before serving.
→ Can I make it dairy‑free?
Swap the butter and cream with coconut oil and coconut milk ice cream for a dairy‑free version.
→ Do I need a special pan?
A simple 9‑inch round cake pan works fine; line it with parchment for easy removal.
→ What’s the best way to slice?
Warm a long, serrated knife under hot water, dry it, then slice; the heat cuts through cleanly.
→ Can I add fruit layers?
Absolutely—layer fresh strawberries or raspberries between the cake and ice cream for brightness.
Nutrition Facts
per serving
420
Calories
6g
Protein
55g
Carbs
18g
Fat
Taste Profile
Sweet, buttery, and lightly citrusy with a cool creamy finish
Ingredient Substitutions
Don't have an ingredient? Try these alternatives
Gives a nutty notes; reduce liquid slightly.
Maintains dairy‑free status, adds mild sweetness.
Recipe Variations
Try these delicious twists on the original
Spicy Version
Add a pinch of cayenne and swirl a bit of chocolate sauce into the ice cream for subtle heat.
Mediterranean Style
Incorporate crushed pistachios and a hint of orange blossom water into the frosting for a fragrant twist.
Common Mistakes to Avoid
Learn from others' mistakes for perfect results
- Over‑mixing the batter, which can lead to a dense crumb.
- Using ice cream that’s too hard to spread, causing uneven layers.
- Skipping the freezer step for cake layers, resulting in soggy texture.
Meal Prep & Storage
Make Ahead Tips
Bake and freeze the cake layers a day ahead, and keep the ice cream softened in the fridge until assembly.
Leftover Ideas
Slice leftovers and store in an airtight container in the freezer; re‑soften in the fridge before enjoying again.
Perfect Pairings
Serve this with...
Cooking Timeline
Gather and measure all dry ingredients; preheat oven.
Cream butter and sugar, then add eggs and vanilla.
Combine wet and dry mixtures, divide batter, and bake.
Cool cake layers, wrap, and freeze.
Soften ice cream, assemble layers, and refreeze.
 Sweet Treats
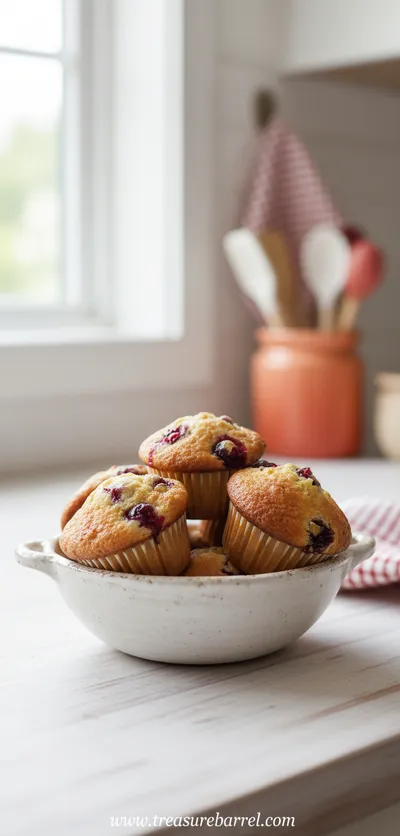
Cranberry Orange Muffins
Tender muffins bursting with orange zest and tart cranberries, ideal for a comforting morning treat.
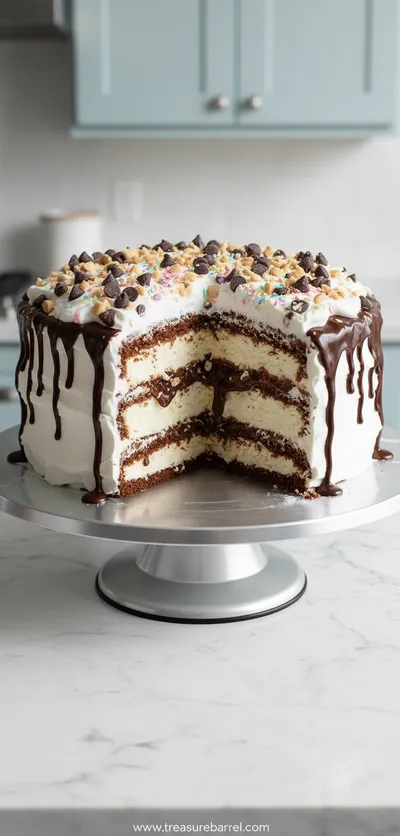
Ice Cream Sandwich Cake
Indulge in a delightful Ice Cream Sandwich Cake—layers of soft vanilla cake and creamy ice cream that melt together for a cool, sweet treat perfect for celebrations or quiet evenings alike.
Timing
Prep Time
30 Minutes
Cook Time
30 Minutes
Total Time
1 Hour 15 Minutes
Recipe Details
Ingredients
Cake Layers
-
01
2 cups all‑purpose flour
-
02
1 ½ cups granulated sugar
-
03
1 cup unsalted butter, softened
-
04
4 large eggs
-
05
1 cup whole milk
-
06
2 tsp vanilla extract
-
07
2 tsp baking powder
-
08
¼ tsp salt
Ice Cream Filling
-
01
2 quarts vanilla ice cream (see vanilla ice cream)
-
02
1 tbsp melted butter (for brushing)
-
03
Zest of one lemon
Optional Garnish
-
01
Fresh berries
-
02
A drizzle of chocolate sauce (see chocolate cake)
Instructions
Preheat the oven to 350°F (175°C). Grease two 9‑inch round cake pans and line the bottoms with parchment.
In a large bowl, cream the butter and sugar until pale and fluffy. Beat in the eggs one at a time, then stir in vanilla.
Whisk together flour, baking powder, and salt. Alternately add the dry mixture and milk to the butter mixture, beginning and ending with the dry ingredients.
Divide batter evenly, pour into prepared pans, and bake for 25‑30 minutes, or until a toothpick comes out clean.
Allow cakes to cool completely, then wrap each layer in plastic wrap and freeze for at least 30 minutes.
Soften the vanilla ice cream slightly (10‑15 seconds in the microwave). Spread a thin layer of softened ice cream on the first cake layer, sprinkle lemon zest, then place the second layer on top.
Cover the assembled cake with the remaining ice cream, smoothing the surface. Return to the freezer for at least 2 hours.
Before serving, brush the top with melted butter, add berries or a drizzle of chocolate sauce, and slice with a hot knife.
Notes & Tips
-
1
If you prefer a fruit‑infused ice cream, try the mint chocolate chip version for a refreshing twist.
-
2
For a lighter version, substitute half of the butter with unsweetened applesauce.
-
3
Keep the cake on a sturdy tray; the frozen layers can be heavy.
 Sweet Treats
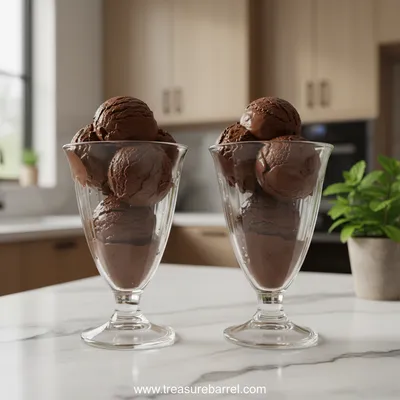
Duo of Chocolate Ice Cream Glasses
Elegant chocolate ice cream duo served in glasses – creamy, refreshing, and utterly satisfying.
Tools You'll Need
-
9‑inch round cake pans
-
Electric mixer
-
Spatula
-
Plastic wrap
-
Freezer‑safe serving platter
-
Hot, wet knife
Must-Know Tips
-
Freeze cake layers before stacking; it prevents sogginess.
-
Soften ice cream just enough to spread, not melt.
-
Use a hot knife for clean, smooth slices.
Professional Secrets
-
Room‑temperature butter creates a tender crumb.
-
High oven heat gives the cake a light, airy texture.
-
A quick brush of melted butter adds shine and flavor.

Recipe by
Lila GraceLila creates magical desserts 🍫🧁, sprinkles joy 🌈✨, and shares sweet moments 🍬💖. Her kitchen is full of smiles 😄 and sugar-dusted memories 🍪🍯.
Get Delicious Recipes Weekly
Join 25,000+ home cooks getting our best recipes straight to their inbox.
Free forever • No spam • Unsubscribe anytime