
I remember when my kids were little, Friday night was always pizza night. It was our thing. We’d pull out all the little bowls of toppings—chopped peppers, mushrooms, olives, and cheese—and the whole kitchen counter would become a canvas. The best part, for me, was always making the dough. The initial mixing, the quiet kneading while listening to music, and that moment of pure satisfaction when you see it has doubled in size, all puffy and alive in the bowl. It was a simple, grounding rhythm that signaled the end of the week and the start of our cozy family weekend. Sometimes the flour would end up everywhere, little white handprints on the cabinets, but those messes are part of the memory, right?
Some weekends were filled with all sorts of comforting kitchen projects. One day it would be this pizza, the next we might be simmering a pot of chicken and dumplings, and on Sunday mornings, it could be the best crepe recipe or a loaf of easy banana bread. But pizza night held a special place. It was interactive, creative, and just plain fun. This recipe is more than just instructions; it’s the heart of those memories, a simple foundation for creating your own traditions and delicious, imperfectly perfect homemade pizzas.
Why You'll Love This Dough
-
Incredibly Simple & Forgiving: Honestly, this recipe is almost foolproof. It uses basic pantry staples and requires very little hands-on time. Even if you're new to working with yeast, the steps are so clear and gentle that you’ll feel like a seasoned baker. It’s the perfect starting point for making pizza dough from scratch.
-
The Perfect Texture: The dream is a crust that's soft and chewy on the inside with a slight crispness on the bottom, and this recipe delivers just that. It has a beautiful 'give' when you bite into it and holds up to all sorts of toppings without getting soggy. It creates the most wonderful foundation for a truly satisfying pizza.
-
So Much Better Than Store-Bought: There is simply no comparison. The flavor, the smell, the texture... making it at home is a completely different experience. You control the ingredients, so there are no strange preservatives, and the fresh-baked taste is something you just can't get from a package. It elevates your pizza night from a simple meal to a special event.
-
A Fun, Grounding Activity: There is something so therapeutic about kneading dough. It’s a chance to slow down, use your hands, and connect with your food. It’s a wonderful activity to do with kids, family, or even just by yourself with some good music on. It’s a little moment of creative calm in a busy world.
“I never thought I could make pizza dough, but this recipe made it so simple and calming. The crust was incredible!”
Essential Ingredient Guide
- Active Dry Yeast: This is what brings our dough to life! Don't be intimidated by it. The key is to wake it up gently in warm water—not too hot, not too cold, just like a nice bath. When you see it start to get foamy and smell, well, yeasty, you know it's happy and ready to work its magic. This little step, called blooming, is your insurance for a light and airy crust.
- All-Purpose Flour: Good old all-purpose flour is all you need here. It provides the perfect structure and chew. I find that spooning the flour into your measuring cup and leveling it off gives a more accurate measurement than scooping it directly from the bag, which can pack it down. A light hand here ensures a tender dough, which is key for achieving that perfect crust.
- Extra Virgin Olive Oil: Olive oil is our flavor-enhancer and softener. It adds a subtle richness and a lovely, delicate flavor to the crust that complements any topping. It also helps make the dough soft and pliable, which makes it a dream to stretch and shape later on. A good quality olive oil really does make a difference you can taste, so use one that you enjoy.
 Home Baking
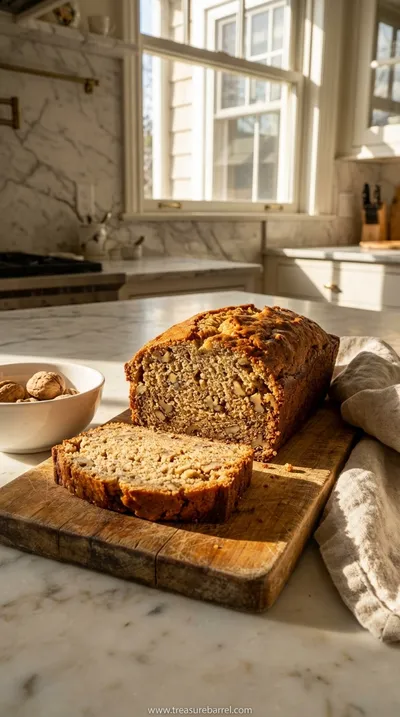
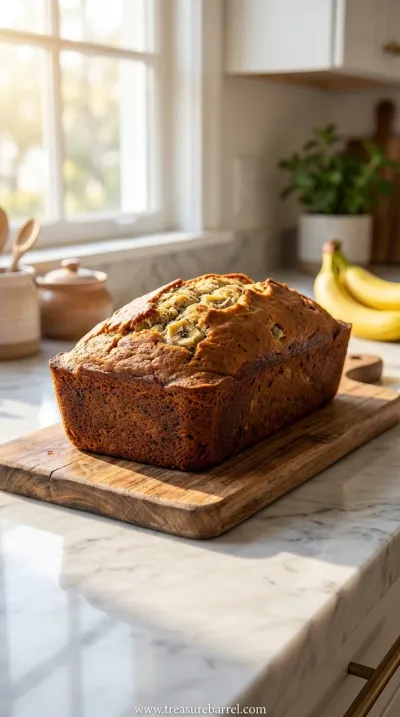
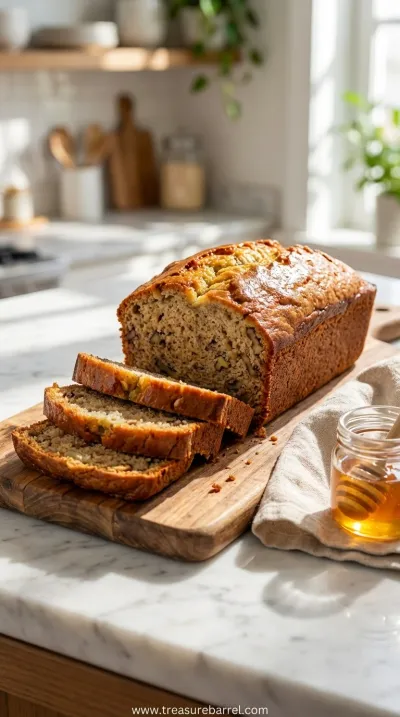
Best Banana Bread Recipe: Moist & Delicious
A classic, incredibly moist homemade banana bread. The perfect easy treat for any day.
Complete Cooking Process
-
Preparation & Mixing:
This first stage is all about gentle beginnings. We'll start by waking up the yeast in some warm water with a touch of sugar to give it a little snack. While that's getting foamy, you'll measure out your flour and salt into a big, welcoming bowl. Once the yeast is alive and bubbling, you'll pour it in, along with the olive oil, and begin to bring everything together. This part is slow and meditative; watching a shaggy mess transform into a cohesive ball of dough is one of the simple joys of baking. No need to rush it, just enjoy the process.
-
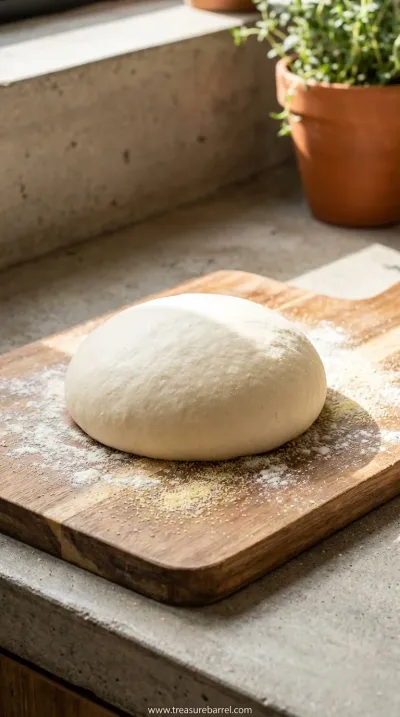
Kneading & First Rise:
Now comes the tactile part. You'll turn the dough out onto a lightly floured surface and begin to knead. This isn't about being aggressive; it's a rhythmic push, fold, and turn motion. You're developing the gluten, which will give the crust its signature chew. After about 8-10 minutes, the dough will feel smooth and elastic, like a soft stress ball. Then, you'll tuck it into an oiled bowl, cover it, and let it rest in a warm spot. This is where the magic happens, as it doubles in size, becoming airy and full of life.
-
Shaping & Baking:
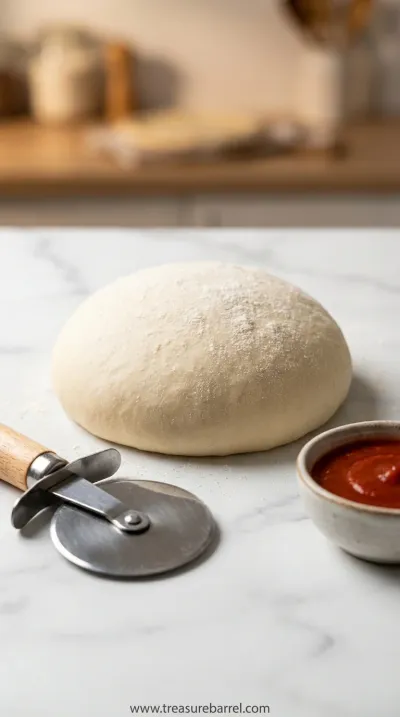
Once the dough has risen, you'll gently press the air out and divide it. This recipe makes enough for two beautiful pizzas. Now, you get to shape it. I like to use my fingertips to gently press and stretch the dough into a circle, leaving a slightly thicker rim for the crust. This is your canvas! Top it with your favorite sauce, cheese, and toppings—maybe even make a version of my hot honey pepperoni pizza. Then it's into a very hot oven to bake until the cheese is bubbly and the crust is a gorgeous golden brown.
-
Use lukewarm water for the yeast, around 105-115°F. Too hot and it will harm the yeast; too cold and it won't activate properly.
-
Don't add too much flour when kneading. A little sticking is okay! A slightly tacky dough results in a more tender crust.
-
Let the dough rise in a cozy, draft-free spot. I often use my oven with just the light on to create a slightly warm environment.
Pro Tips for Success
Following these little suggestions can make a big difference in your final crust. It's all about creating the right conditions for your dough to thrive.

Frequently Asked Questions
→ My yeast didn't get foamy. What did I do wrong?
Oh, that can be so disheartening, but it's usually an easy fix! Most often, it means the water was either too hot or too cold, or the yeast itself may have expired. Check the date on your yeast packet first. For the water, aim for a temperature that feels comfortably warm to the touch, like a baby's bath. If you try again with fresh yeast and properly warmed water and it still doesn't foam after 10 minutes, it's best to start over. It's worth the extra few minutes to ensure a beautiful rise.
→ Can I make this pizza dough without a stand mixer?
Absolutely! In fact, I wrote this recipe specifically to be made by hand. I find the process of kneading dough by hand to be so relaxing and satisfying. It allows you to really feel the dough change and develop. All you need is a large bowl, a wooden spoon or spatula to start, and your hands. It's a wonderful way to connect with the baking process without relying on any fancy equipment. A true back-to-basics approach to creating the best homemade pizza dough.
→ How do I get a crispy crust?
A crispy crust is all about high heat! First, make sure your oven is preheated thoroughly, and I mean for at least 30 minutes at its highest setting (usually 500-550°F). Using a pizza stone or a steel is a game-changer; preheat it with the oven so it's screaming hot when the pizza hits it. If you don't have one, you can flip over a sturdy baking sheet and preheat that instead. That initial blast of intense heat helps to cook the bottom of the crust quickly, resulting in that coveted crispy texture.
→ Can I prepare this dough ahead of time?
Yes, this dough is wonderfully flexible. You can make it and let it do its first rise in the refrigerator for up to 3 days. This slow, cold fermentation actually develops a more complex and delicious flavor in the crust. Just place the dough in an oiled bowl, cover it tightly, and pop it in the fridge. When you're ready to bake, take it out about 2-3 hours beforehand to let it come to room temperature and finish rising before shaping.
→ How thin should I stretch the dough?
This is really up to your personal preference! For a classic, slightly chewy crust that's not too thick and not too thin, I aim for about a 1/4-inch thickness in the center, leaving the outer edge a little thicker for that puffy crust. If you love a super thin and crispy crust, you can stretch it thinner, but be gentle so you don't create any holes. If you prefer a thicker, breadier crust, leave it a bit thicker. The beauty of homemade is that you get to make it exactly how you love it.
→ Can I freeze the pizza dough?
You sure can! This is one of my favorite kitchen hacks for future-me. After the first rise, punch the dough down gently, divide it into portions, and lightly coat each ball with olive oil. Place each one in a separate freezer-safe bag, squeeze out the air, and freeze for up to 3 months. To use, just thaw it in the refrigerator overnight, then let it sit on the counter for an hour or two to come to room temperature before shaping. It's a lifesaver for spontaneous pizza nights.
Nutrition Facts
per serving
250
Calories
6g
Protein
40g
Carbs
7g
Fat
Taste Profile
A clean, savory, and slightly yeasty flavor that provides the perfect neutral-yet-delicious base for any toppings.
Ingredient Substitutions
Don't have an ingredient? Try these alternatives
If you only have instant yeast, you can use the same amount. The great thing about instant yeast is that you don't need to bloom it first; you can mix it directly in with the dry ingredients.
You can substitute the sugar with an equal amount of honey or maple syrup to feed the yeast. Just mix it into the warm water along with the yeast to dissolve it before adding to the flour.
Recipe Variations
Try these delicious twists on the original
Whole Wheat Dough
For a heartier, nuttier flavor, replace half of the all-purpose flour with whole wheat flour. You may need to add an extra tablespoon or two of water as whole wheat flour is a bit thirstier.
Herb-Infused Dough
Add 1-2 teaspoons of dried herbs like oregano, basil, or a classic Italian seasoning blend to the dry ingredients. You can also add a clove of finely minced garlic for an extra layer of flavor.
Common Mistakes to Avoid
Learn from others' mistakes for perfect results
- Killing the yeast with water that is too hot.
- Not letting the dough rise long enough, resulting in a dense crust.
- Using a rolling pin, which can press out all the beautiful air bubbles.
- Not preheating the oven and baking surface sufficiently.
- Adding too much flour during kneading, which can make the dough tough.
Meal Prep & Storage
Make Ahead Tips
This dough is perfect for making ahead. You can prepare the dough through the kneading step, then place it in an oiled, covered bowl in the refrigerator for up to 3 days. This slow cold ferment actually improves the flavor. Just remember to pull it out 2-3 hours before you want to bake to let it come to room temperature and finish its rise.
Leftover Ideas
Store leftover pizza slices in an airtight container in the refrigerator. To reheat, my favorite method is to place the slices in a dry, non-stick skillet over medium heat. Cover the pan for a few minutes to melt the cheese, then uncover to let the bottom crisp up. It's almost as good as fresh!
Perfect Pairings
Serve this with...
Cooking Timeline
Bloom the yeast and mix the dough ingredients.
Knead the dough until smooth and elastic.
Let the dough rise in a warm place until doubled (approx. 1 hour).
Preheat oven. Gently punch down and shape the dough.
Add toppings and bake until golden and bubbly (approx. 10-12 minutes).
Best Pizza Dough Recipe: Quick and Easy Homemade
Make the best homemade pizza dough with this easy recipe. Perfect for quick family dinners and delicious pizza nights at home.
Timing
Prep Time
20 Minutes
Cook Time
12 Minutes
Total Time
1 Hour 32 Minutes (includes rising time)
Recipe Details
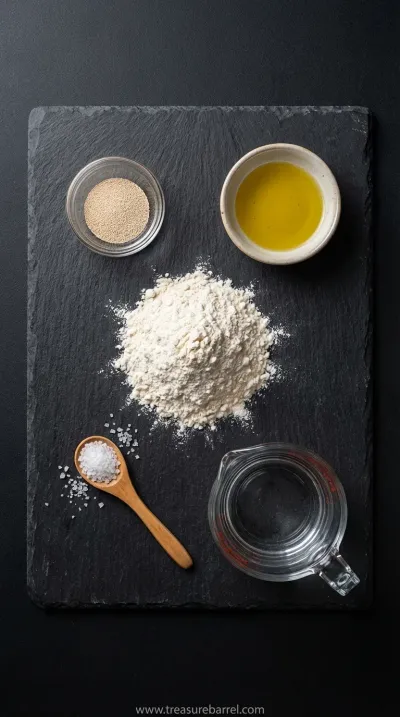
Ingredients
For the Pizza Dough
-
01
1 ½ cups warm water (105-115°F or 40-46°C)
-
02
2 ¼ teaspoons active dry yeast (1 standard packet)
-
03
1 teaspoon granulated sugar
-
04
3 ½ cups all-purpose flour, plus more for dusting
-
05
2 teaspoons fine sea salt
-
06
¼ cup extra virgin olive oil
Instructions
First, let's gently wake up the yeast. Find a small bowl and pour in your warm water. It should feel pleasantly warm, not hot. Sprinkle the yeast and the sugar over the water, give it a tiny stir, and then just let it be for about 5 to 10 minutes. You're looking for the mixture to become foamy and creamy on top. This is called 'blooming,' and it's how you know your yeast is alive and ready to do its beautiful work. If nothing happens, it's best to start over with fresh yeast.
While the yeast is blooming, grab your largest mixing bowl. Add the flour and salt and give them a quick whisk to combine everything evenly. Once your yeast is nice and foamy, pour the mixture into the flour, along with the olive oil. Use a sturdy spatula or wooden spoon to mix it all together until a shaggy, rough-looking dough starts to form. Don't worry if it looks a little messy at this stage; it's supposed to. Just focus on getting all the dry bits of flour incorporated.
Now for the best part. Lightly flour a clean countertop or a large wooden board and turn your dough out onto it. It's time to knead. Gently fold, press, and turn the dough for about 8-10 minutes. You'll feel it transform under your hands, going from sticky and lumpy to smooth, soft, and beautifully elastic. It should spring back gently when you poke it. This process builds the gluten that gives pizza its signature chew. Put on some music and enjoy the rhythm of it.
Once your dough is smooth and lovely, lightly oil the bowl you used earlier and place the dough inside, turning it over once to coat it in the oil. This prevents a skin from forming. Cover the bowl with a clean kitchen towel or plastic wrap and set it in a warm, draft-free place to rise for about 1 to 1.5 hours, or until it has doubled in size. When you poke it, the indentation should remain. Your dough is now ready to be shaped, topped, and baked into a delicious pizza!
Notes & Tips
-
1
The amount of flour can vary slightly depending on the humidity in your kitchen. If the dough feels overly sticky after a few minutes of kneading, add a tablespoon of flour at a time until it's manageable, but remember that a slightly tacky dough is a good thing!
-
2
Patience during the rise is key. Rushing this step will result in a dense crust. Give it the full time it needs to double in size; the airy, chewy texture you get in return is absolutely worth the wait. It's a perfect time to prep your toppings.
-
3
For a richer flavor, you can let the dough do its first rise in the refrigerator for 24 to 72 hours. This cold fermentation process develops deeper, more complex flavors. Just be sure to let it come back to room temperature for a couple of hours before you plan to shape it.
Tools You'll Need
-
Large Mixing Bowl: You'll need a spacious bowl to give the dough plenty of room to be mixed without making a mess, and more importantly, enough space to double in size as it rises.
-
Measuring Cups and Spoons: Baking is a bit of a science, so accurate measurements are important, especially for the water, yeast, and salt. Level off your dry ingredients for the best results.
-
Dough Scraper (optional): While not essential, a bench or dough scraper is a wonderful little tool for easily lifting and turning the dough while kneading, and for cleaning your work surface afterward. It really makes you feel like a pro.
-
Clean Kitchen Towel or Plastic Wrap: You’ll need this to cover the bowl while the dough rises. This keeps the surface of the dough from drying out and allows it to create its own warm, humid environment to thrive in.
Must-Know Tips
-
Don't Rush the Rise: The rising time is when the yeast is working its magic, creating air pockets that result in a light and chewy crust. Let it double in size, no matter how long it takes. Patience is the most important ingredient here.
-
Use a Hot Oven: For a crust that’s crispy on the bottom and chewy inside, your oven needs to be as hot as it can get. Preheating is not just about reaching the temperature, but about letting the oven walls soak in that heat.
-
Stretch, Don't Roll: Gently stretching the dough with your hands instead of using a rolling pin preserves the delicate air bubbles created by the yeast. This leads to a much better texture with a puffy, airy crust.
Professional Secrets
-
A Cold Ferment for Flavor: For a truly superior, artisan-style flavor, let your dough rise slowly in the refrigerator for 1-3 days. This process, called cold fermentation, develops complex flavors that you just can't achieve with a quick rise.
-
Hydration is Key: Don't be afraid of a slightly sticky dough. A higher hydration (water-to-flour ratio) dough is what creates that coveted open, airy crumb and a tender bite. Add flour sparingly during kneading.
-
Add a Semolina Dusting: When you're ready to bake, sprinkle your pizza peel or the back of your baking sheet with a little semolina flour. It acts like tiny ball bearings, helping the pizza slide into the oven easily and adds a subtle, lovely crunch to the bottom of the crust.

Recipe by
Sofia BelleSofia bakes with love 🧁💛, sweet smells filling her home 🍪🏡, and flour on her hands 🤲✨. She believes every loaf 🍞 and cake 🎂 tells a story of wa ...
Get Delicious Recipes Weekly
Join 25,000+ home cooks getting our best recipes straight to their inbox.
Free forever • No spam • Unsubscribe anytime